半夜翻到某条说说之后,看到星空就突然想到怎么写了~ 于是果断起来嗨!最后也总算是写出来了(然而写完的时候re:0也没更新……)
于是可以先看看下面的两张图
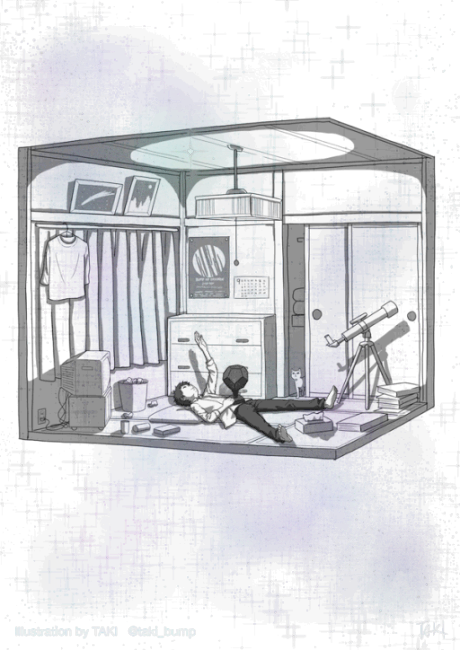
看起来好像是两张不同的图,但是实际上是同一张哦~(=゚ω゚)ノ
整体的想法比较简单,我们姑且把上面的第一张称为front layer,那么对应的,看起来是星空的那张就称为back layer.
这样的效果主要是利用了在展示图片时,(到目前为止)通常在缩略图/预览图的界面会使用白色作为底色,当进入沉浸式(或者简单来说就是欣赏图片)的时候,会使用黑色作为底色。
知道了这一点之后,我们可以推断front layer中看到的白色,实际上(多数)是由底色提供的,back layer中的黑色也是如此。
那么接下来要做的就是
- 以灰度模式读入front layer和back layer
- 将front layer中的“白色”换为透明色
- 将back layer中的“黑色”换为透明色
- 合并两张图,保存为支持Alpha通道的图像格式
当然,上面提到的“白色”、“黑色”都是相对而言,我们将会使用一个阀值(threshold)来控制。front layer中,小于threshold的像素点将会使用透明色。back layer中,大于threshold的像素点将会使用透明色。这个值可以根据实际情况调整,比如front layer色调明亮,back layer以暗色调为主时,则可控制在128~192左右。若是两者均以亮色为主,则需要调高一些。
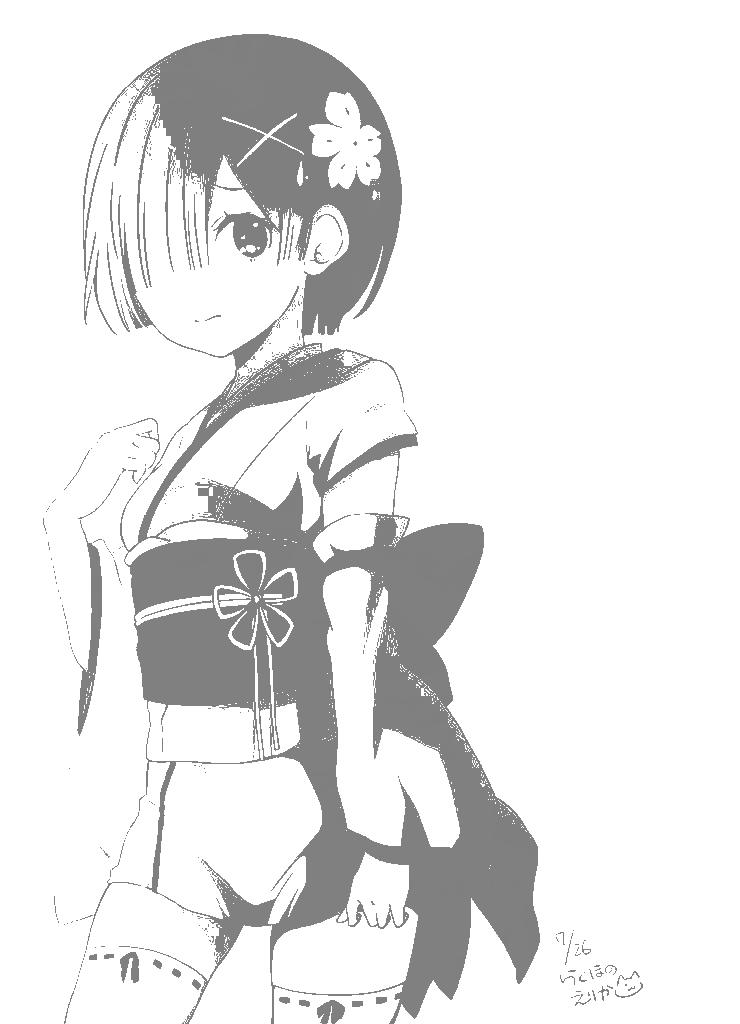
下面两张图分别作为front layer和back layer,threshold为224。


做出的效果如下
实际用到代码如下,也可以在Github上找到hoshizora
#include <getopt.h>
#include <stdlib.h>
#include <cmath>
#include <opencv2/opencv.hpp>
#include <opencv2/core/version.hpp>
#include <opencv2/imgproc/imgproc.hpp>

using namespace cv;

#if (CV_VERSION_MAJOR < 3)
#define CV_CVTCOLOR_BGR2GREY  CV_BGR2GRAY
#define CV_CVTCOLOR_GREY2BGRA CV_GRAY2BGRA
#else
#define CV_CVTCOLOR_BGR2GREY  COLOR_BGR2GRAY
#define CV_CVTCOLOR_GREY2BGRA COLOR_GRAY2BGRA
#endif

#define K_DEFAULT_THRESHOLD 192
#define K_TRANSPARENT_ALPHA 0
#define deviant 255

#define ENSURE_NOT_NULL(x) (x != nullptr)

char * frontlayer = NULL;
char * backlayer = NULL;
char * output = NULL;
int threshold_value = K_DEFAULT_THRESHOLD;

static struct option long_options[] = {
    {"help",      no_argument,       0, 'h'},
    {"front",     required_argument, 0, 'f'},
    {"back",      required_argument, 0, 'b'},
    {"ouput",     required_argument, 0, 'o'},
    {"threshold", optional_argument, 0, 't'},
    {0, 0, 0, 0}
};

/**
 *  @brief Prints the usage message of this program.
 */
void print_usage() {
    fprintf(stderr, "Usage: hoshizora [-f front layer] [-b back layer] [-t threshold] [-o ouput]\n"
                    "                 -h To print this help\n");
}

int parse_command_line(int argc, char * const * argv) {
    int c;
    int option_index = 0;

    while (1) {
        option_index = 0;
        c = getopt_long (argc, argv, "hf:b:t:o:", long_options, &option_index);
        if (c == -1)
            break;
        switch (c) {
            case 0:
                if (long_options[option_index].flag != 0)
                    break;
                break;
            case 'h':
                print_usage();
                return 0;
            case 'o': {
                asprintf(&output, "%s", optarg);
                break;
            }
            case 'f': {
                asprintf(&frontlayer, "%s", optarg);
                break;
            }
            case 'b': {
                asprintf(&backlayer, "%s", optarg);
                break;
            }
            case 't': {
                threshold_value = atoi(optarg);
                break;
            }
            case '?':
                print_usage();
                return 0;
            default:
                abort();
        }
    }

    returnENSURE_NOT_NULL(frontlayer) &&
           ENSURE_NOT_NULL(backlayer)  &&
           ENSURE_NOT_NULL(output) &&
           threshold_value >= 0;
}

/**
 *  @brief Resize image to fit
 */
void resize(Mat &src, Mat &dest, int width, int height, int interpolation = INTER_LINEAR) {
    if (width <= 0 && height <= 0) {
        dest = src.clone();
        return;
    }
    int w,h;
    w = src.cols;
    h = src.rows;

    if (width == 0) {
        double ratio = height / double(h);
        width = w * ratio;
    } else {
        double ratio = width / double(w);
        height = h * ratio;
    }
    cv::resize(src, dest, Size(width, height), width/w, height/h, interpolation);
}

int main(int argc, const char * argv[]) {
    if (!parse_command_line(argc, (char * const *)argv)) {
        print_usage();
        exit(EXIT_FAILURE);
    }

    // Load and transform to gray scale
    Mat front = imread(frontlayer, CV_LOAD_IMAGE_GRAYSCALE);
    Mat back  = imread(backlayer,  CV_LOAD_IMAGE_GRAYSCALE);

    // resize image to fit
    if (front.cols > back.cols) {
        if (front.rows > back.rows) {
            if (((double)front.cols / (double)front.rows) > ((double)back.cols / (double)back.rows)) {
                resize(back, back, 0, front.rows);
            } else {
                resize(back, back, front.cols, 0);
            }
        } else {
            resize(back, back, 0, front.rows);
        }
    } else {
        if (front.rows < back.rows) {
            if (((double)front.cols / (double)front.rows) > ((double)back.cols / (double)back.rows)) {
                resize(front, front, 0, back.rows);
            } else {
                resize(front, front, back.cols, 0);
            }
        } else {
            resize(front, front, 0, back.rows);
        }
    }

    // convert colorspace into BGRA
    cvtColor(front, front, CV_CVTCOLOR_GREY2BGRA);
    cvtColor(back,  back,  CV_CVTCOLOR_GREY2BGRA);

    // for front layer
    // we remove 'white color' (above threshold)
    for (auto pixel = front.begin<Vec4b>(); pixel != front.end<Vec4b>(); pixel++) {
        if ((*pixel)[0] < threshold_value) {
            (*pixel)[2] = (*pixel)[1] = (*pixel)[0] = 0;
            (*pixel)[3] = 255;
        } else {
            (*pixel)[2] = (*pixel)[1] = (*pixel)[0] = 255;
            (*pixel)[3] = K_TRANSPARENT_ALPHA;
        }
    }

    // for back layer
    // we remove 'black color' (below threshold)
    for (auto pixel = back.begin<Vec4b>(); pixel != back.end<Vec4b>(); pixel++) {
        if ((*pixel)[0] > threshold_value) {
            (*pixel)[2] = (*pixel)[1] = (*pixel)[0] = 255;
            (*pixel)[3] = 255;
        } else {
            (*pixel)[2] = (*pixel)[1] = (*pixel)[0] = 0;
            (*pixel)[3] = K_TRANSPARENT_ALPHA;
        }
    }

    Mat result = front.clone();
    Rect roi = Rect((front.cols - back.cols) / 2, (front.rows - back.rows) / 2, back.cols, back.rows);
    Mat fusion = result(roi);
    addWeighted(fusion, 0.5, back, 0.5, 0.0, fusion);

    imwrite(output, result);

    free((void *)frontlayer);
    free((void *)backlayer);
    free((void *)output);
    return 0;
}
这么好的文章竟然没人评论∑(゚Д゚);
其实一个月前就看过一遍的,换了n个关键字google到的这儿;
看起来好复杂 = =;
非cs专业小萌新,不会c++打算用python PIL库试试 ;
https://github.com/yansixing/image-blending
加上出处了喵?~
想把blog也做成黑白的,开灯时字体黑色,图片front layer用正常的图片,然后关灯后... .../doge脸
其实用上https://blog.0xbbc.com/2016/09/magic-image2-mathematical-model/这边的数学模型效果更好的说,用这里的threshold的方法做出来就完全是二值化的图了ww
已经用了的,做出来效果已经很完美啦!