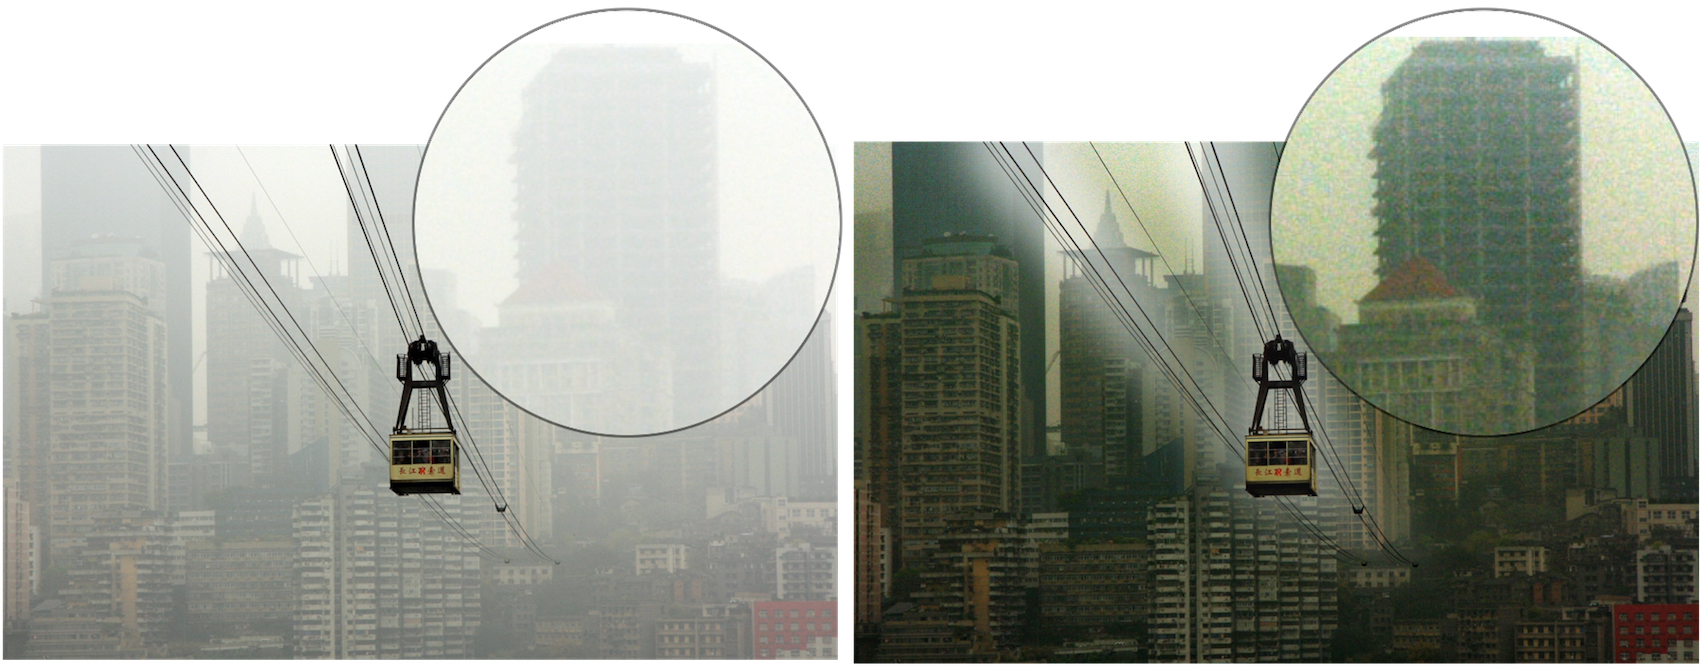
- A Brief Review
- Dark Channel Prior
- 估算透射率
- 估算全局大气光强(global atmospheric light)
- Python Implementation Using OpenCV
- References

A Brief Review
「Single Image Haze Removal Using Dark Channel Prior」是 2009 年 CVPR 最佳论文,何凯明博士在这篇论文中提出了暗通道先验的图像去雾算法。
那么暗通道先验是什么呢?这种方法是基于这样的一个观察:
It is based on a key observation most local patches in haze-free outdoor images contain some pixels which have very low intensities in at least one color channel.
简单来说就是对绝大多数没有雾的图像来说,它们的一些局部区域的像素中,某些像素至少有一个颜色通道的值很低。或者对应于原文的「low intensities」,即光强度很低。
我们需要对图像去雾的原因主要是图像中的雾会给很多算法带来麻烦,比如物体识别,特征提取等,它们都默认输入的图像是清晰的,没有雾的。或者不考虑算法,对于在野外或者无人机上的监视摄像头,遇到有雾的场景也是经常的事,即使是人工监视也是需要去雾的。
顺便一提,利用暗通道先验的算法去雾,还可以得到不错的景深图。
Last, the haze removal can produce depth information and benefit many vision algorithms and advanced image editing. Haze or fog can be a useful depth clue for scene understanding. The bad haze image can be put to good use.
在有雾的图像中,一个广泛使用的成像数学模型如下
\begin{equation}
    \mathbf{I}(\mathbf{x})=\mathbf{J}(\mathbf{x})t(\mathbf{x})+\mathbf{A}(1-t(\mathbf{x}))\tag{1}
\end{equation}
Dark Channel Prior
那么回到暗通道先验,我们知道了对绝大多数没有雾的图像来说,它们的一些局部区域的像素中,某些像素至少有一个颜色通道的值很低。「most local patches in haze-free outdoor images contain some pixels which have very low intensities in at least one color channel」。它的数学描述就是
\begin{equation}
    J^{dark}(\mathbf{x})=\min_{c\in\{r,g,b\}}(\min_{\mathbf{y}\in\Omega(\mathbf{x})}(J^c(\mathbf{y})))\tag{5}
\end{equation}
其中$J^c$代表$\mathbf{J}$的某一个颜色通道,而$\Omega(\mathbf{x})$表示以$\mathbf{x}$为中心的一个邻域(local patch)。根据原论文的观察,除开天空的部分,$J^{dark}$总是具有一个很低的值,并且有$J^{dark}\rightarrow 0$。
这个知识是通过统计得出的,论文分析了三个使得$J^{dark}\rightarrow 0$的主要因素,i) 图像中本身的阴影部分。 ii) 鲜艳的物体或表面(colorful objects or surfaces)。如树叶、草地、花、水面等。 iii) 暗色物体或表面。如树干或者石头。
估算透射率
要对图像去雾的话,首先要做的是估算透射率$t(\mathbf{x})$。原文中先假定$\mathbf{A}$是全局大气光强(global atmospheric light)是已知的,随后给出了如何从有雾的图像中计算$\mathbf{A}$是全局大气光强(global atmospheric light)的方法。其次,原文假定了局部$\Omega(x)$的透射率$t(\mathbf{x})$是不变的,记为$\overset{\sim}{t}(\mathbf{x})$
对式(1)做如下变化,
\begin{equation}
    \mathbf{I}(\mathbf{x})=\mathbf{J}(\mathbf{x})t(\mathbf{x})+\mathbf{A}(1-t(\mathbf{x}))\tag{1}
\end{equation}
分别对各邻域的各颜色通道求最小,其中,我们假定每个邻域的透射率$\overset{\sim}{t}(\mathbf{x})$是常数
\begin{equation}
    \min_{\mathbf{y}\in\Omega(\mathbf{x})}(\mathbf{I}^c(\mathbf{y}))=\overset{\sim}{t}(\mathbf{x})\min_{\mathbf{y}\in\Omega(\mathbf{x})}(J^c(\mathbf{y}))+(1-\overset{\sim}{t}(\mathbf{x})\mathbf{A}^c)\tag{6}
\end{equation}
接下来,两边同除$\mathbf{A}^c$,有
\begin{equation}
    \min_{\mathbf{y}\in\Omega(\mathbf{x})}(\frac{\mathbf{I}^c(\mathbf{y})}{\mathbf{A}^c})=\overset{\sim}{t}(\mathbf{x})\min_{\mathbf{y}\in\Omega(\mathbf{x})}(\frac{J^c(\mathbf{y})}{\mathbf{A}^c})+(1-\overset{\sim}{t}(\mathbf{x}))\tag{7}
\end{equation}
随后,再从RGB这三个颜色通道中取最小
\begin{equation}
    \min_{c}(\min_{\mathbf{y}\in\Omega(\mathbf{x})}(\frac{\mathbf{I}^c(\mathbf{y})}{\mathbf{A}^c}))=\overset{\sim}{t}(\mathbf{x})\min_{c}(\min_{\mathbf{y}\in\Omega(\mathbf{x})}(\frac{J^c(\mathbf{y})}{\mathbf{A}^c}))+(1-\overset{\sim}{t}(\mathbf{x}))\tag{8}
\end{equation}
由式(5)和暗通道先验的$J^{dark}\rightarrow 0$可得,
\begin{equation}
    J^{dark}(\mathbf{x})=\min_{c}(\min_{\mathbf{y}\in\Omega(\mathbf{x})}(J^c(\mathbf{y})))=0\tag{9}
\end{equation}
因为$\mathbf{A}^c$总是一个正数,于是有
\begin{equation}
    \min_{c}(\min_{\mathbf{y}\in\Omega(\mathbf{x})}(\frac{J^c(\mathbf{y})}{\mathbf{A}^c}))=0\tag{10}
\end{equation}
最后,将式(10)代入式(8)中,就可以得到透射率$\overset{\sim}{t}(\mathbf{x})$的预估值了
\begin{equation}
    \overset{\sim}{t}(\mathbf{x})=1-\min_{c}(\min_{\mathbf{y}\in\Omega(\mathbf{x})}(\frac{I^c(\mathbf{y})}{\mathbf{A}^c}))
\end{equation}
随后,论文提到即使是晴天下,空气中也会存在一定的颗粒,因此当我们看远处的物体时还是会有那么一点雾,并且雾对于我们也说也是一个重要的景深信息来源。所以论文引入了一个$\omega\in (0, 1]$参数,来保留一定的雾。此时我们的透射率预估函数就变为如下
\begin{equation}
    \overset{\sim}{t}(\mathbf{x})=1-\omega\min_{c}(\min_{\mathbf{y}\in\Omega(\mathbf{x})}(\frac{I^c(\mathbf{y})}{\mathbf{A}^c}))
\end{equation}
估算全局大气光强(global atmospheric light)
接下来就是$\mathbf{A}$,全局大气光强(global atmospheric light)的估计。论文中,先找到暗通道图像中亮度前$0.1\%$的像素,然后在原始有雾图像中对应的像素里找具有最高亮度的作为$\mathbf{A}$,全局大气光强(global atmospheric light)。
现在回到式(1),求解$\mathbf{J}(x)$,
\begin{equation}
\begin{aligned}
    \mathbf{I}(\mathbf{x})&=\mathbf{J}(\mathbf{x})t(\mathbf{x})+\mathbf{A}(1-t(\mathbf{x}))\\
    \mathbf{I}(\mathbf{x})&=\mathbf{J}(\mathbf{x})t(\mathbf{x})+\mathbf{A}-t(\mathbf{x})\mathbf{A}\\
    \mathbf{I}(\mathbf{x})-\mathbf{A}&=\mathbf{J}(\mathbf{x})t(\mathbf{x})-t(\mathbf{x})\mathbf{A}\\
    \mathbf{J}(\mathbf{x})t(\mathbf{x})-t(\mathbf{x})\mathbf{A}&=\mathbf{I}(\mathbf{x})-\mathbf{A}\\
    \mathbf{J}(\mathbf{x})t(\mathbf{x})-t(\mathbf{x})\mathbf{A}&=\mathbf{I}(\mathbf{x})-\mathbf{A}\\
    \mathbf{J}(\mathbf{x})-\mathbf{A}&=\frac{\mathbf{I}(\mathbf{x})-\mathbf{A}}{t(\mathbf{x})}\\
    \mathbf{J}(\mathbf{x})&=\frac{\mathbf{I}(\mathbf{x})-\mathbf{A}}{t(\mathbf{x})}+\mathbf{A}\\
\end{aligned}
\end{equation}
需要注意的是,当我们预估的透射率$t(\mathbf{x})$很小的时候,$\mathbf{J}(\mathbf{x})$的值会变得很大,于是我们可以限制透射率$t(\mathbf{x})$的最小值不低于某个$t_{0}$,于是,最终的恢复公式如下
\begin{equation}
\mathbf{J}(\mathbf{x})=\frac{\mathbf{I}(\mathbf{x})-\mathbf{A}}{\max(t(\mathbf{x}), t_{0})}+\mathbf{A}\\
\end{equation}
Python Implementation Using OpenCV
于是这里就是具体实现,基于cnblogs上的代码修改,暗通道去雾算法的python实现
#!/usr/bin/env python3.5
# -*- coding:utf-8 -*-

import optparse
import cv2
import numpy as np
import sys

def create_dehaze_options():
    usage = "usage: %prog <options>"
    parser = optparse.OptionParser(prog='dehaze', usage=usage)
    parser.add_option('-i', '--image', type='string', dest='image', help='Image to dehaze')
    parser.add_option('-o', '--output', type='string', dest='output', help='Path to save the output image')
    return parser

def zmMinFilterGray(src, r=7):
    '''minimum filter with radius'''
    if r <= 0:
        return src
    h, w = src.shape[: 2]
    I = src
    res = np.minimum(I, I[[0] + list(range(h - 1)), :])
    res = np.minimum(res, I[list(range(1, h)) + [h - 1], :])
    I = res
    res = np.minimum(I, I[: , [0] + list(range(w - 1))])
    res = np.minimum(res, I[: , list(range(1, w)) + [w - 1]])
    return zmMinFilterGray(res, r - 1)

def guidedfilter(I, p, r, eps):
    '''Guided Filter'''
    height, width = I.shape
    m_I = cv2.boxFilter(I, -1, (r, r))
    m_p = cv2.boxFilter(p, -1, (r, r))
    m_Ip = cv2.boxFilter(I * p, -1, (r, r))
    cov_Ip = m_Ip - m_I * m_p
    m_II = cv2.boxFilter(I * I, -1, (r, r))
    var_I = m_II - m_I * m_I
    a = cov_Ip / (var_I + eps)
    b = m_p - a * m_I
    m_a = cv2.boxFilter(a, -1, (r, r))
    m_b = cv2.boxFilter(b, -1, (r, r))
    return m_a * I + m_b

def getV1(m, r, eps, w, maxV1):
    '''
    m is a RGB image with color value ranged in [0, 1]
    Computing transmittance mask image V1
    and Airlight A
    '''
    # Dark Channel Image
    V1 = np.min(m, 2)

    # Apply Guided Filter
    V1 = guidedfilter(V1, zmMinFilterGray(V1, 7), r, eps)

    # Calculating Airlight
    bins = 2000
    ht = np.histogram(V1, bins)
    d = np.cumsum(ht[0]) / float(V1.size)
    for lmax in range(bins - 1, 0, -1):
        if d[lmax] <= 0.999:
            break
        A = np.mean(m, 2)[V1 >= ht[1][lmax]].max()

    # Limit value range
    V1 = np.minimum(V1 * w, maxV1)
    return V1, A

def deHaze(m, r = 81, eps = 0.001, w = 0.95, maxV1 = 0.80, bGamma = False):
    Y = np.zeros(m.shape)
    # Calculating transmittance mask and airlight
    V1, A = getV1(m, r, eps, w, maxV1)
    for k in range(3):
        # Color correction
        Y[: , :, k] = (m[: , :, k] - V1) / (1 - V1 / A)
        Y = np.clip(Y, 0, 1)

        # Gamma correction if required
        if bGamma:
            Y = Y ** (np.log(0.5) / np.log(Y.mean()))
    return Y

if __name__ == '__main__':
    parser = create_dehaze_options()
    (option, args) = parser.parse_args()

    if option.image == None or option.output == None:
        print(parser.format_help())
        sys.exit(1)

    # 读取需要去雾的图片
    # 并将所有的值映射到[0, 1]内
    haze = cv2.imread(option.image) / 255.0

    # 应用暗通道先验去雾算法
    # 重新将色彩的值映射回[0, 255]
    dehazed = deHaze(haze) * 255

    # 输出图像
    cv2.imwrite(option.output, dehazed)
感觉会很有用……emmmm 虽然没看明白○( ^皿^)っHiahiahia…
すごいすごい。