从零开始的 Rust 学习笔记(17) —— 做一个提问箱 Boxy ?

于是我自己的提问箱就是 https://ask.[data deleted]

源代码在这里 #/boxy ?(给大家表演如何用一个项目气死你写前端和 Rust 的朋友(x

回答是人工的,并不是人工智能?(不过感觉加上人工智能的话似乎也蛮好玩诶!

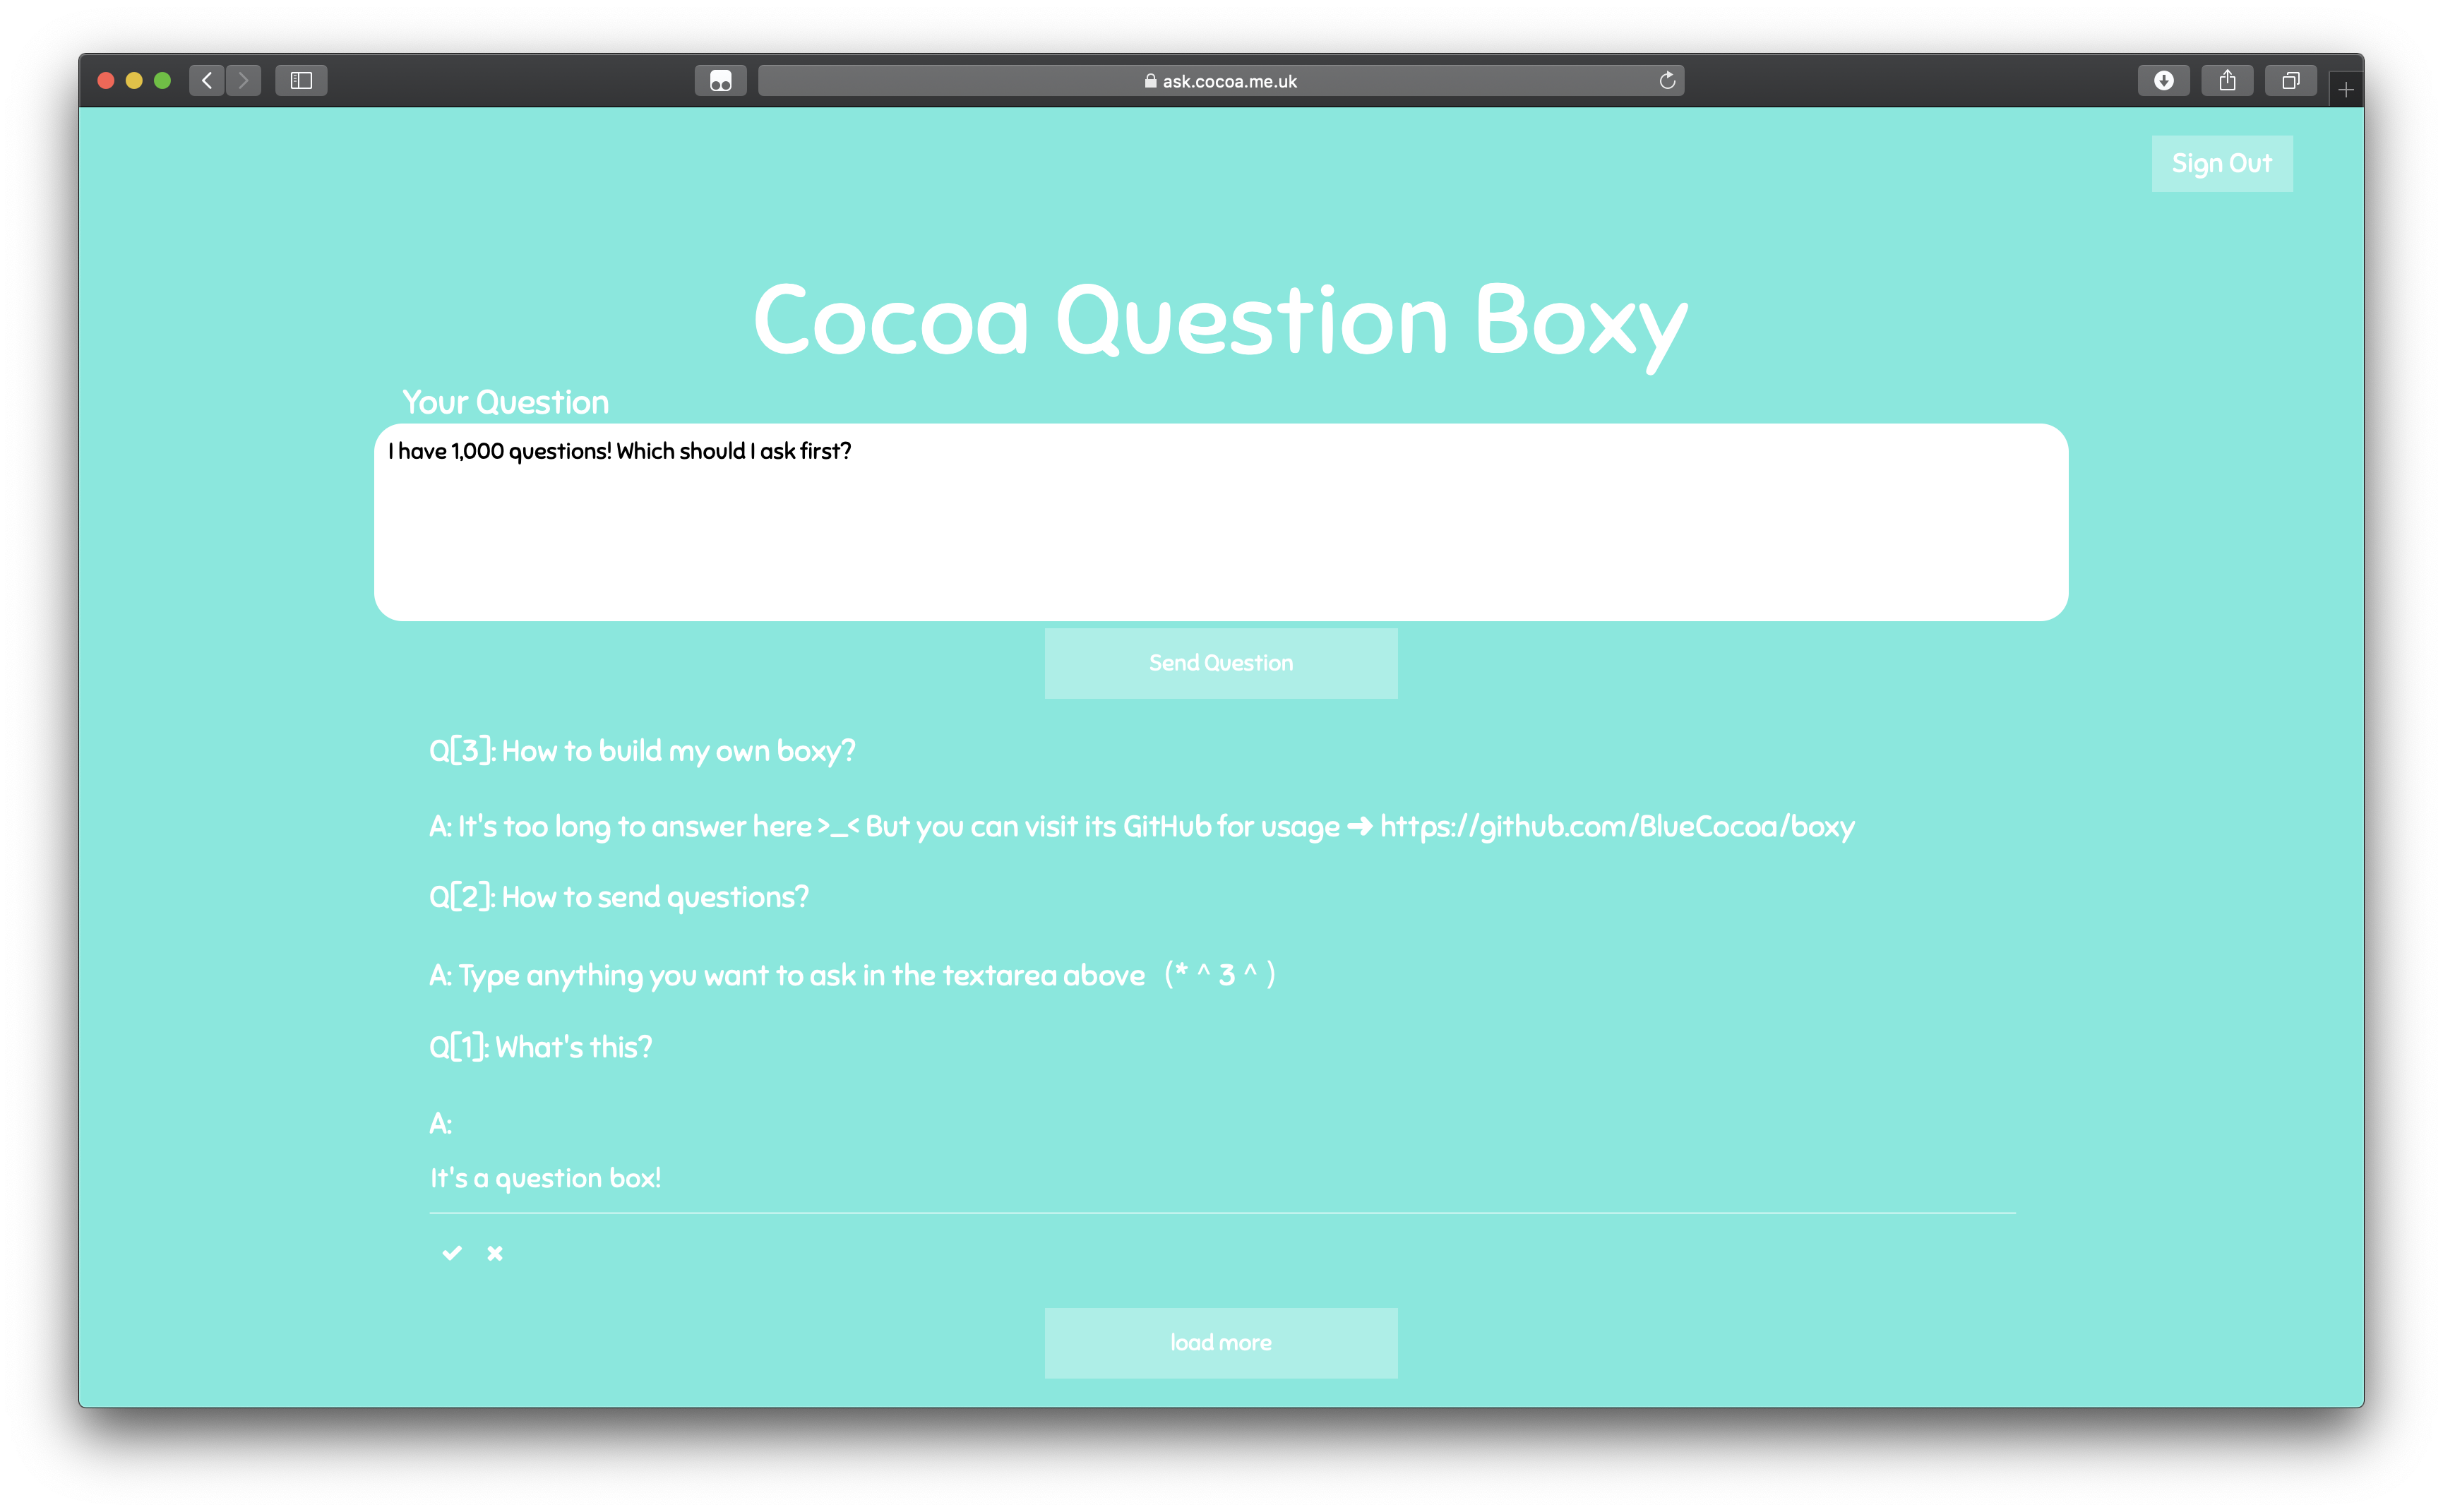
然后因为是模仿 peing 或者 sarahah 那样的匿名的提问箱,所以这个截图里就差不多是后台了~既然说是匿名的话,那就是真匿名~除了记录了提问时间,IP 只用来做了速度限制,没扔数据库。Question 在 MongoDB 里的模型则是

{ 
    "_id" : ObjectId("5e0a0ca0001cd1ea00876f2e"), 
    "question" : "What's this?", 
    "question_time" : NumberLong(1577716896), 
    "answer" : "It's a question box!", 
    "answer_time" : NumberLong(1577716906), 
    "id" : NumberLong(0) 
}

箱子的 owner 登录之后,直接点击答案的部分就进入编辑 / 回答模式,然后也可以删除提问什么的~

代码里倒是 Web 和纯 API 方式都实现了~然后回答之后自动生成 Twitter 卡片什么的还没有做_(:3」∠)_

再从技术层面上来说的话,这个项目用 Rust 上的 Hyper 作为 HTTP 服务器,然后数据库使用了 MongoDB,考虑到是作为单一用户的提问箱,因此用户名和密码是需要写在 boxy.json 里的~当然放进数据库里的是密码加盐后再 HMAC + SHA512 过的

stored_password = HMACSHA512(password + password_salt, password_salt)
{
    "_id" : ObjectId("5e09a250004b7da70096e3dc"),
    "user" : "ryza",
    "password" : "xxxxxxxxxxxxxxxxxxxxxxxxxxxxxxxxxxxxxxxxxxxxxxxxxxxxxxxxxxxxxxxxxxxxxxxxxxxxxxxxxxxxxxxxxxxxxxxxxxxxxxxxxxxxxxxxxxxxxxxxxxxxxxxx"
}

Web 界面和后端做了分离,我自己写了一个简单的~因此就直接手写了,没有用到现在前端流行的 Vue 或者 Angular 之类的框架。访问后端的 API 也是直接用的 jQuery 的 AJAX 模块。

登录之后会返回一个 token,包含了有效期,默认是 365 天,保存在了浏览器的 localStorage 里。登出的时候会自动清掉,但不是关闭页面 / 浏览器自动清除,所以在公用电脑上要记得登出~

那么下面是目前有的一些 API~ 以 http://localhost:5534 为例子!

Continue reading 从零开始的 Rust 学习笔记(17) —— 做一个提问箱 Boxy ?

从零开始的 Rust 学习笔记(16) —— K-means 模版

重构一下前两天用 Rust 写的 Colorline 中 K-means 聚类算法的部分~因为之前 kmeans 放在了 dominant_color.rs 下,显然 kmeans 这个算法不应该属于 dominant_color;同时,之前的 kmeans 算法只能用在这里,考虑到以后代码复用的话,当然是要写成模版啦╮(╯▽╰)╭

kmeans 独立出来之后,让 kmeans 可以接受任意 impl 了 KmeansComputable trait 的类。其实很久以前用 C++ 也写了一个比较通用的 K-means 模版,但是当时并没有考虑 trait 这样的,而是直接用了两个回调函数(不过写完这个 Rust 版本的之后似乎突然有点思路了)

Rust 这个写起来思路很清晰,首先就是 kmeans 函数应该接受:

  1. 一组待聚类的数据 array
  2. 要求聚类的的类数 k
  3. 收敛条件 min_diff —— k 个类每次迭代后各类中心点移动距离的上界

其中,array 应该是 KmeansComputable 的。

那么 KmeansComputable 这个 trait 的设计的话,第一点显然是要可以给出该类任意两个 instance 之间的距离;第二点则是可以在给出一组该类的后计算其中心点。也就是

pub trait KmeansComputable {
    fn distance(&self, other: &Self) -> f64;
    fn compute_center(cluster: &Vec<Self>) -> Self where Self: Sized;
}

于是 kmeans 函数如下~(高亮的部分则是用到 KmeansComputable trait 里要求实现的函数的地方)

Continue reading 从零开始的 Rust 学习笔记(16) —— K-means 模版

从零开始的 Rust 学习笔记(15) —— Colorline

在圣诞节的时候一个人回顾了一下 LoveLive μ's 3rd Live,然后就做了这个~从视频里提取每个时间点的主要色彩并生成一张大的图。

假如视频时长为 01:43:25,每隔 1 秒计算一次其画面的主要色彩,并且在画出高度为 120 像素,宽度为 1 像素的 colorline 的话,就可以组成下面这样图的啦~

那么理论上长度就是 103 * 60 + 25 = 6205 秒,也就是 6205 像素。但是实际上需要注意的是 FPS 的获取,视频时长的计算和如何选择帧。因为视频的 FPS 可能并不是一个整数,而是类似 29.97 这样的浮点数,可是在 OpenCV 里并不支持按秒读取。于是只好先获取视频的 FPS 与 FRAME_COUNT。

但是如果直接 as i32 的话,原本 29.97 的 FPS 就会变成 29,那么显然对视频时长的计算就会出错,6205 * 29.97 / 29 = 6412 秒,足足多了 207 秒!(那么问题来了)同时也会导致生存的图片在时间轴上不够精确。因此在代码上需要注意一下~

那比如在 3135 像素附近,开始出现了很多蓝色的条~粗略算一下也就是视频的 52:15 附近,这个显然就是「賢い、かわいい —— エリーチカ!」

(下面两张截图是在对应的区段里随便找的~并不是严格对应到起点的)

然后到了 3310 像素附近是大段连续紫色出现的起点~也就是视频里 55:10 的地方~「希パワーたーっぷり注入 はーいっプシュ!

那么实现起来的话,也并不算是很复杂~项目的源代码在 GitHub 上~#/colorline

1. 整体思路

首先需要视频文件的路径,然后用户要求每隔多少秒计算一次画面的主要色彩。接下来打开文件之后,计算视频以秒为单位的长度以及按照要求的话,需要产生多少根 Colorline。

随后启动一个抽取视频每一帧的线程,Video Extraction Thread。因为视频并不能真正的随机访问某一帧(可参考视频编码原理, P 帧、I 帧的概念等),故将会顺序遍历一次所有的 frame。

接下来到了应该被抽取出来计算主要彩色的帧的时候,为了利用好 CPU 资源,肯定会放到别的线程上去计算,不会放在 Video Extraction Thread 里做 。但是每到一个都另起一个线程的话,显然一会儿线程的数量可能就爆炸了~

那么我们就用一个线程池来做。这个线程池里的每一个 worker 接收的参数是一个需要计算的画面,以及这个画面对应的 Colorline 的 index。一个 worker 一次只负责计算某一帧的主要色彩,然后将计算结果与对应的 Colorline 的 index用 channel 送回。

为什么不直接画在 Mat 上?理论上这些线程访问的内存资源都不会有冲突,但是 Rust 里 OpenCV bindings 的 Mat 是不能在线程之间共享的(要么就一路 unsafe 走起,但那样似乎不如直接用 C++ 写了)。

所以对于线程池 worker threads 的计算结果,我们需要另外 spawn 一个 Worker-Thread Gather Thread,它负责收集所有 worker 计算的结果。如何判断收集完呢?我们已经有了视频长度与用户希望的间隔时间,那么提前就可以计算出一共会从 channel 中收到多少 message。

最后,用户可以 poll 我们的计算结果。如果已经计算完成,但是还没生成最后的图,那么就生成好 Mat 然后返回;如果还没好的话,就告知 InProgress;要是中间什么环节出错的话,就返回 Err

好了,基本的想法确定下来了,下面就可以开始写大坑了(*^3^)

Continue reading 从零开始的 Rust 学习笔记(15) —— Colorline

从零开始的 Rust 学习笔记(14) —— 计算图像相似度

上一篇 post 记录了 OpenCV 的编译脚本,当然是因为马上会用到啦~在 Rust 中要用 OpenCV 的话,则是需要用到 twistedfall/opencv-rust 这个 binding。使用方法其实倒也蛮简单,只不过 Rust 里面的函数没有参数默认值这个东西,于是在Rust 里使用 OpenCV 函数的时候,还能顺便记忆 OpenCV 里函数都有哪些参数╮( ̄▽ ̄"")╭

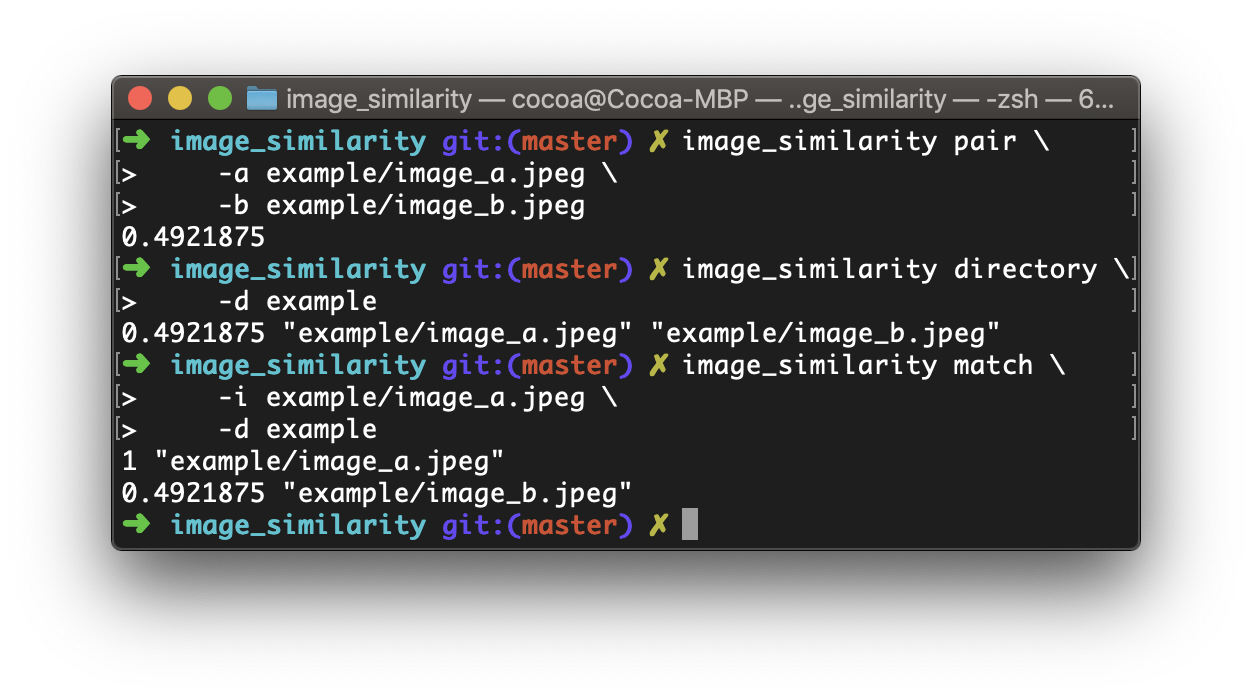
在有了图像相似度之后,就可以做比如查找某一目录下是否有重复的图片之类的,或者给出一张图,查找某个目录下与它最相似的图片等等~

计算方法

当然话说回来,计算图像相似度本身是有很多种方法的,这里因为学习 Rust 为主要目的,于是暂且不在计算方法上做什么创新。后文中使用到的计算图像相似度的算法与参数取自 MoeOverflow 组织 @Shincurry 的 AnimeLoop 项目,详细的参数选择解释可以在 Shincurry 的博客里找到~ https://blog.windisco.com/animeloop-paper/

简单来说,我们会将图片转化为灰度图,然后缩放到 64x64 的大小,并转换其底层的数据类型为 f64,随后计算其相应的离散余弦变换「Discrate Cosine Transform」。

接着取离散余弦变换结果矩阵的左上 $16\times 16$ 的子矩阵,计算其均值,需要注意的是,$(0, 0)$ 的值要排除在外。因为 $(0, 0)$ 是其直流分量「DC coefficient」,如果用来计算平均值的话,则可能会明显影响计算结果。那么在计算平均值的时候的总个数就是 $16 \times 16 - 1$。

在有了左上角 $16 \times 16$ 矩阵的均值 $m$ 之后,就可以依次将这个 $16 \times 16$ 矩阵的每一个元素 $v_{(p, q)}$ 与 $m$ 相比较,如果 $v_{(p, q)} \lt m$,那么 pHash 字符串就最末尾增加 "1";否则则增加 "0"

在有了两张图片的 pHash 字符串 $\mathcal{A}, \mathcal{B}$ 之后,我们计算两个 pHash 的汉明距离「Hamming Distance」 $d$,然后相似度则为 $r = 1.0 - \frac{d}{l}$,其中 $l$ 为 pHash 字符串长度。

\begin{align} &d = 0\\ &l = 16\times 16\\ & \forall i \in [0, 16\times 16)\\ & \left\{ \begin{aligned} d = d + 1, &\, \mathcal{A}_i \lt \mathcal{B}_i\\ d = d + 0, &\, \mathcal{A}_i \ge \mathcal{B}_i \end{aligned} \right.\\ &r = 1.0 - \frac{d}{l} \end{align} Continue reading 从零开始的 Rust 学习笔记(14) —— 计算图像相似度

Ryza 的编译安装 OpenCV 的 script

嘛,就当是记录一下好了,只需要知道自己要安装的 OpenCV 的版本号就行~

顺便处理了一下 OpenCV 4 之后生成 pkgconfig 文件「opencv4.pc」的小坑,

OpenCV 3 和 4 都没问题,2 的话没有测试过;然后 Python binding 是 Python 3,因为 Python 2 本身也快 deprecated 了。最后就是需要有 cmake, curl, unzip 和 pip。当然 freetypeharfbuzz 包也是需要的,用对应的包管理软件安装一下即可~

于是下面的代码需要根据自己需求改的部分就是一个 OpenCV 的版本号,然后是跟生成 pkgconfig 文件有关的那两行,OpenCV 3 应该不用的,OpenCV 4 则需要加上。

export OPENCV_VER=4.4.0

export OPENCV_SRC="https://github.com/opencv/opencv/archive/${OPENCV_VER}.zip"
export OPENCV_CONTRIB_SRC="https://github.com/opencv/opencv_contrib/archive/${OPENCV_VER}.zip"

curl -L -o "opencv-${OPENCV_VER}.zip" "$OPENCV_SRC"
curl -L -o "opencv_contrib-${OPENCV_VER}.zip" "$OPENCV_CONTRIB_SRC"

unzip "opencv-${OPENCV_VER}.zip" 1>&2 > /dev/null
unzip "opencv_contrib-${OPENCV_VER}.zip" 1>&2 > /dev/null

export OPENCV="`pwd`/opencv-${OPENCV_VER}"
export OPENCV_CONTRIB="`pwd`/opencv_contrib-${OPENCV_VER}/modules"

pip3 install numpy

mkdir -p "${OPENCV}/build"
cd "${OPENCV}/build"
cmake -D CMAKE_BUILD_TYPE=RELEASE \
    -D CMAKE_INSTALL_PREFIX=/usr/local \
    -D OPENCV_EXTRA_MODULES_PATH="${OPENCV_CONTRIB}" \
    -D PYTHON3_LIBRARY=`python3 -c 'import subprocess ; import sys ; s = subprocess.check_output("python3-config --configdir", shell=True).decode("utf-8").strip() ; (M, m) = sys.version_info[:2] ; print("{}/libpython{}.{}.dylib".format(s, M, m))'` \
    -D PYTHON3_INCLUDE_DIR=`python3 -c 'import distutils.sysconfig as s; print(s.get_python_inc())'` \
    -D PYTHON3_EXECUTABLE=`which python3` \
    -D BUILD_opencv_python2=OFF \
    -D BUILD_opencv_python3=ON \
    -D INSTALL_PYTHON_EXAMPLES=OFF \
    -D INSTALL_C_EXAMPLES=OFF \
    -D OPENCV_ENABLE_NONFREE=ON \
    -D OPENCV_GENERATE_PKGCONFIG=ON \
    -D OPENCV_PC_FILE_NAME=opencv4.pc \
    -D BUILD_EXAMPLES=OFF ..

等生成好 Unix makefile 之后就可以开始编译了~macOS 上则是

make -j`sysctl -a | grep 'hw.ncpu' | awk '{print \\$2}'`

*nix 则是

make -j`nproc`

最后安装即可~

sudo make install

从零开始的 Rust 学习笔记(13) —— YouTube Playlist Watcher & Downloader

最近在 YouTube 上听了很多 Harutya 的作品,然后也看了各种 Talk 的视频。在电脑上看的时候,对感兴趣的视频可以很方便的用 Python 的 youtube-dl 直接下下来,但是在 iPad 或者手机上的时候就不那么方便了。

  1. 整体思路
  2. 创建公开的 YouTube Playlist
  3. Playlist Watcher Config 配置文件
  4. Rust 代码模块组织
  5. PlaylistWatcherConfig
  6. YouTubeError
  7. Decode Percentage Encoded URL
  8. Access YouTube API
    1. HTTP Client
    2. Get All Video ID in Playlist
    3. Get Video Info
    4. Code of src/youtube/api.rs
  9. Stream
    1. Stream utility functions
    2. DownloadableStream Trait
    3. Code of src/youtube/stream.rs
  10. Video
    1. VideoStream
    2. AudioStream
    3. Video 类
  11. Playlist
  12. Downloader
  13. Watch Playlist and Download
    1. VideoConsumerMessage
    2. VideoConsumer
    3. PlaylistWatcher
    4. Code of src/youtube/video_consumer.rs
    5. Code of src/youtube/playlist_watcher.rs
  14. YouTube module / crate
  15. YouTube Playlist Watcher & Downloader
  16. 后记

项目的源代码同时也在我的 GitHub 上~ #/watchyou

1. 整体思路

那么想了一个 workaround ——

先在 YouTube 上创建一个公开的 Playlist,然后看到有想要下载的视频之后,就把它放进这个 Playlist 里面。假设这个 Playlist 的 URL 是

https://www.youtube.com/playlist?list=PLmPVZgHRcD6ZzbLAxHcP5FJRUOsUP5g4G

接下来,用代码每隔一段时间抓取一次这个 Playlist 的网页,然后 parse 出在这个 Playlist 里的所有 Video 的 ID。

下一步的话,就是用 YouTube 的 API 去获取每个 Video ID 所对应的视频的信息。

最后 parse 出来 API 返回数据里面的每一个 Video 的音频流和视频流的下载地址,并且下载即可~

2. 创建公开的 YouTube Playlist

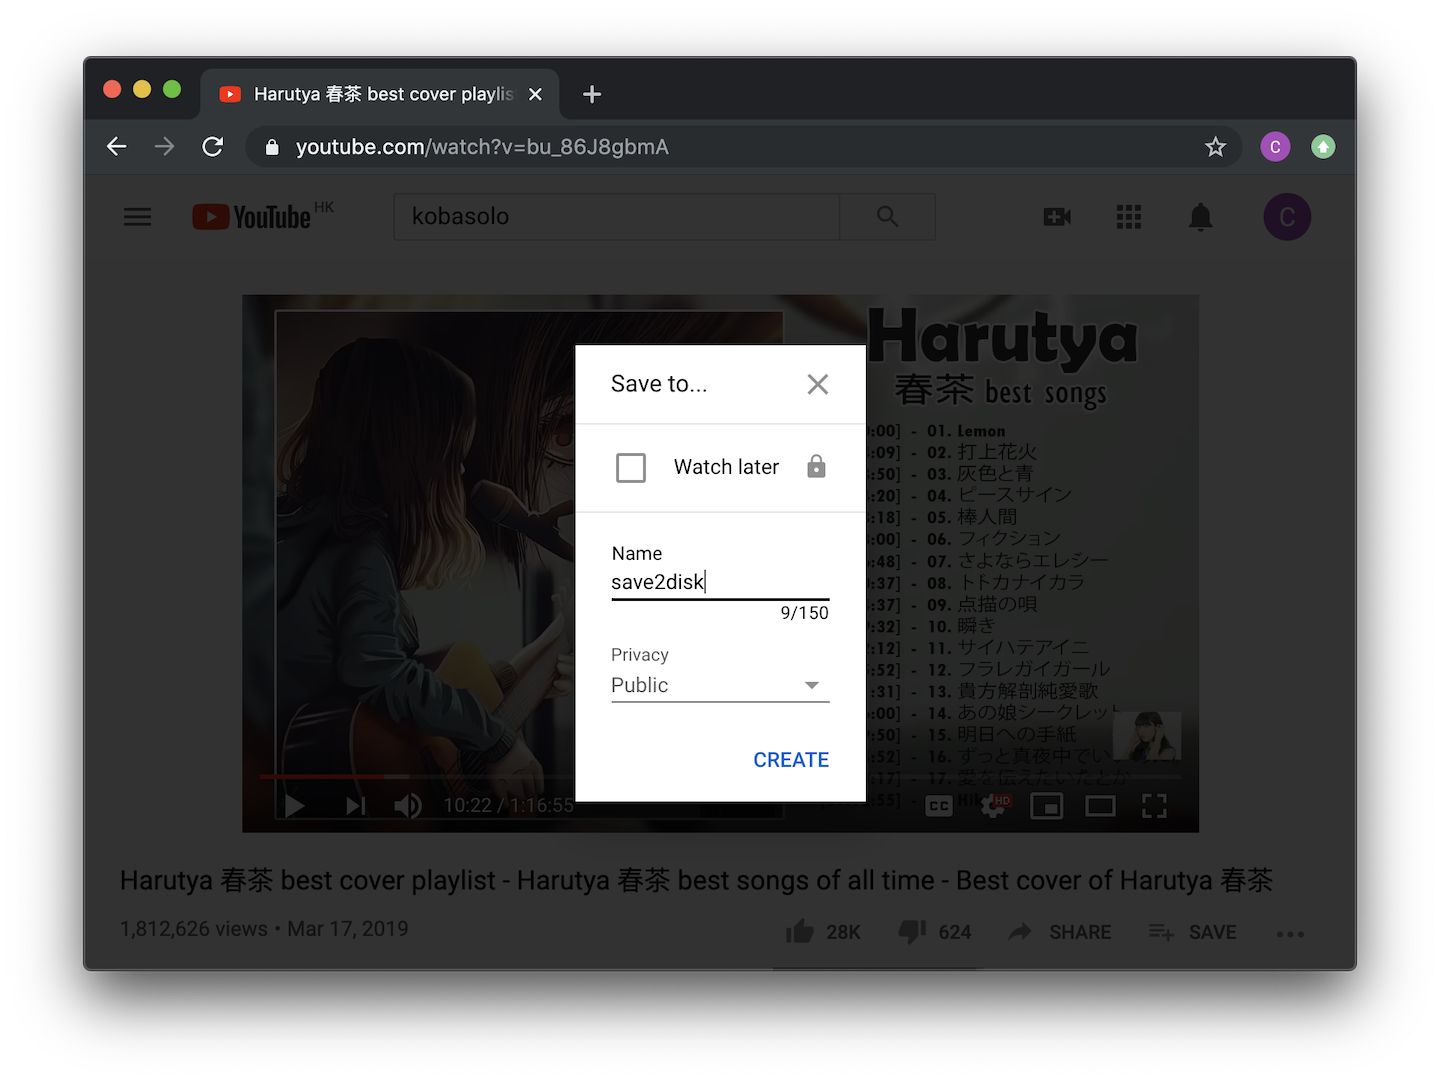
比如我们这里创建一个名为 save2disk 的公开 Playlist

然后就可以拿到这个 Playlist 对应的 URL 了~

这里的的 URL 是

https://www.youtube.com/playlist?list=PLmPVZgHRcD6ZzbLAxHcP5FJRUOsUP5g4G
Continue reading 从零开始的 Rust 学习笔记(13) —— YouTube Playlist Watcher & Downloader

从零开始的 Rust 学习笔记(12) —— 用 Rust CLI 来飞 Tello Drone

试手了一下 DJI 和 Intel 出的 Tello 迷你四轴飞行器~

Tello 起飞之后基本上还是比较稳,但是在相对较小的室内还是会受到自身气流的干扰,在室外有风的时候也能看到 Tello 随风摆动。

在玩了一段时间之后,感觉 Tello,或者说所有四轴飞行器的硬伤还是电池。Tello 标准套装里只有 1 块电池,满电续航差不多10分钟,说实话这个时间真的还蛮短的。我的 Kit 里包含了 3 块电池,理论上「车轮战」的话似乎可行,但除非自己一直跟着飞行器,要不然实际可以飞的距离还是受限于单块电池。

此外,Kit 里包含的充电器虽然可以同时插 3 块电池,但其并不能同时为 3 块电池充电。因此就算是「车轮战」可能也坚持不了多少,带 3 块电池车轮战的话,最多玩 1 小时左右吧。

主要的缺点说完之后,来说说 Tello 比较好玩的地方。首先是有 SDK,可以自己编程上去,要想更灵活的话,也可以自己按照 API 来写 —— 也就是这篇 post 玩的,当然并没有实现全部功能。其次是非常轻,3 块电池加上飞行器本体背在包里几乎没有什么感觉。

先放几张拆箱图吧(^O^)

这个小盒子里面装的就是 Tello 了(((o(*゚▽゚*)o)))

在说明书下面还有一套备用替换的螺旋桨~♪(´ε` )

Continue reading 从零开始的 Rust 学习笔记(12) —— 用 Rust CLI 来飞 Tello Drone

Maybe you can implement Maybe in this way in C++

I call it my billion-dollar mistake. It was the invention of the null reference in 1965. At that time, I was designing the first comprehensive type system for references in an object oriented language (ALGOL W). My goal was to ensure that all use of references should be absolutely safe, with checking performed automatically by the compiler. But I couldn't resist the temptation to put in a null reference, simply because it was so easy to implement. This has led to innumerable errors, vulnerabilities, and system crashes, which have probably caused a billion dollars of pain and damage in the last forty years. —— Tony Hoare, QCon London 2009

This post demonstrates a naive idea of how to implement Maybe trait (like std::option::Option in Rust or Maybe in Haskell) in C++17 and above.

What drives us to use Maybe is to avoid ambitious result. For example, if you're going to write a simple function that handle division.

int div_v1(int a, int b) {
    return a / b;
}

Of course we know that if b is 0, a floating point exception will be raised and your program will crash.

Well, technically we can just let the program crash, but most of the time we want to handle this illegal input more elegantly. So a if statement should be put in this function to see whether b is 0.

int div_v2(int a, int b) {
    if (b == 0) {
        fprintf(stderr, "[ERROR] %s: b is 0", __PRETTY_FUNCTION__);
        // but what should we return?
        return 0;
    } else {
        return a / b;
    }
}

However, it seems that there is no appropriate value to return if b is 0. Think about div_v2(0, 233), the result should exactly 0, so 0 cannot be used as an identification of illegal input.

Any other number? Then think about div_v2(a, 1), since variable a can be any number, and b is 1, so there is no such number we can use as identification of illegal input.

Do we have any workaround? Let's see. Try to return NULL if b is 0. But NULL is just an alias of 0 before C++11 standard.

If we use nullptr, which introduced since C++11 so that we can distinguish 0 and nullptr , the code will be

int * div_v3(int a, int b) {
    if (b == 0) {
        fprintf(stderr, "[ERROR] %s: b is 0", __PRETTY_FUNCTION__);
        return nullptr;
    } else {
        // since we cannot return a temporary variable on stack
        // we have to explicitly allocate memory
        int * res = new int;
        *res = a / b;
        return res;
    }
}

int main(int argc, char *argv[]) {
    int * res = div_v3(0, 3);
    if (res != nullptr) {
        printf("%d\n", *res);
        
        // which introduced extra memory management
        delete res;
    }
}

As you can see, this requires extra memory management. Maybe you will argue that we can do this

int * div_v4(int a, int b, int &result) {
    if (b == 0) {
        fprintf(stderr, "[ERROR] %s: b is 0", __PRETTY_FUNCTION__);
        return nullptr;
    } else {
        result = a / b;
        return &result;
    }
}

int main(int argc, char *argv[]) {
    int result;
    int * ret = div_v4(0, 3, result);
    if (ret != nullptr) {
        printf("%d\n", result);
    }
}

And if you're using C++17 standard, you can write the code of main part more compactly.

// compile with `-std=c++17`
if (int result; div_v4(0, 3, result) != nullptr) {
    printf("%d\n", result);
}

Well, this is where a "but" comes in. You cannot transform the math expression (100 / 10) / (200 / 50) in one line. So instead of writing something we could do with div_v1

int result = div_v1(div_v1(100, 10), div_v1(200, 50));

we can only write

// compile with `-std=c++17`
if (int result_a; div_v4(100, 10, result_a) != nullptr) {
    if (int result_b; div_v4(200, 50, result_b) != nullptr) {
        if (int result_c; div_v4(result_a, result_b, result_c) != nullptr) {
            // what a hell
        }
    }
}

In order to be safe and easy, we can write a maybe.hpp that wraps all functionalities of Maybe

Continue reading Maybe you can implement Maybe in this way in C++

使用 Prometheus + Grafana 来监控 Mac Mini 的风扇与温度

其实程序部分也没什么复杂的,就当是个笔记吧~

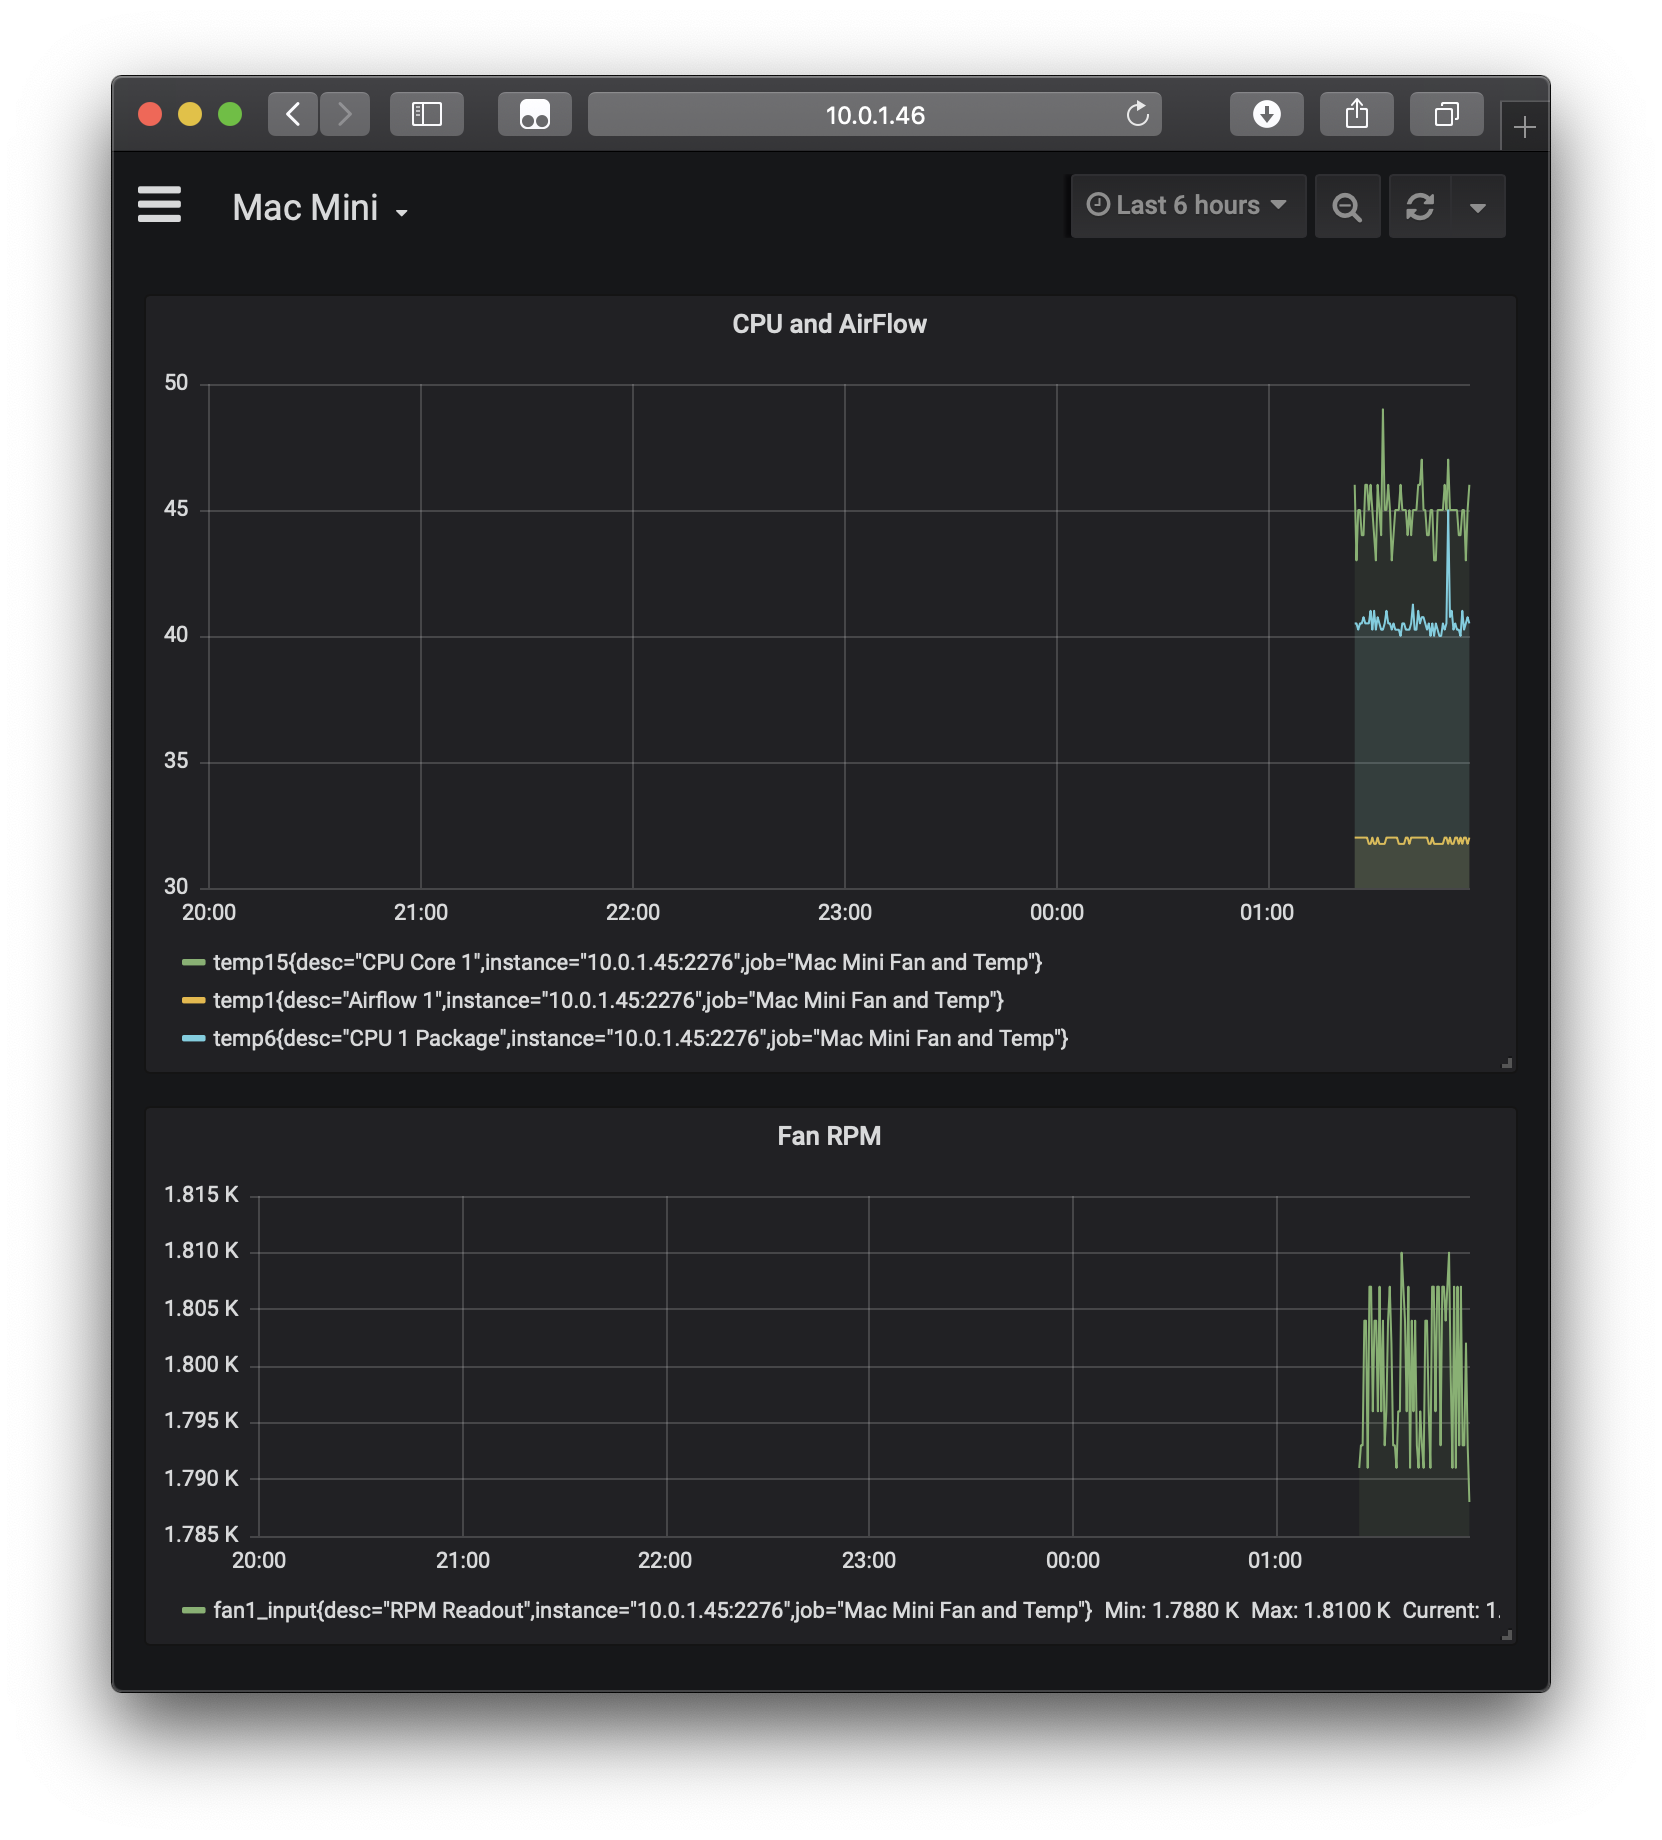
上次给 Mac Mini 安装了 Ubuntu,然后因为学习 Rust,就用 Rust 写了一个 RESTful 的控制风扇的服务;这次就是记录一下使用 Prometheus,Grafana 与 Golang,写个导出 Mac Mini 风扇与温度监控信息到 Prometheus 的坑吧~

(这里我的 Mac Mini 的 IP 地址是 10.0.1.45,Docker 部署的 Prometheus + Grafana 的 Mac 是 10.0.1.46,下面某些配置或者访问的 URL 自行改一下 IP 地址~)

首先就是直接拿 Docker 部署一下 Prometheus + Grafana,这里暂时没有什么好说的。目录结构是

.
└── metrics
    ├── configs
    │   └── prometheus
    │       └── prometheus.yml
    ├── data
    │   └── grafana
    └── docker-compose.yml

data/grafana 是一个空的目录,在下面 docker-compose 设置中会映射给给 Grafana(^O^)

docker-compose.yml 如下

version: '3'
services:
  prom:
    image: prom/prometheus
    ports:
      - "9090:9090"
    volumes:
      - ./configs/prometheus/prometheus.yml:/etc/prometheus/prometheus.yml

  grafana:
    image: grafana/grafana
    ports:
      - "3000:3000"
    volumes:
      - ./data/grafana:/var/lib/grafana
    environment:
      - GF_SECURITY_ADMIN_PASSWORD=secret

上面的 GF_SECURITY_ADMIN_PASSWORD=secret 则是设置了 Grafana 的 admin 用户的密码为 secret,可以根据需要更改一下~

然后是 Prometheus 的配置文件,./configs/prometheus/prometheus.yml,每 5 秒从我的 Mac Mini 上 pull 一次

Continue reading 使用 Prometheus + Grafana 来监控 Mac Mini 的风扇与温度

iPad 与 Raspberry Pi 4 通过 Type-C 直连 —— NAT 篇

在前两篇 post 中(iPad 与 Raspberry Pi 4 通过 Type-C 直连 —— SSH 篇iPad 与 Raspberry Pi 4 通过 Type-C 直连 —— VNC 篇),虽然 SSH 和 VNC 都可以愉快的工作,Raspberry Pi 也可以正常的用 Wi-Fi 上网。然而!(゚o゚;;

iPad 在连接有线以太网之后就默认所有的通信都走以太网了;同时,在默认设置下,Raspberry Pi 也并不会帮 iPad 做网络转发,因此还需要再单独设置一下 Raspberry Pi 上的 NAT,做到 iPad ⇆ Type C ⇆ Pi (usb0) ⇆ Pi (wlan0)

哎,不就是 iptables 和 NAT 嘛,去 pick up 一下,现学现卖hhhhhhhh╮(╯▽╰)╭

Continue reading iPad 与 Raspberry Pi 4 通过 Type-C 直连 —— NAT 篇