This post mainly demonstrates my personal virtualization setup. The configuration of my computer (along with some peripherals) is listed below.
- AMD Ryzen 3900XT 12 cores 24 threads
- ASUS TUF GAMING B550M-PLUS (WI-FI)
- 64GB DDR4
- Samsung 860 Pro 512G NVMe
- Intel 760p 2TB NVMe
- NVIDIA RTX 3090
- NVIDIA RTX 2070 Super
- Dell TypeC-Ethernet Dongle
I tried to use unRAID to fulfil my purpose, but I could not do a PCIe passthrough for the Intel 760p drive because there were some glitches with the SM2271 controller. Also, the specific motherboard I used is kind of cheap, so there are only 2 m.2 sockets (x4.CPU + x4.Chipset) and 3 PCIe sockets. The layout is shown in the figure below.
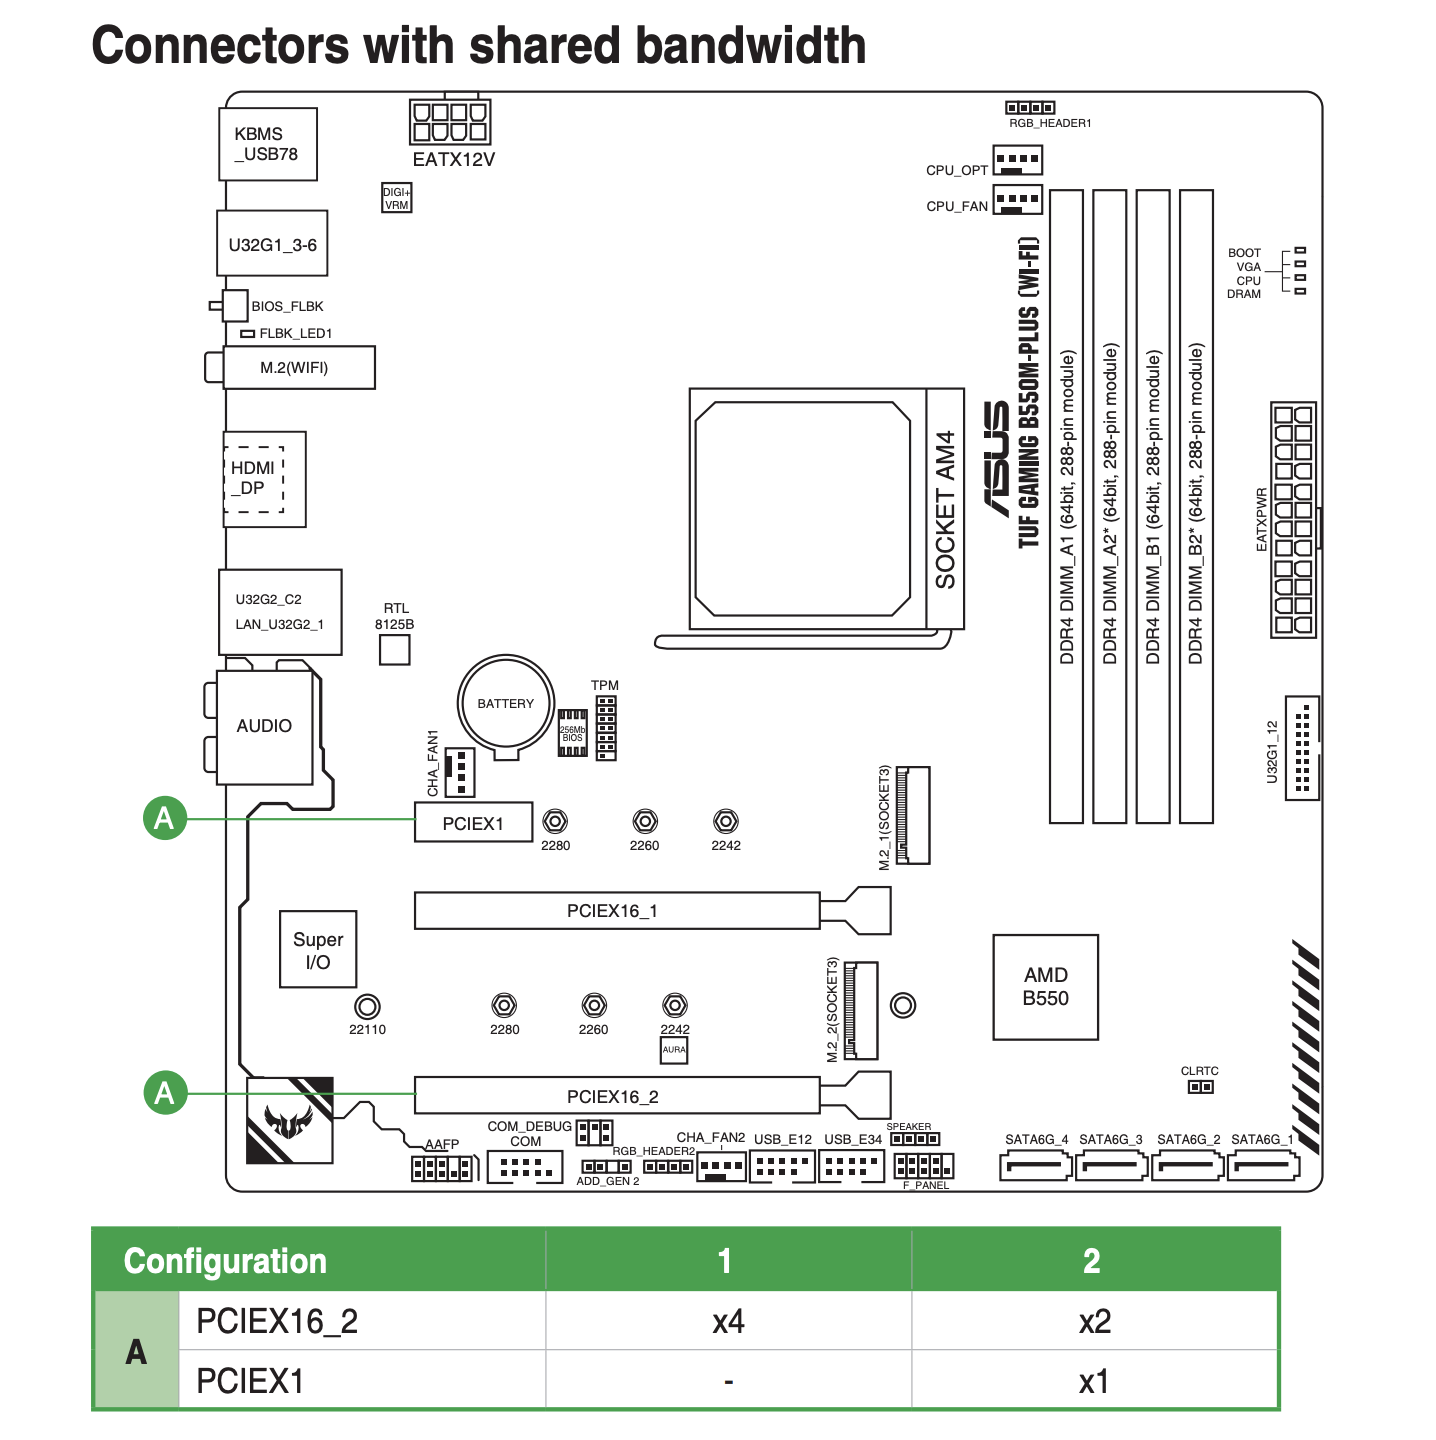
As the manual says that PCIEX1 and PCEIX16_2 share bandwidth and the maximum bandwidth for PCEIX16_2 is PCIe 3.0@x4. PCIEX16_1 can reach up to PCIe 4.0@x16. So I'm going to plug in my RTX 3090 in PCIEX16_1 and plug in 2070 Super in PCIEX16_2. The PCIEX1 will not be used.
Then, of course, we need to switch on IOMMU in UEFI. This is part of what I get when I check the IOMMU grouping. There are literally a bunch of devices in IOMMU Group 15 (I guess that came from the B550M Chipset). But as you can see, the RTX 2070 Super GPU is one of the devices in IOMMU group 15. I cannot do PCIe passthrough for this GPU. (Next time I perhaps will buy a better motherboard and a better CPU with more PCIe lanes).
IOMMU Group 15:
 02:00.0 USB controller [0c03]: Advanced Micro Devices, Inc. [AMD] Device [1022:43ee]
 02:00.1 SATA controller [0106]: Advanced Micro Devices, Inc. [AMD] Device [1022:43eb]
 02:00.2 PCI bridge [0604]: Advanced Micro Devices, Inc. [AMD] Device [1022:43e9]
 03:00.0 PCI bridge [0604]: Advanced Micro Devices, Inc. [AMD] Device [1022:43ea]
 03:04.0 PCI bridge [0604]: Advanced Micro Devices, Inc. [AMD] Device [1022:43ea]
 03:08.0 PCI bridge [0604]: Advanced Micro Devices, Inc. [AMD] Device [1022:43ea]
 03:09.0 PCI bridge [0604]: Advanced Micro Devices, Inc. [AMD] Device [1022:43ea]
 04:00.0 VGA compatible controller [0300]: NVIDIA Corporation TU104 [GeForce RTX 2070 SUPER] [10de:1e84] (rev a1)
 04:00.1 Audio device [0403]: NVIDIA Corporation TU104 HD Audio Controller [10de:10f8] (rev a1)
 04:00.2 USB controller [0c03]: NVIDIA Corporation TU104 USB 3.1 Host Controller [10de:1ad8] (rev a1)
 04:00.3 Serial bus controller [0c80]: NVIDIA Corporation TU104 USB Type-C UCSI Controller [10de:1ad9] (rev a1)
 05:00.0 Non-Volatile memory controller [0108]: Samsung Electronics Co Ltd NVMe SSD Controller SM981/PM981/PM983 [144d:a808]
 06:00.0 Network controller [0280]: Intel Corporation Wi-Fi 6 AX200 [8086:2723] (rev 1a)
 07:00.0 Ethernet controller [0200]: Realtek Semiconductor Co., Ltd. RTL8125 2.5GbE Controller [10ec:8125] (rev 04)
Alright, I cannot use unRAID or just passthrough my RTX 2070 Super. But it's not that bad. Because I only use Windows for games at my free time. I can just unbind RTX 3090 from nvidia kernel driver and bind it to the vfio-pci one if I want to use Windows, and vice-versa if I need to run Tensorflow or PyTorch. And most importantly, with unRAID, I need to shut down my Ubuntu, add/remove the RTX 3090 to/in it and then power it on. Now I can use my Ubuntu without interrupting.
So I installed Ubuntu 20.04 LTS the normal way and then I install all necessary packages for the KVM virtualization (as well as the NVIDIA driver for Linux).
sudo apt install qemu-kvm libvirt-clients libvirt-daemon-system bridge-utils virt-manager ovmf
The next step is to edit /etc/default/grub and add proper boot args. The content I added is highlighted below. (Please use intel_iommu if you are on Intel platform.) After editing, please update the grub configuration using sudo update-grub and do a reboot.
GRUB_CMDLINE_LINUX_DEFAULT="quiet splash amd_iommu=on kvm.ignore_msrs=1"
Then we can find the corresponding PCIe devices using lspci -nnk. Below only contains entries related to my GPUs. Highlighted ones are what we'd like to do the passthrough.
04:00.0 VGA compatible controller [0300]: NVIDIA Corporation TU104 [GeForce RTX 2070 SUPER] [10de:1e84] (rev a1)
 Subsystem: Gigabyte Technology Co., Ltd TU104 [GeForce RTX 2070 SUPER] [1458:4001]
 Kernel driver in use: nvidia
 Kernel modules: nvidiafb, nouveau, nvidia_drm, nvidia
04:00.1 Audio device [0403]: NVIDIA Corporation TU104 HD Audio Controller [10de:10f8] (rev a1)
 Subsystem: Gigabyte Technology Co., Ltd TU104 HD Audio Controller [1458:4001]
 Kernel driver in use: snd_hda_intel
 Kernel modules: snd_hda_intel
04:00.2 USB controller [0c03]: NVIDIA Corporation TU104 USB 3.1 Host Controller [10de:1ad8] (rev a1)
 Subsystem: Gigabyte Technology Co., Ltd TU104 USB 3.1 Host Controller [1458:4001]
 Kernel driver in use: xhci_hcd
 Kernel modules: xhci_pci
04:00.3 Serial bus controller [0c80]: NVIDIA Corporation TU104 USB Type-C UCSI Controller [10de:1ad9] (rev a1)
 Subsystem: Gigabyte Technology Co., Ltd TU104 USB Type-C UCSI Controller [1458:4001]
 Kernel driver in use: nvidia-gpu
 Kernel modules: i2c_nvidia_gpu
08:00.0 VGA compatible controller [0300]: NVIDIA Corporation Device [10de:2204] (rev a1)
 Subsystem: ZOTAC International (MCO) Ltd. Device [19da:1613]
 Kernel driver in use: nvidia
 Kernel modules: nvidiafb, nouveau, nvidia_drm, nvidia
08:00.1 Audio device [0403]: NVIDIA Corporation Device [10de:1aef] (rev a1)
 Subsystem: ZOTAC International (MCO) Ltd. Device [19da:1613]
 Kernel driver in use: snd_hda_intel
 Kernel modules: snd_hda_intel
With this information, we can unbind them from the nvidia driver and bind to vfio-pci using
echo "0000:08:00.0" | sudo tee /sys/bus/pci/drivers/nvidia/unbind
echo "0000:08:00.1" | sudo tee /sys/bus/pci/drivers/snd_hda_intel/unbind
echo "0000:08:00.0" | sudo tee /sys/bus/pci/drivers/vfio-pci/bind
echo "0000:08:00.1" | sudo tee /sys/bus/pci/drivers/vfio-pci/bind

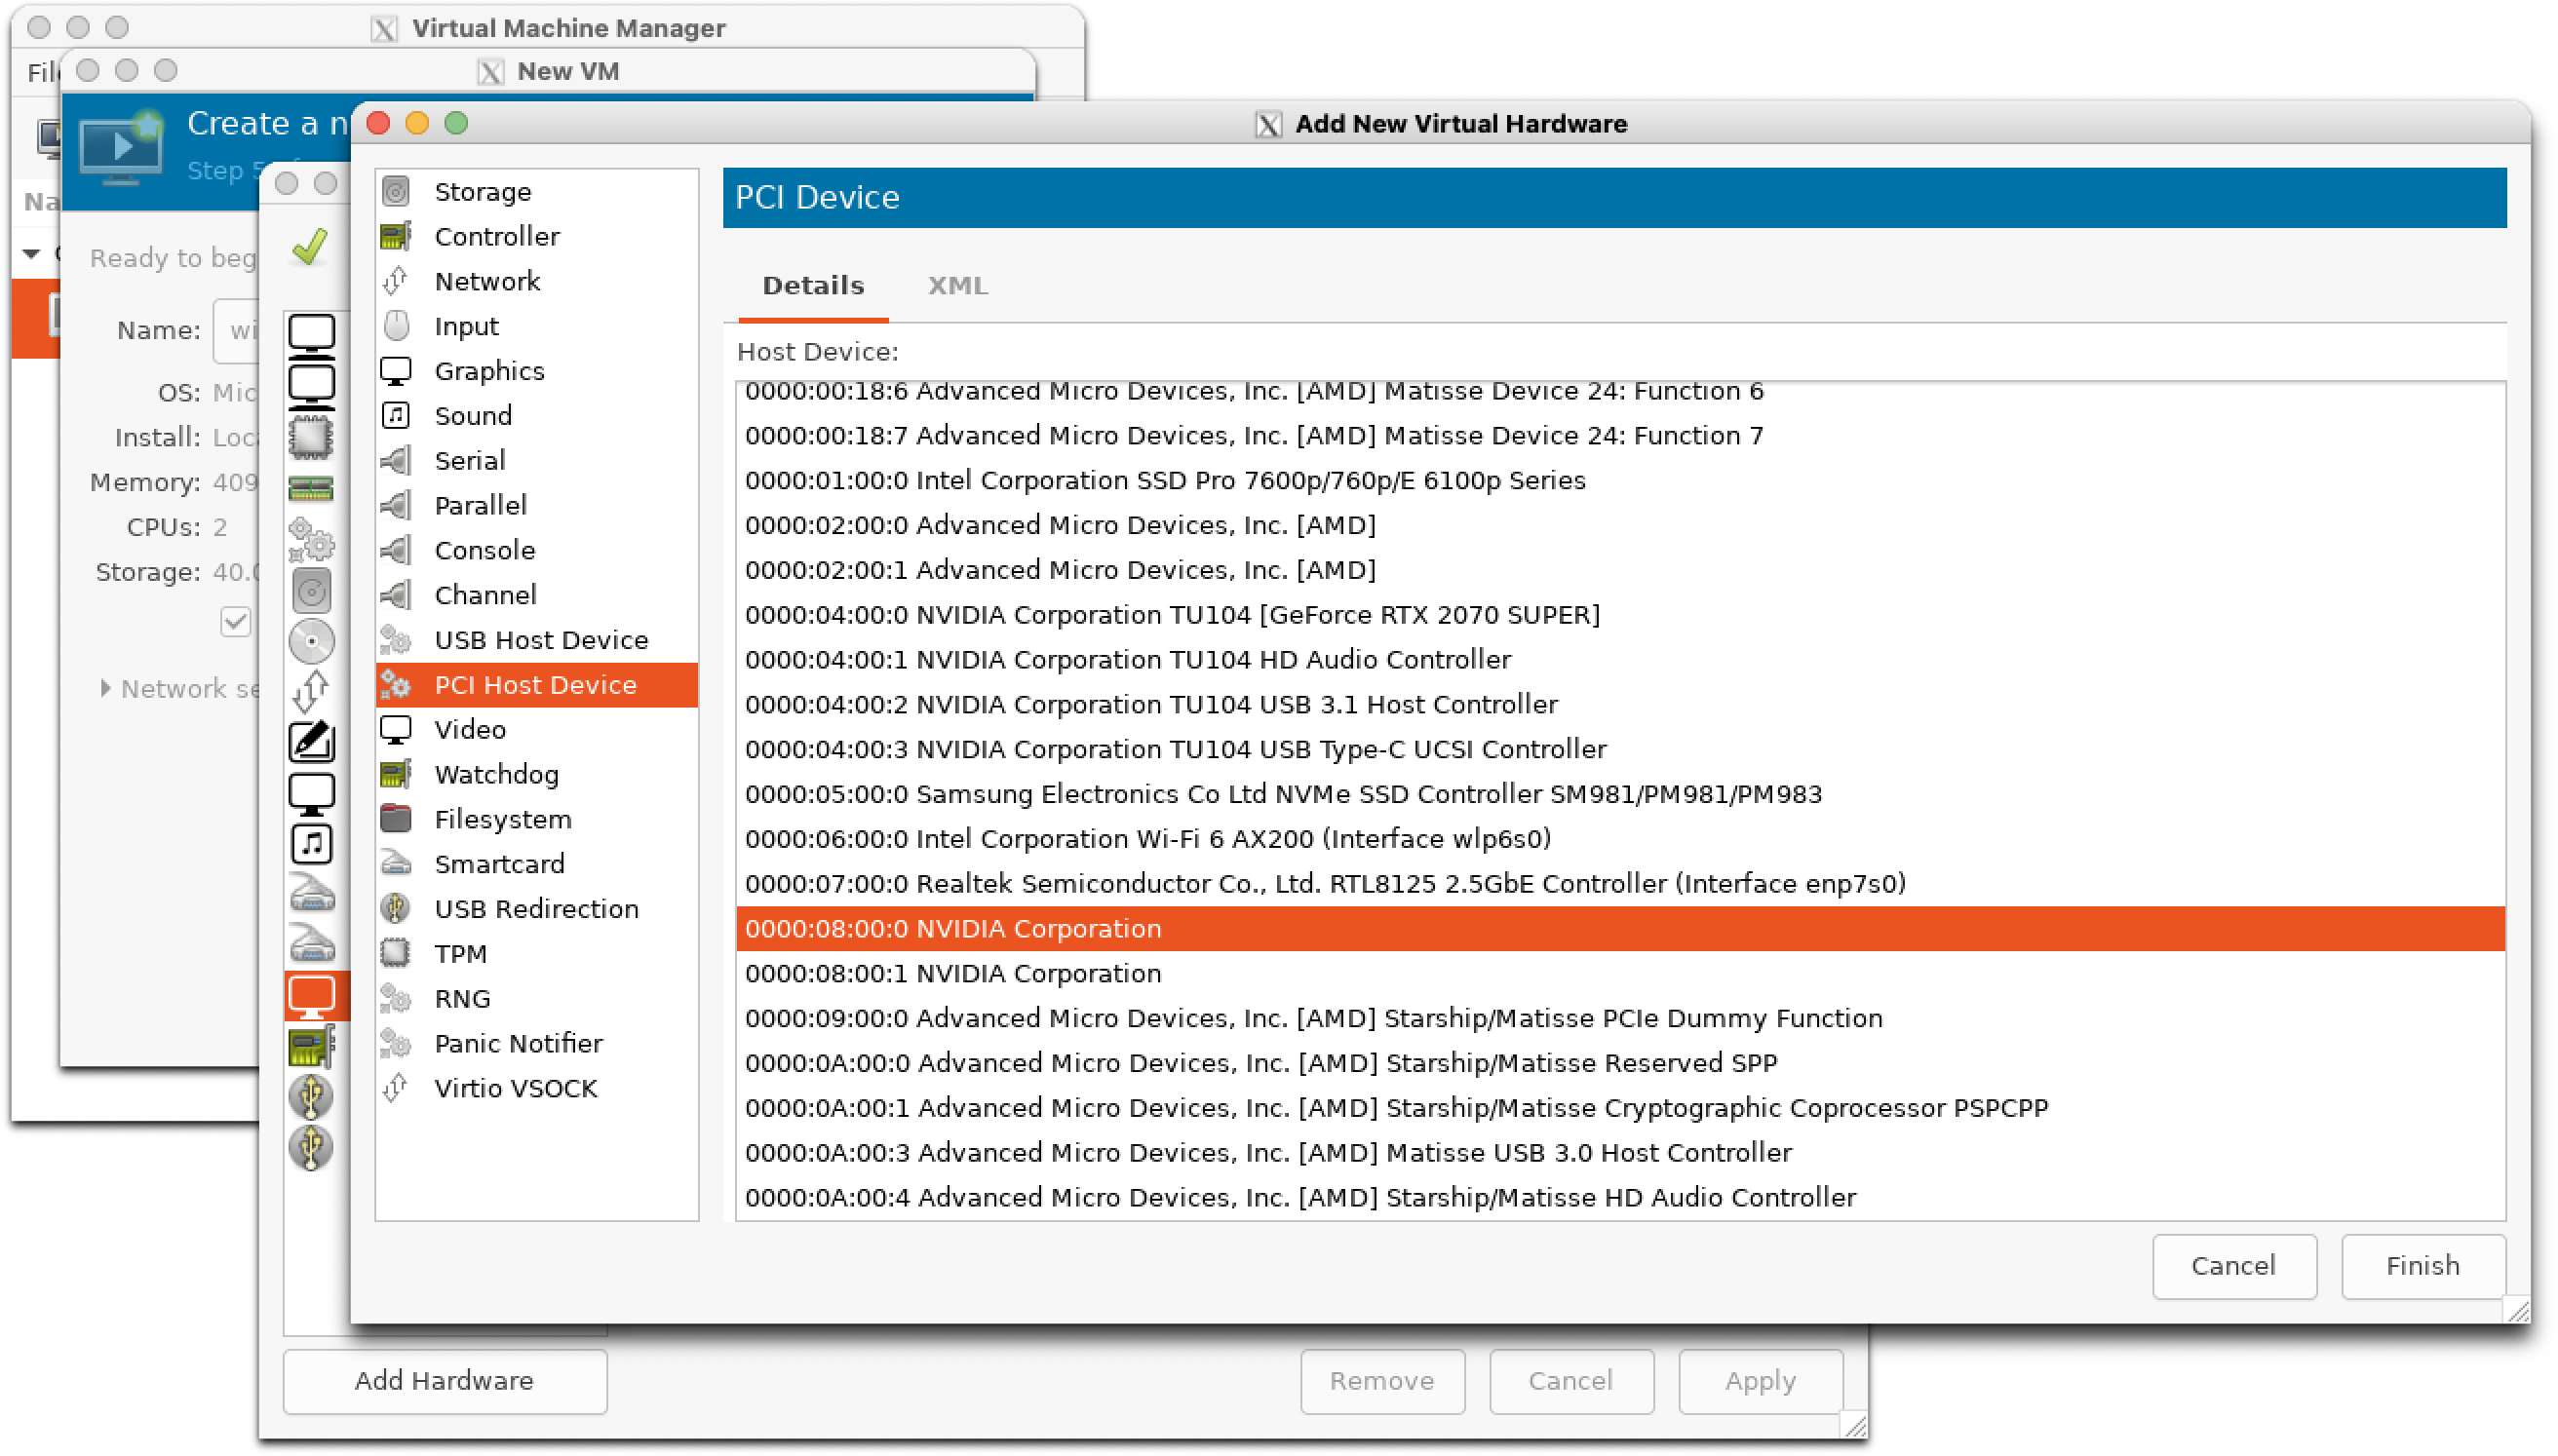
Now, we can use virt-manager to create a new virtual machine. Remember to remove Display Spice and Video QXL first, then you can add corresponding PCI Host Device by clicking on Add Hardware. Be sure to add ALL devices under an IOMMU group (this is why I cannot just passthrough my RTX 2070 Super for gaming).
But for Windows, we have to edit the VM's XML manually otherwise you will encounter Code 43 in Windows and the GPU just won't work. You need to add the highlighted part to your VM's XML file.
<feature>
  <acpi/>
  <apic/>
  <hyperv>
    <relaxted state="on"/>
    <vapic state="on"/>
    <spinlocks state="on" retries="8192"/>
    <vender_id state="on" value="whatever">
  <hyperv/>
  <kvm>
    <hidden state="on"/>
  </kvm>
</feature>
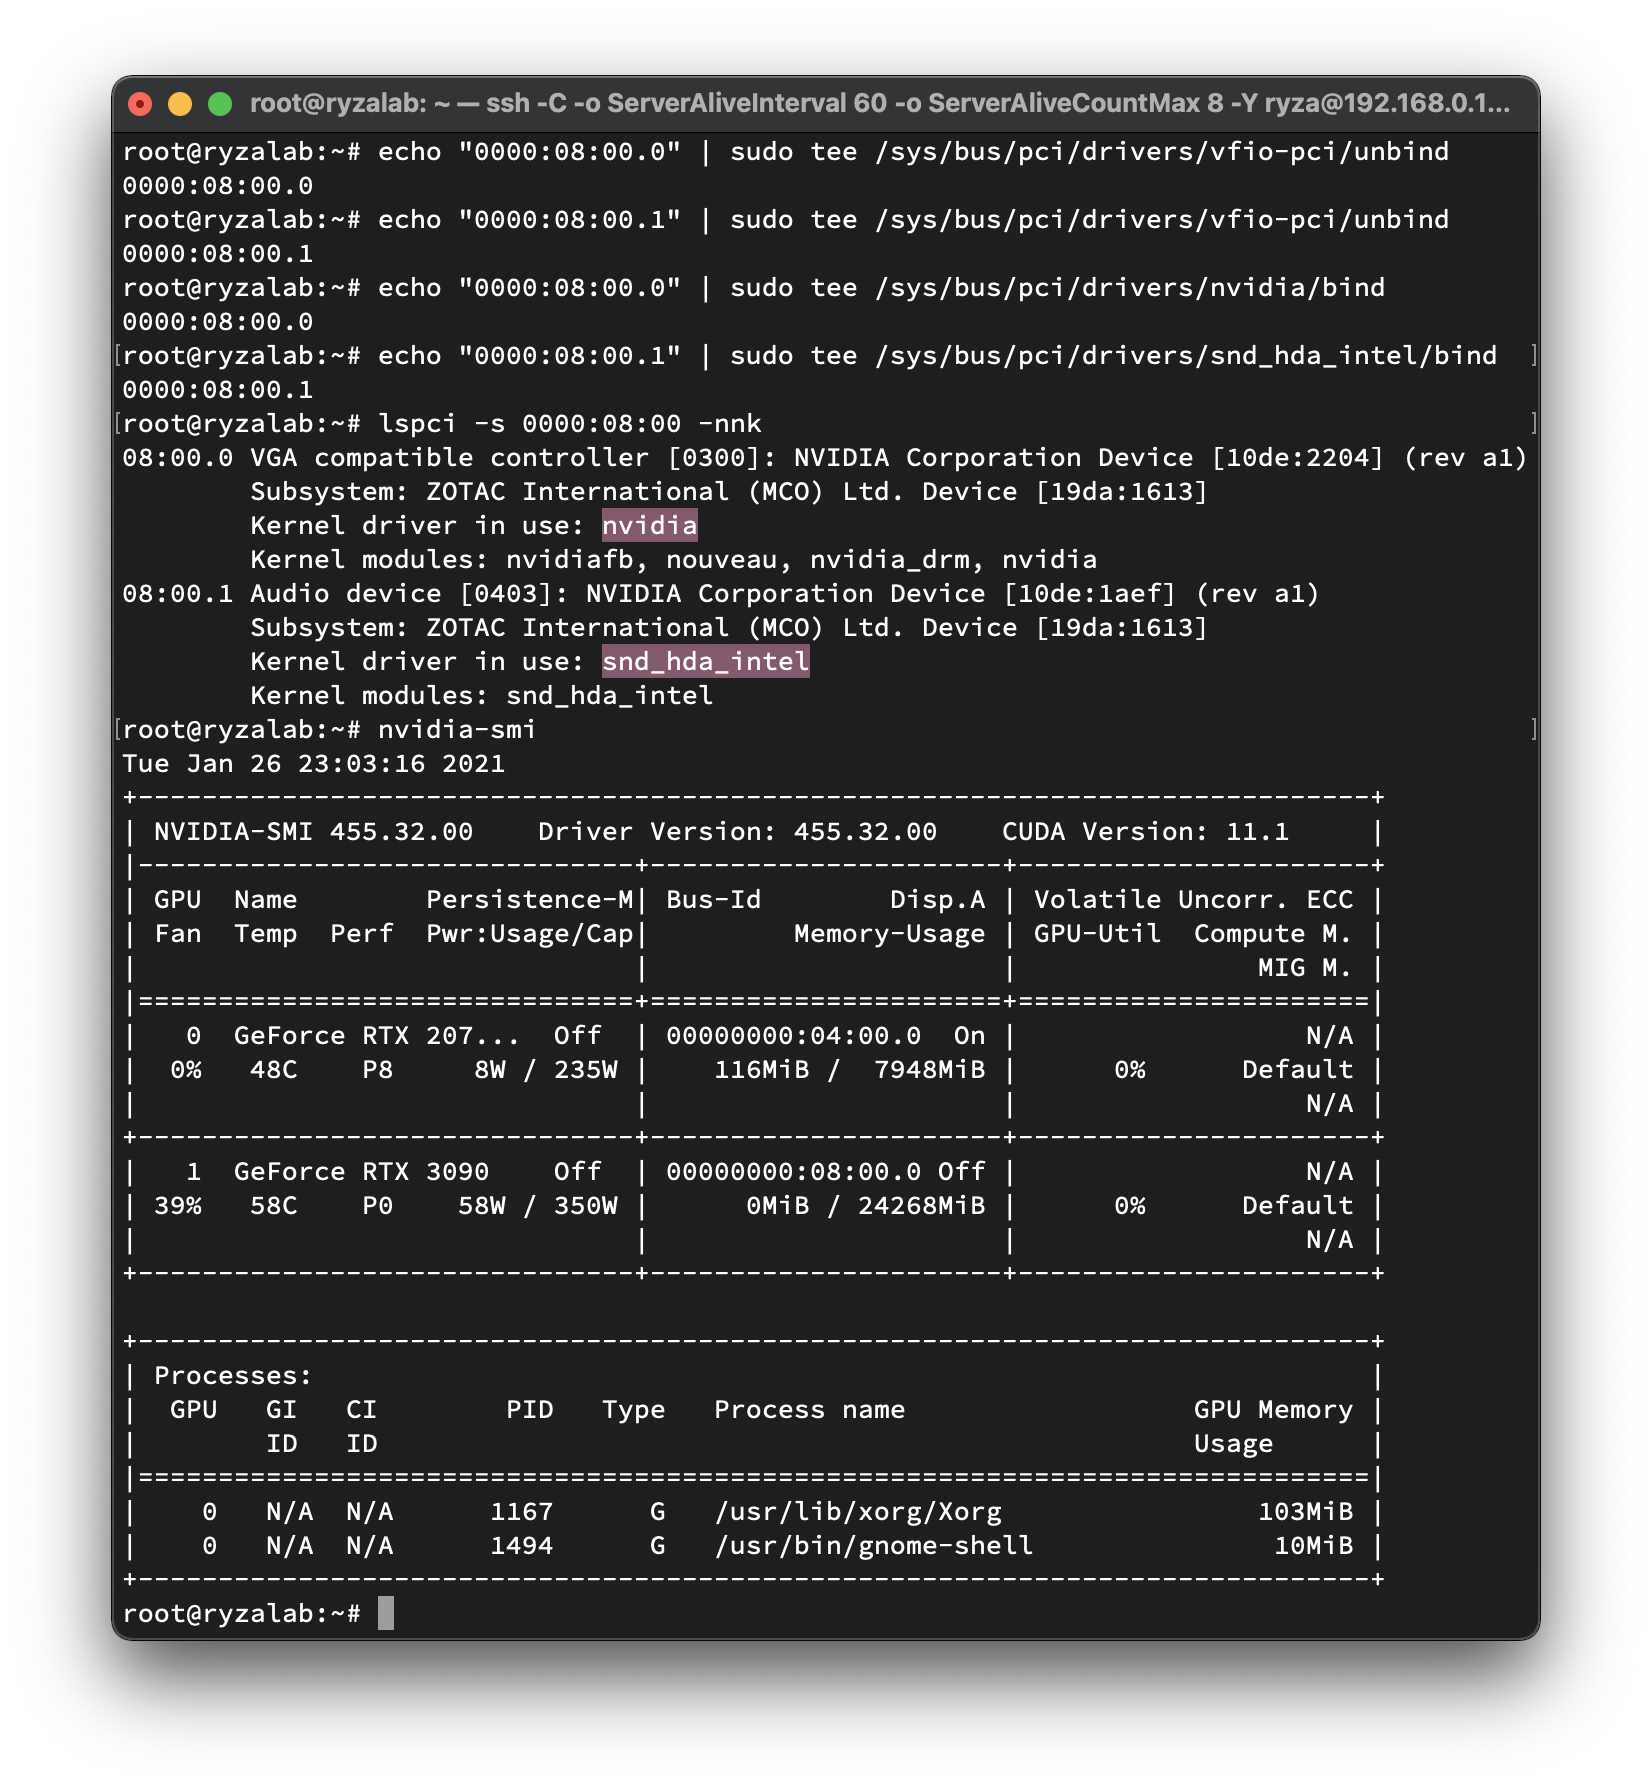
When I don't need Windows anymore, I can just shut down the VM and then bind my GPU back to nvidia driver.
echo "0000:08:00.0" | sudo tee /sys/bus/pci/drivers/vfio-pci/unbind
echo "0000:08:00.1" | sudo tee /sys/bus/pci/drivers/vfio-pci/unbind
echo "0000:08:00.0" | sudo tee /sys/bus/pci/drivers/nvidia/bind
echo "0000:08:00.1" | sudo tee /sys/bus/pci/drivers/snd_hda_intel/bind