Category Archives: Linux

PicoBf: A brainf**k lang REPL environment for Pico Pi

こんぺこ〜こんぺこ〜こんぺこ!

I heard that Pico Pi @Raspberry_Pi only has MicroPython REPL at the moment, so I had some fun writing a brainf**k REPL in C++17 for Pico Pi XDDDDD (btw, the output image is also written in bf lang!)

The brainf**k interpreter is adapted from a previous project, you can find it in this post, Brainfuck Interpreter in C++17——A Modern Approach to Kill Your Brain.

Source code on GitHub, https://github.com/BlueCocoa/pico-bf

My Virtualization Setup

This post mainly demonstrates my personal virtualization setup. The configuration of my computer (along with some peripherals) is listed below.

  • AMD Ryzen 3900XT 12 cores 24 threads
  • ASUS TUF GAMING B550M-PLUS (WI-FI)
  • 64GB DDR4
  • Samsung 860 Pro 512G NVMe
  • Intel 760p 2TB NVMe
  • NVIDIA RTX 3090
  • NVIDIA RTX 2070 Super
  • Dell TypeC-Ethernet Dongle

I tried to use unRAID to fulfil my purpose, but I could not do a PCIe passthrough for the Intel 760p drive because there were some glitches with the SM2271 controller. Also, the specific motherboard I used is kind of cheap, so there are only 2 m.2 sockets (x4.CPU + x4.Chipset) and 3 PCIe sockets. The layout is shown in the figure below.

As the manual says that PCIEX1 and PCEIX16_2 share bandwidth and the maximum bandwidth for PCEIX16_2 is PCIe 3.0@x4. PCIEX16_1 can reach up to PCIe 4.0@x16. So I'm going to plug in my RTX 3090 in PCIEX16_1 and plug in 2070 Super in PCIEX16_2. The PCIEX1 will not be used.

Then, of course, we need to switch on IOMMU in UEFI. This is part of what I get when I check the IOMMU grouping. There are literally a bunch of devices in IOMMU Group 15 (I guess that came from the B550M Chipset). But as you can see, the RTX 2070 Super GPU is one of the devices in IOMMU group 15. I cannot do PCIe passthrough for this GPU. (Next time I perhaps will buy a better motherboard and a better CPU with more PCIe lanes).

IOMMU Group 15:
 02:00.0 USB controller [0c03]: Advanced Micro Devices, Inc. [AMD] Device [1022:43ee]
 02:00.1 SATA controller [0106]: Advanced Micro Devices, Inc. [AMD] Device [1022:43eb]
 02:00.2 PCI bridge [0604]: Advanced Micro Devices, Inc. [AMD] Device [1022:43e9]
 03:00.0 PCI bridge [0604]: Advanced Micro Devices, Inc. [AMD] Device [1022:43ea]
 03:04.0 PCI bridge [0604]: Advanced Micro Devices, Inc. [AMD] Device [1022:43ea]
 03:08.0 PCI bridge [0604]: Advanced Micro Devices, Inc. [AMD] Device [1022:43ea]
 03:09.0 PCI bridge [0604]: Advanced Micro Devices, Inc. [AMD] Device [1022:43ea]
 04:00.0 VGA compatible controller [0300]: NVIDIA Corporation TU104 [GeForce RTX 2070 SUPER] [10de:1e84] (rev a1)
 04:00.1 Audio device [0403]: NVIDIA Corporation TU104 HD Audio Controller [10de:10f8] (rev a1)
 04:00.2 USB controller [0c03]: NVIDIA Corporation TU104 USB 3.1 Host Controller [10de:1ad8] (rev a1)
 04:00.3 Serial bus controller [0c80]: NVIDIA Corporation TU104 USB Type-C UCSI Controller [10de:1ad9] (rev a1)
 05:00.0 Non-Volatile memory controller [0108]: Samsung Electronics Co Ltd NVMe SSD Controller SM981/PM981/PM983 [144d:a808]
 06:00.0 Network controller [0280]: Intel Corporation Wi-Fi 6 AX200 [8086:2723] (rev 1a)
 07:00.0 Ethernet controller [0200]: Realtek Semiconductor Co., Ltd. RTL8125 2.5GbE Controller [10ec:8125] (rev 04) 

Alright, I cannot use unRAID or just passthrough my RTX 2070 Super. But it's not that bad. Because I only use Windows for games at my free time. I can just unbind RTX 3090 from nvidia kernel driver and bind it to the vfio-pci one if I want to use Windows, and vice-versa if I need to run Tensorflow or PyTorch. And most importantly, with unRAID, I need to shut down my Ubuntu, add/remove the RTX 3090 to/in it and then power it on. Now I can use my Ubuntu without interrupting.

Continue reading My Virtualization Setup

在 CentOS 7 中编译安装 Aria2

以前自己折腾的时候主要是 Ubuntu / Debian,自己有记录一份 Ubuntu / Debian 下 Aria2 的编译安装流程~不过 CentOS 的话,因为是 RedHat 系,所以有蛮多不一样的地方,于是就一边摸索一边记录下来了~

那么第一步就是安装各种依赖了,当然还有 autotools 和 libtool 也是需要的/

sudo yum install expat-devel libssh2-devel libxml2-devel \
     c-ares-devel zlib-devel gnutls-devel nettle-devel \
     gmp-devel libsqlite3x-devel automake autoconf \
     gettext-devel libtool

第二步则是安装 GCC 8.0 了喵~因为 Aria2 需要 C++14 的编译支持,而 CentOS 默认的似乎是 GCC 4.9.0 的样子

sudo yum install centos-release-scl
sudo yum install devtoolset-8-gcc devtoolset-8-gcc-c++

安装好之后,就可以先切换到 GCC 8.0 的环境下来操作了/

sudo scl enable devtoolset-8 -- zsh

第三步就很简单了,git clone 下来 Aria2 的 repo,然后正常编译安装就好~

git clone --depth=1 https://github.com/aria2/aria2.git cd aria2 autoreconf -i && ./configure --enable-libaria2 && \
     make -j`nproc` && sudo make install

下面就来到了第四步~这里假设希望的 Aria2 的下载目录和 session 目录都是 /mnt/vdb/aria2~先创建名为 aria2 的用户和 group,然后创建好对应的下载目录和 session 文件,并且将下载目录和 session 文件的所属用户和所属组都设置为 aria2,同时设置 aria2 用户和组对该下载目录可读可写。

Continue reading 在 CentOS 7 中编译安装 Aria2

使用 Prometheus + Grafana 来监控 Mac Mini 的风扇与温度

其实程序部分也没什么复杂的,就当是个笔记吧~

上次给 Mac Mini 安装了 Ubuntu,然后因为学习 Rust,就用 Rust 写了一个 RESTful 的控制风扇的服务;这次就是记录一下使用 Prometheus,Grafana 与 Golang,写个导出 Mac Mini 风扇与温度监控信息到 Prometheus 的坑吧~

(这里我的 Mac Mini 的 IP 地址是 10.0.1.45,Docker 部署的 Prometheus + Grafana 的 Mac 是 10.0.1.46,下面某些配置或者访问的 URL 自行改一下 IP 地址~)

首先就是直接拿 Docker 部署一下 Prometheus + Grafana,这里暂时没有什么好说的。目录结构是

.
└── metrics
    ├── configs
    │   └── prometheus
    │       └── prometheus.yml
    ├── data
    │   └── grafana
    └── docker-compose.yml

data/grafana 是一个空的目录,在下面 docker-compose 设置中会映射给给 Grafana(^O^)

docker-compose.yml 如下

version: '3'
services:
  prom:
    image: prom/prometheus
    ports:
      - "9090:9090"
    volumes:
      - ./configs/prometheus/prometheus.yml:/etc/prometheus/prometheus.yml

  grafana:
    image: grafana/grafana
    ports:
      - "3000:3000"
    volumes:
      - ./data/grafana:/var/lib/grafana
    environment:
      - GF_SECURITY_ADMIN_PASSWORD=secret

上面的 GF_SECURITY_ADMIN_PASSWORD=secret 则是设置了 Grafana 的 admin 用户的密码为 secret,可以根据需要更改一下~

然后是 Prometheus 的配置文件,./configs/prometheus/prometheus.yml,每 5 秒从我的 Mac Mini 上 pull 一次

Continue reading 使用 Prometheus + Grafana 来监控 Mac Mini 的风扇与温度

iPad 与 Raspberry Pi 4 通过 Type-C 直连 —— NAT 篇

在前两篇 post 中(iPad 与 Raspberry Pi 4 通过 Type-C 直连 —— SSH 篇iPad 与 Raspberry Pi 4 通过 Type-C 直连 —— VNC 篇),虽然 SSH 和 VNC 都可以愉快的工作,Raspberry Pi 也可以正常的用 Wi-Fi 上网。然而!(゚o゚;;

iPad 在连接有线以太网之后就默认所有的通信都走以太网了;同时,在默认设置下,Raspberry Pi 也并不会帮 iPad 做网络转发,因此还需要再单独设置一下 Raspberry Pi 上的 NAT,做到 iPad ⇆ Type C ⇆ Pi (usb0) ⇆ Pi (wlan0)

哎,不就是 iptables 和 NAT 嘛,去 pick up 一下,现学现卖hhhhhhhh╮(╯▽╰)╭

Continue reading iPad 与 Raspberry Pi 4 通过 Type-C 直连 —— NAT 篇

iPad 与 Raspberry Pi 4 通过 Type-C 直连 —— VNC 篇

上一篇折腾的时候其实只是提了一下,理论上直连之后还可以用 VNC,于是今天来实际实验一下 VNC 2333333

在完成上一篇的操作之后,已经可以直接在 iPad 上直连 Raspberry Pi 了,要加上 VNC 的话,需要如下步骤~

  1. 打开 VNC 功能
  2. 手动设定分辨率 (Optional)
  3. 设置 Raspberry Pi 默认启动到桌面
  4. 在 iPad 上使用 VNC 接连 Raspberry Pi
  5. 设置 Raspberry Pi 默认使用 Wi-Fi / Ethernet 连接网络
Continue reading iPad 与 Raspberry Pi 4 通过 Type-C 直连 —— VNC 篇

iPad 与 Raspberry Pi 4 通过 Type-C 直连 —— SSH 篇

因为 Raspberry Pi 4 现在有了 Type-C 线,并且它的 Type-C 接口不仅仅是供电,还包括了 OTG 功能,此外还支持 Etherne。于是想法就是 Raspberry Pi 4 ⇆ Type C ⇆ iPad,一根线解决供电与数据的问题~ (⁎⁍̴̛ᴗ⁍̴̛⁎)

要打开 Raspberry Pi 的 OTG 功能倒是很简单,先是修改 /boot/config.txt,在新的行里加上

# Enable USB OTG like ethernet
dtoverlay=dwc2

然后是 /boot/cmdline.txt,这个则是直接加在 rootwait 的后面,当然,rootwait 和我们增加的内容之间是有一个空格的~

modules-load=dwc2,g_ether g_ether.host_addr=25:25:2c:0c:0a:00

这两个文件编辑完之后大概如下~

接下来的话,则是需要手动设置一下 Raspberry Pi 上的 IP,如果你的电脑可以直接读写 Micro SD 卡上的 rootfs 分区的话,那么就可以直接编辑 /etc/dhcpcd.conf 这个文件;否则的话,就按老方法 SSH 到 Raspberry Pi 上编辑 /etc/dhcpcd.conf

这里我们需要配置的是 usb0 这个接口上的 IP。不过 iPad 似乎不能作为 Router,所以就让 Raspberry Pi 当 Router 好啦。在 /etc/dhcpcd.conf 这个文件里新增如下内容,给 usb0 接口设置一个静态 IP

interface usb0
static ip_address=10.42.0.1/24
static routers=10.42.0.1
Continue reading iPad 与 Raspberry Pi 4 通过 Type-C 直连 —— SSH 篇

从零开始的 Rust 学习笔记(11) —— 让 Breezin 用上 RESTful API 和 Access Token

於是接著上一篇 Rust 學習筆記,讓上次寫的 Breezin 用上 RESTful API 和 Access Token~之前的 HTTP API 的話就是特別樸素的那種,比如

http://10.0.1.2:2275/get?name=fan1
http://10.0.1.2:2275/set?name=fan1&value=2000
http://10.0.1.2:2275/set?name=fan1&value=auto

並且上面的都是 GET 請求,好處就是在瀏覽器裡手動輸入相應的 API 和引數就能呼叫;壞處就是非常不 RESTful,表示是否成功的狀態碼只在返回的 JSON 中,而 HTTP 的狀態碼都是 HTTP 200 OK;其次,動詞 setget 都在 URL 中出現,而不是像 RESTful API 規範的那樣,體現在 HTTP Method 上。

使用 RESTful API 的話,我們的請求就是如下樣子的了~

请求数据

HTTP MethodAPI EndpointDescription
GEThttp://10.0.1.2:2275/api/v1/fansGet all fans status
GEThttp://10.0.1.2:2275/api/v1/fans/:idGet fan status of given :id
GEThttp://10.0.1.2:2275/api/v1/tempsGet all smc temperature sensors' status
PUThttp://10.0.1.2:2275/api/v1/fans/:idUpdate specified property of fan with :id

當然,更新風扇的屬性的話,實際上可寫入的就只有 3 個 —— min, manualoutput。那麼要傳值的話,肯定就是放在 PUT 方法的 body 裡面了~

例如需要設定 fan1 的最低 RPM 為 2000 的話,那麼就使用 PUT 方法訪問的 API Endpoint 是 http://10.0.1.2:2275/api/v1/fans/1,其 body 為

{
  "property": "min",
  "value": 2000
}

同時,因為選擇哪一個風扇是在 URI 上確定的,因此也需要用一下正則表達式去匹配。這裡我們用到的正則表達式如下~

Continue reading 从零开始的 Rust 学习笔记(11) —— 让 Breezin 用上 RESTful API 和 Access Token

Ubuntu Linux 部署 v2ray 软路由做透明代理

就当是笔记啦 ╮( ̄▽ ̄"")╭ 感谢 Project V 及其所有 contributors

下面的脚本唯一 assumed 的是服务器那边 v2ray 开启了 mKCP,具体 assumed 的 mKCP 配置如下

"streamSettings": {
    "tlsSettings": {
        "allowInsecure": true
    },
    "security": "none",
    "kcpSettings": {
        "header": {
            "type": "srtp"
        },
        "mtu": 1350,
        "congestion": true,
        "tti": 20,
        "uplinkCapacity": 100,
        "writeBufferSize": 1,
        "readBufferSize": 1,
        "downlinkCapacity": 200
    },
    "network": "kcp"
},

要使用的话,要么改一下自己服务器那边的配置,要么就改一下下面脚本中高亮的部分即可~(总之保持一致就可以( ´▽`)

Continue reading Ubuntu Linux 部署 v2ray 软路由做透明代理

从零开始的 Rust 学习笔记(10) —— Breezin

家裡有一臺半閒置的 12 年的 Mac Mini,之前偶爾跑點 Docker 的東西,順便還有把一臺超舊的印表機共享到局域網裡。不過想想應該拿它做點別的事,比如裝個 Linux 然後搭上 v2ray 做軟路由實現透明代理,然後再裝個 Docker 偶爾測試自己寫的 Linux 的東西~

不過這一篇 post 並不是寫如何用 v2ray 在 Linux 上搭軟路由,而是想起現在的軟路由用的是 Raspberry Pi 4。Raspberry Pi 4 在實際使用的時候還是不錯的,但是發熱量比較大,以及 softirq 看起來略有點爆炸 233333

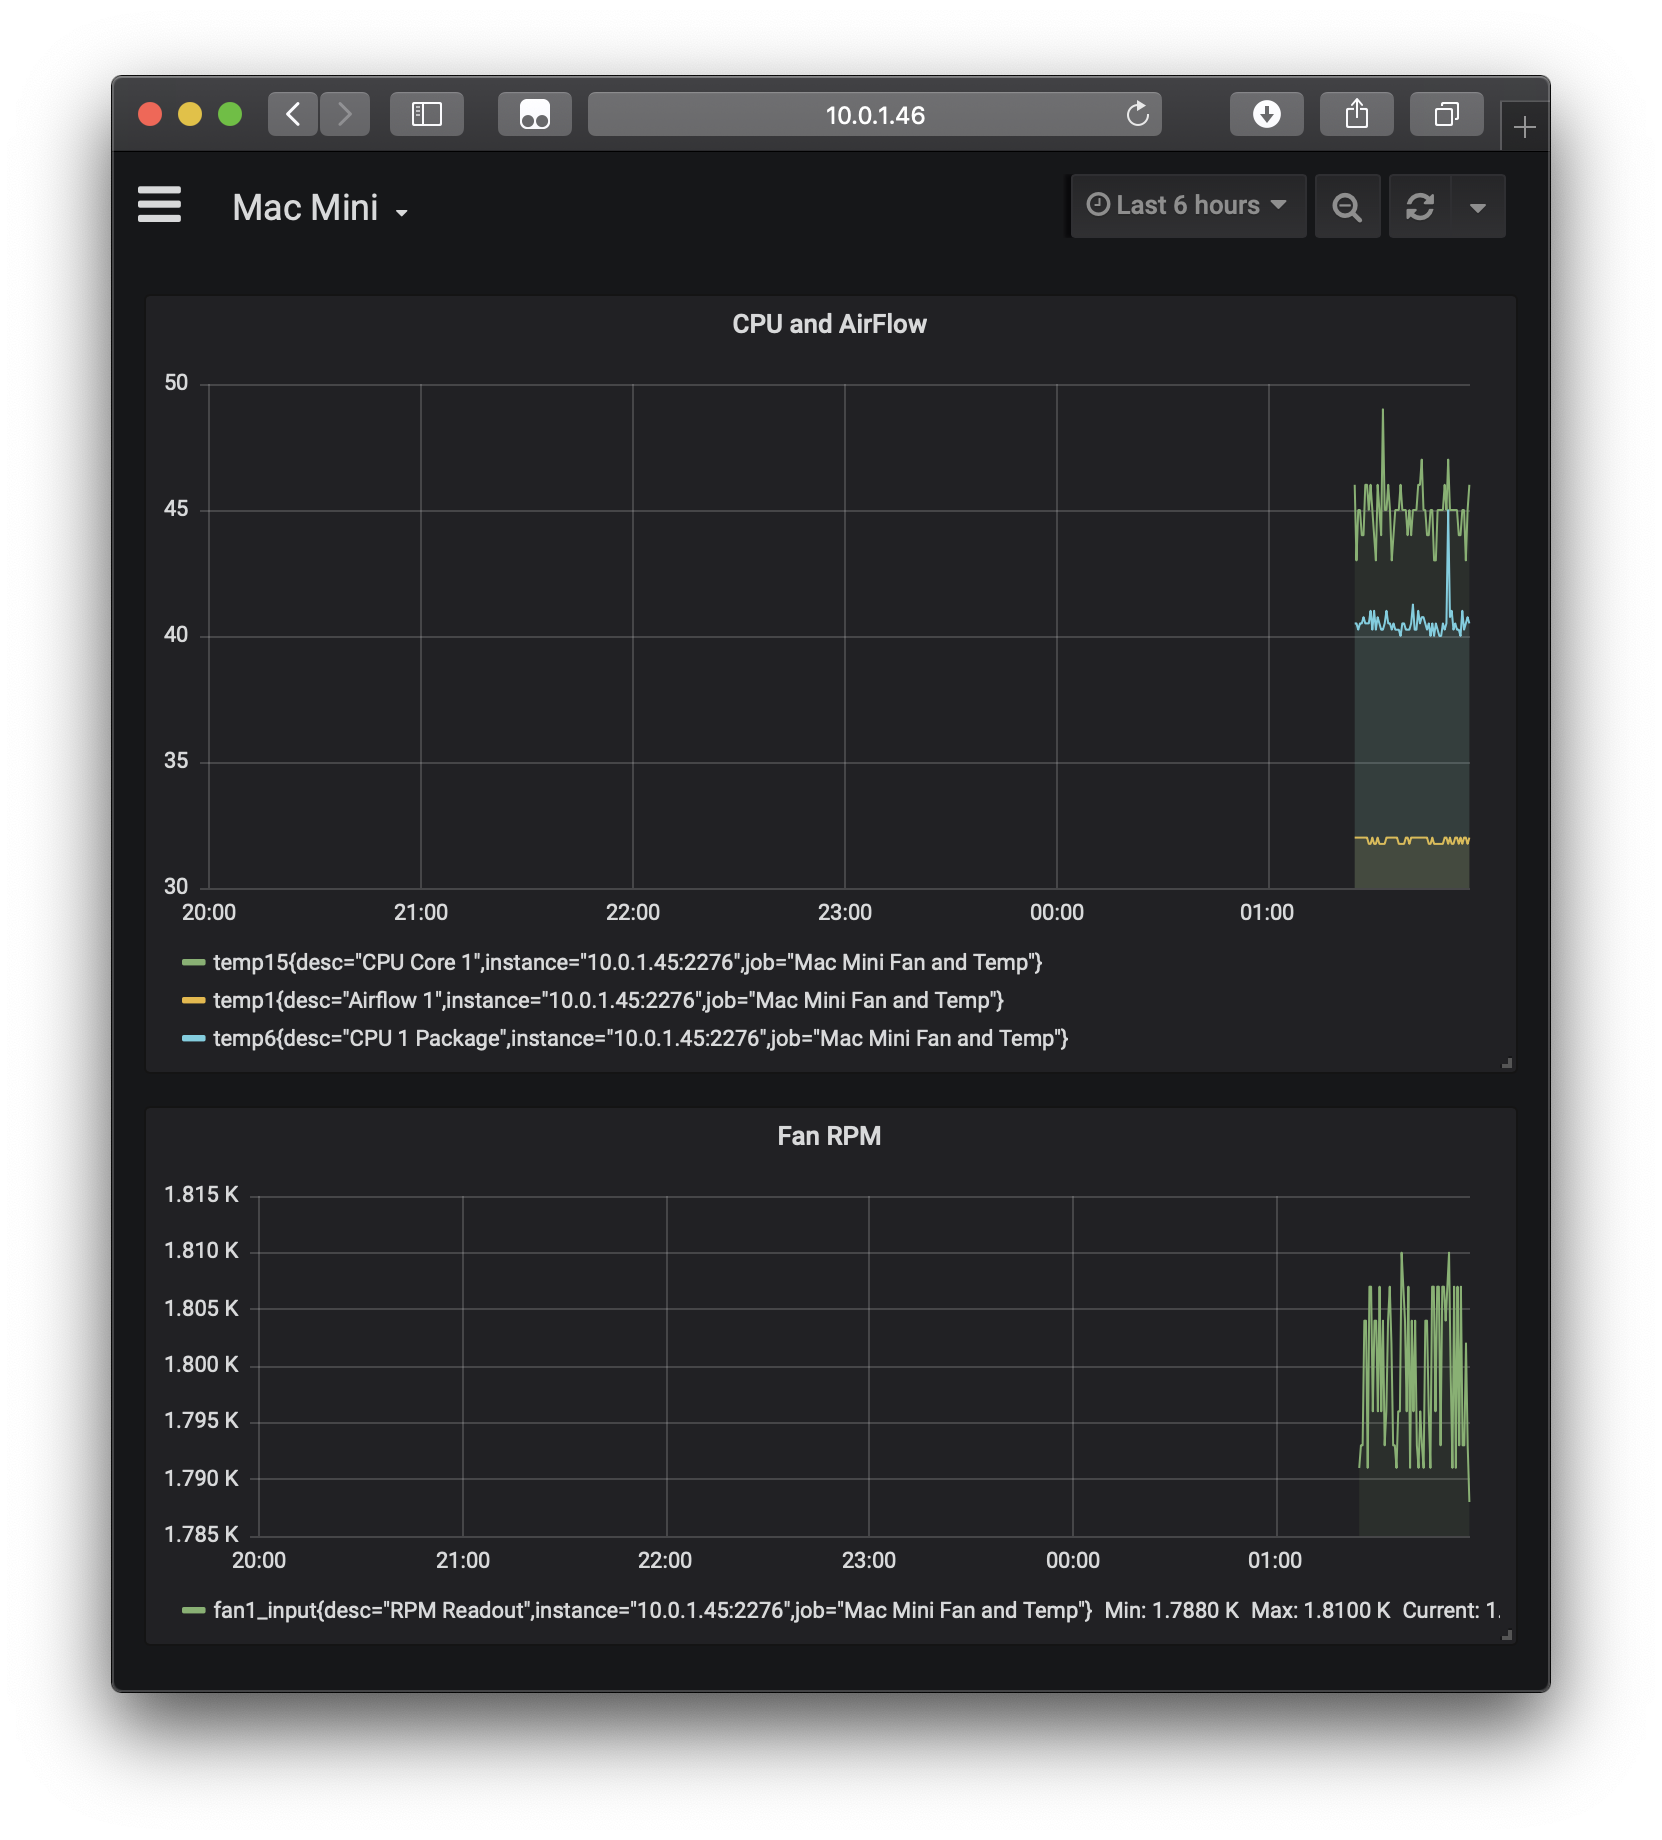
因為打算用 Raspberry Pi 4 做點別的專案,那麼軟路由透明代理的 workload 就交給 Mac Mini 好啦,再寫個程式手動控制一下 Mac Mini 的風扇轉速~這樣就不會因為 workload 比較大,然後晚上風扇轉速太高影響睡眠? 白天的時候倒是基本無所謂。測試的時候發現 3000-3300 RPM 幾乎聽不到聲音,同時也比最低速 1800 RPM 高出一截,不太會因為過熱而出現問題~(╹ڡ╹)

那麼名字就叫 Breezin 好啦(一邊聽彩彩的 Breezin' 一邊寫~

當然,僅僅說完成功能的話,Shell Script 都完全足夠,但是既然是正好在玩 Rust 的話,那就用 Rust 寫來玩玩吧(*^3^)

在 Mac Mini 上安裝了 Ubuntu 18.04 LTS 之後,SMC 報告的風扇和溫度等資訊都被對映在了 /sys/devices/platform/applesmc.768

➜ ~ ls /sys/devices/platform/applesmc.768/fan*
-r--r--r-- 1 root root 4096 12  3 14:52 /sys/devices/platform/applesmc.768/fan1_input
-r--r--r-- 1 root root 4096 12  3 14:52 /sys/devices/platform/applesmc.768/fan1_label
-rw-r--r-- 1 root root 4096 12  3 14:53 /sys/devices/platform/applesmc.768/fan1_manual
-r--r--r-- 1 root root 4096 12  3 14:52 /sys/devices/platform/applesmc.768/fan1_max
-rw-r--r-- 1 root root 4096 12  3 14:54 /sys/devices/platform/applesmc.768/fan1_min
-rw-r--r-- 1 root root 4096 12  3 14:53 /sys/devices/platform/applesmc.768/fan1_output
-r--r--r-- 1 root root 4096 12  3 14:52 /sys/devices/platform/applesmc.768/fan1_safe

這裡可以看到實際可寫入的只有 fan1_manual, fan1_minfan1_output

fan1_label 裡面儲存了風扇的名字。fan1_manual 實際上會被解釋成一個 Boolean 值,0 代表系統控制,1 代表手動設定。

fan1_min 是對應風扇的最低的 RPM,這個是我們可以控制的。相應的 fan1_max 則是最大轉速,但是不能限制風扇的最大轉速。

fan1_input 是表示當前風扇報告的 RPM,但是是一個只讀的量。fan1_output 表示需要對應風扇達到的 RPM,當 fan1_manual 的值為 1 時有效,否則寫入之後也會被系統覆蓋(即自動控制轉速)。

最後的 fan1_safe 看起來大概是該風扇的最低?安全轉速,然而雖然寫了可讀,實際測試的時候並不可讀(也許是 Ubuntu 下 SMC 驅動的問題?)。

➜ ~ cat /sys/devices/platform/applesmc.768/fan1_safe
cat: /sys/devices/platform/applesmc.768/fan1_safe: Invalid argument

在知道了這些對應的對映之後,想法就是在使用者請求資訊的時候,去 glob /sys/devices/platform/applesmc.768/fan*,然後做成 JSON 資料返回。在使用者設定的風扇轉速的時候,就寫入到對應的 output 裡面,並將 manual 設定為 1

於是設想就是做一個 HTTP API,假如 IP 是 10.0.1.2,服務執行在 2275 埠的話,那麼要做的就是如下 2 個 API

Continue reading 从零开始的 Rust 学习笔记(10) —— Breezin