Category Archives: Programming

Gambling Problem

The problem is described below:

For the match Limp Stoners vs Exmouth Breathers the two bookmakers A and C offer different odds,

Stoners WinDrawBreathers Win
A4/1 (5.00)3/1 (4.00)2/3 (1.67)
C3/1 (4.00)2/1 (3.00)1/1 (2.00)

You have £100. How do you have to place your bets in order to maximize guaranteed profit no matter what the outcome of the game?

Noticing,

  • One is allowed to put money on different outcomes simultaneously. So, you can bet £50 on Stoners and £20 on Draw at A, and £30 on Breathers at C.
  • The numbers for the odds mean that, for example, if you bet £1 on Stoners at BrokeLads you will get £5.00 back (your own £1 and £4 winning). The fraction format specifies how much you would win if you bet £1, the decimal format specifies how much you would get back if you bet £1 (so, it’s the same as the fraction + 1.
Continue reading Gambling Problem

Rust Learning from Zero (23) —— The OwO software distribution system!

Although I've written a SSL management and distribution system, rcert, but the here immediately goes another problem: I still need to manually deploy the rcert, which is kind of frustrating. Or I can write some shell scripts to make this process automatically. Let's solve this (possibly) once and for all.

I built a handy (perhaps also buggy) software distribution system this time. This main purpose is of course to ease out the deployment process. And I'd like to call it OwO, because this emoji looks so nice and cool. Moreover, it should be able to deploy itself once I have the initial instance ran.

Basically, it will serve these pages and API endpoints below (let's take owo.ryza.moe as its domain)

URLCategoryAuthNotes
Homehttps://owo.ryza.moe/WebpageNo
Admin https://owo.ryza.moe/adminWebpageYesadmin is customisable
Sign Inhttps://owo.ryza.moe/signinWebpage APINo
Sign Outhttps://owo.ryza.moe/signoutWebpage APINo
Compile-time Static Fileshttps://owo.ryza.moe/static/{filename}Web ResourcesYesThese files are compiled into the final binary
Feature Imagehttps://owo.ryza.moe/feature_img/{img}Web ResourcesNoFeature Image for Specific Project
Install Scripthttps://owo.ryza.moe/{name}/install.shWeb ResourcesNoInstall Script for Specific Project
Project Resourceshttps://owo.ryza.moe/{name}/resources/{resource_name}Web ResourcesNoResources for Specific Project
Update Project Infohttps://owo.ryza.moe/update-dist-infoAPI EndpointYesPost
Upload Project Resourcehttps://owo.ryza.moe/upload-dist-resourceAPI EndpointYesPost, one file per request
Get Raw Install Scripthttps://owo.ryza.moe/raw-scriptAPI EndpointYesGet
Remove Project for Versionhttps://owo.ryza.moe/remove-distAPI EndpointYesPost
Remove Project Resourcehttps://owo.ryza.moe/remove-dist-resourceAPI EndpointYesPost

Once I had decided these rules, the next question was which http server crate should I use. I considered hyper, but let's try something else this time. Thus OwO uses actix_web as its http server framework.

Apparently, OwO will output dynamic webpages, so it needs an HTML template engine. After some googling, I chose ructe as the template engine to render dynamic webpages for OwO.

And here is the result of 3 days' coding!

You can visit the live instance of my OwO at https://owo.ryza.moe. And the code goes here: https://magic.ryza.moe/ryza/owo

Rust Learning from Zero (22) —— SSL certificates management and distribution with Rust

Screenshot of rcert

Last night, I was planning to do some web development, and when I created my new VPS, I just felt like it was quite a tedious process either manually copying-pasting SSL certs around or deploying CertBot to allocate new ones for me. My life would be easier if there is some sort of SSL certificates management and distribution system.

Although I didn't really search these keywords on Google, I can promise that they definitely exist on the web. Nevertheless, I want to write one myself, because it has been such a long period since last time I wrote something in Rust.

Continue reading Rust Learning from Zero (22) —— SSL certificates management and distribution with Rust

Rust Learning from Zero (21) —— All I need is a dlsym | Exploit macOS application with Rust

It has been a long time since my last reverse engineering on macOS, and that was about Netease Cloud Music. 

But I always write that in Objective-C, perhaps I should try something different, let's say, Rust.

  1. Compile a .dylib that macOS recognises
  2. Build a Constructor Function that Invokes on dylib Loading
  3. All I need is a dlsym
    1. Find the Symbol You Want
    2. Casting to Function Pointer
  4. Compile and Hook

1. Compile a .dylib that macOS recognises

The first step is to tell cargo that what we need is a library

cargo new --lib exploit

And cargo will create these files for us.

exploit
├── Cargo.toml
└── src
    └── lib.rs

However, if we compile this project, the output library has a suffix .rlib. which suggests that this is a Rust library. Yet we need a dylib that macOS recognises.

Therefore the hint for producing a .dylib library should be added in Cargo.toml, which is shown below.

[lib]
crate-type = ["dylib"]

This tells cargo out crate type is a dylib, which satisfies the format requirements of macOS dynamic library.

Continue reading Rust Learning from Zero (21) —— All I need is a dlsym | Exploit macOS application with Rust

WebP Server in Rust

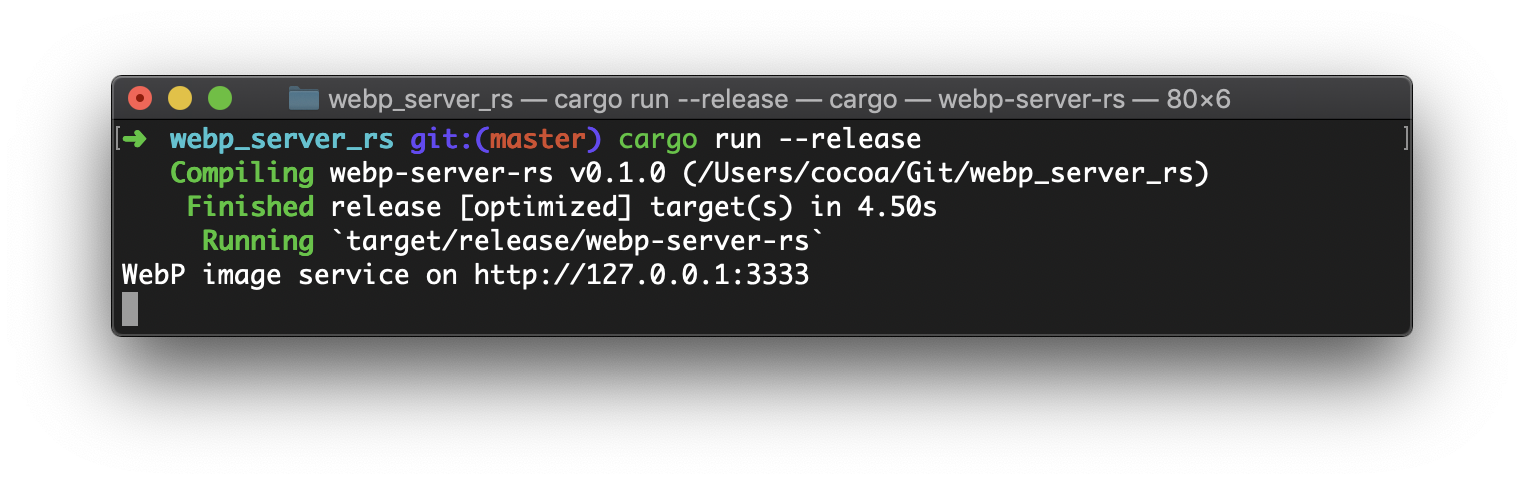
Generate WebP images for JPG / PNG files on-the-fly with Rust! webp_server_rs

Speaking of switching to WebP image, at the first glance, I just did it in a very naive approach.

Then @Nova wrote a Node.JS server that can serve JPG/PNGs as WebP format on-the-fly. You can find that at n0vad3v/webp_server.

A few days ago, @Nova and @Benny rewrite the WebP Server in Golang, webp-sh/webp_server_go

And that looks really promising, the size of the webp server, according to its description, had greatly reduced from 43 MB to 15 MB, and it is a single binary instead of webp_server with node_modules.

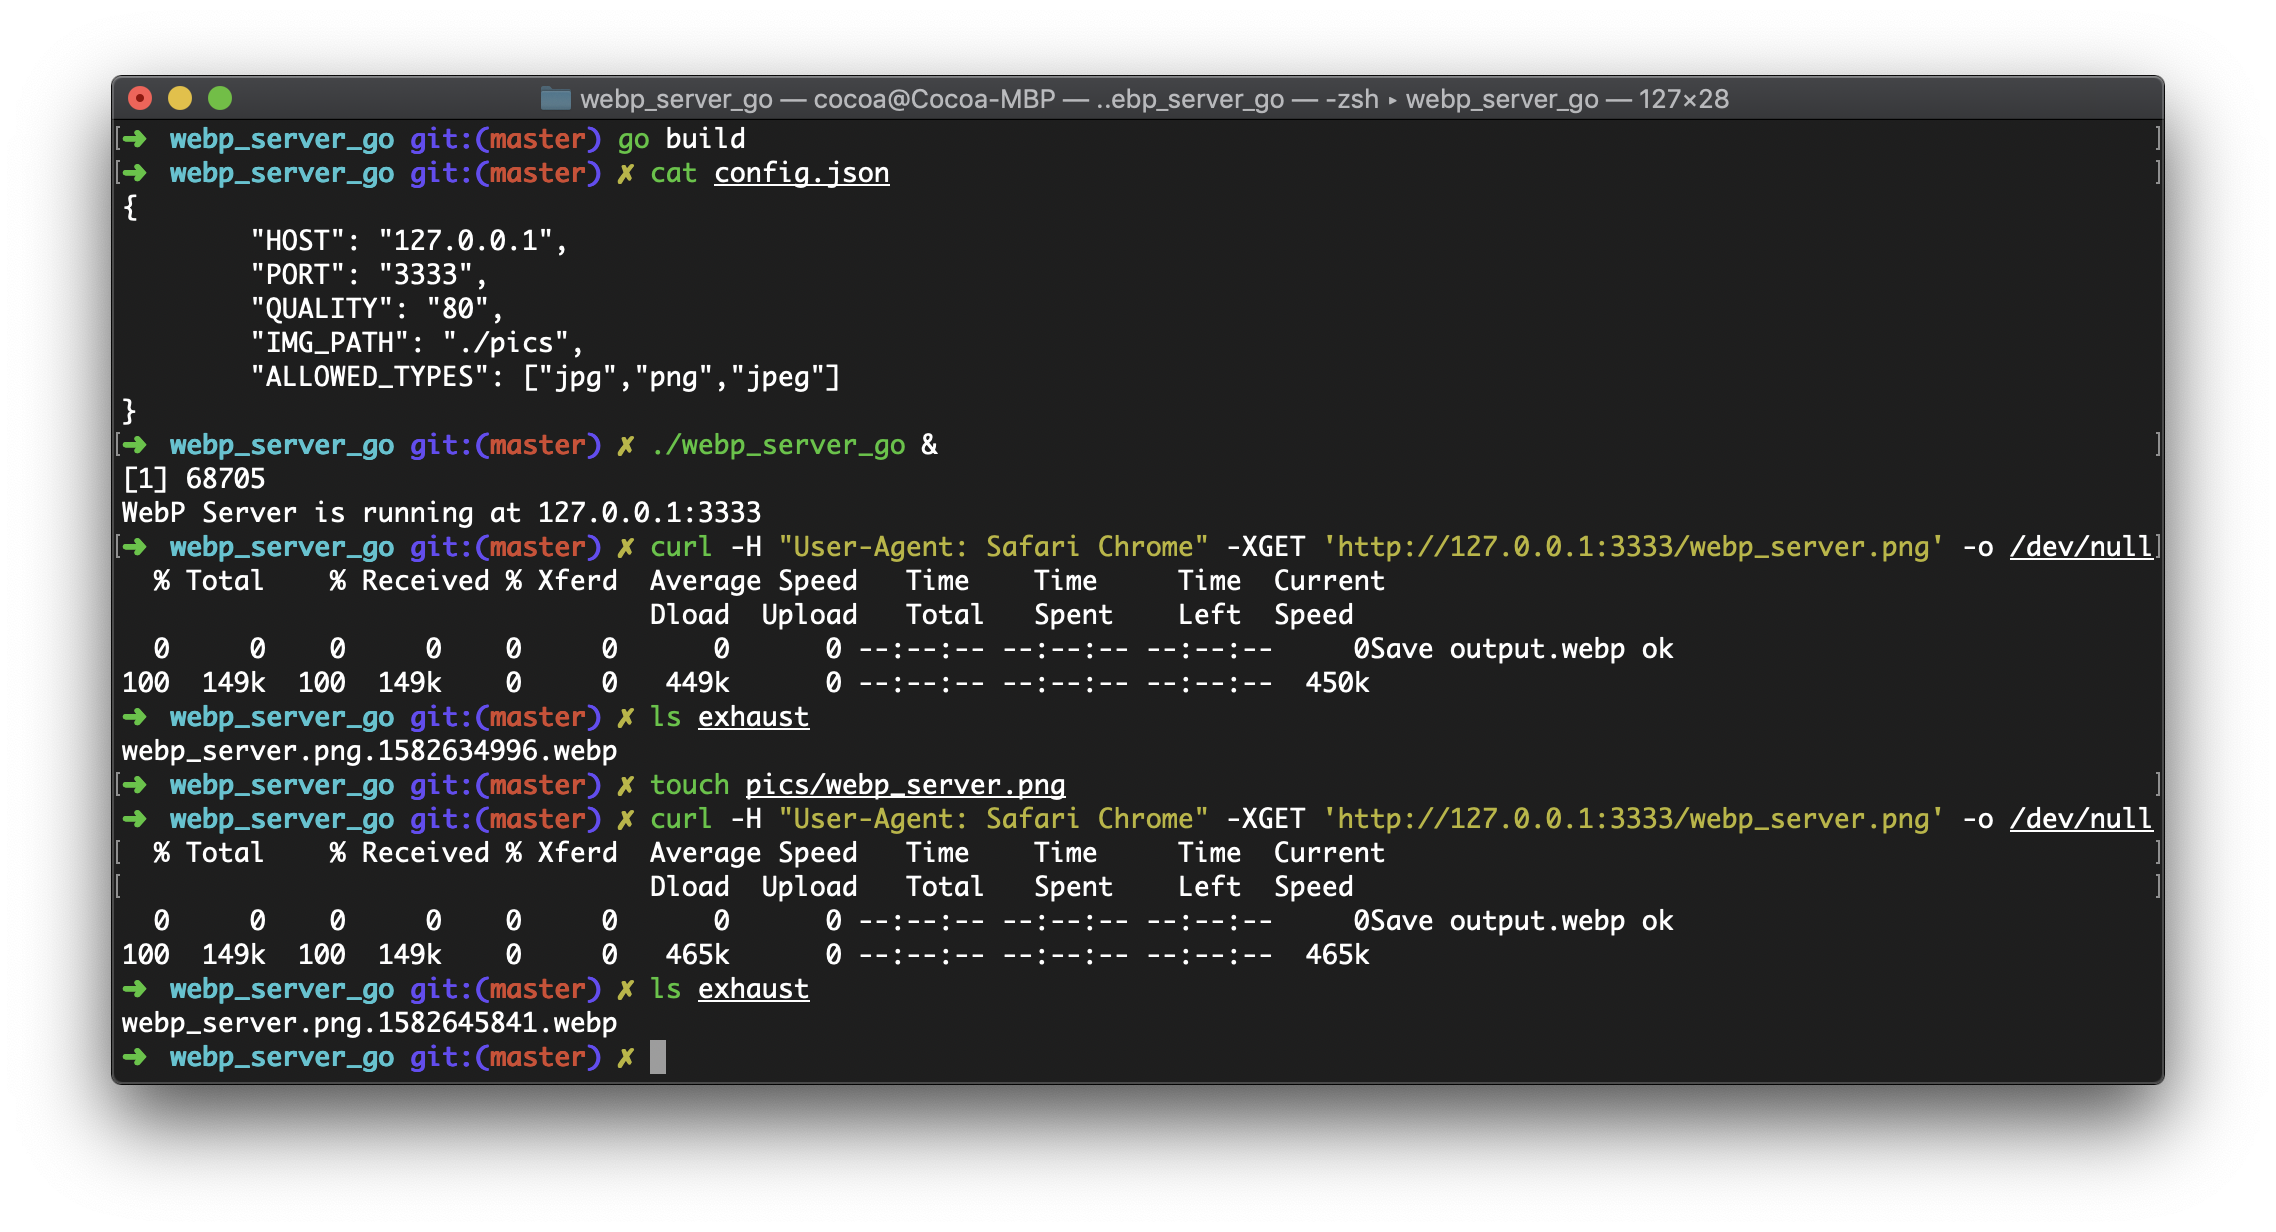
I cloned that project and added a tiny feature. However, I just found that although it is absolutely easy to implement the tiny feature, there is a potential design issue with the `fasthttp` module. In order to get everything work, it took me about 4 hours to debug on it.

Finally, it turned out to be a pointer of an internal variable (ctx.Request.uri, or so) was directly returned from ctx.Path(), and if users invoke ctx.SendFile(filepath), the ctx.Request.uri will be set to filepath, which will also propagate to all variables that hold the shared value of ctx.Path(). You may visit my previous blog post for details.

Well, in aforementioned blog post, I said that it would be better if it was written in Rust. Now, let's make it come true and push the WebP server even further.

There are some comparisons among n0vad3v/webp_server, webp-sh/webp_server_go and webp_server_rs.

As for size,

  • webp_server(nodejs) with node_modules takes 43 MB
  • webp-server(go) has reduced to 15 MB, and it's single binary
  • webp-server(Rust) pushes that even further, only 3.6 MB on macOS and 6.4 MB on Linux

In terms of convenience, you can just download the binary file and run if you choose either webp-server(go) or webp-server(Rust). However, webp_server(nodejs) requires pm2 to run.

Performance, to be honest, I haven't got time to run some benchmarks on them. But IMHO it (webp-server(Rust)) should be as fast as golang version.

记 Golang 下遇到的一回「毫无由头」的内存更改

前两天看到 @Nova Kwok@BennyThink 做了一个 WebP Server,于是 clone 下来玩了一下,发现貌似没有做“原始图像更新后,重新生成相应的 WebP 图像”的功能。好的,这个说起来简单,做起来也很简单,就是 os.Stat 一下,然后取到图像最后修改时间的 UNIX timstamp,STAT.ModTime().Unix(),最后再跟先前生成好的 WebP 文件名比较一下就好(timestamp 会放在生成的 WebP 文件名里)。

上面为止真的都很简单,在 macOS 上测试了一下,看起来没问题~于是就提交 Pull Request

然而 Nova 告诉我说,

Nice PR, but there seems a little problem that the older converted images are not deleted after the change of the original image, this might cause a possible leakage of the original one's content.

显然我是一头雾水,一开始还以为自己提交 PR 的时候是不是手滑删掉了几行,检查了一下之后发现并没有!然后姑且先把 macOS 上测试的截图 comment 在了 PR 下面。

接着我估计 Nova 应该是在 Linux 下跑的测试,于是就在一台新的 VPS 上安装了 go,把我 fork 且修改过的那份代码 clone 在 VPS 里测试。本来我预估的时候要么是我搞错了文件,要么也许是 Nova 不小心用了以前编译好的文件。然后一测试我就惊了,居然真的没有删除以前生成的 WebP 图像 Σ(・□・;)?!

由于没有 Linux 机器,也懒得安装虚拟机了,只能一头雾水的在 VPS 用 fmt.Println 输出来简易 debug 了。根据 fmt.Println 的输出,发现 ImgName 不知道为什么就突然之间被改了!

[1]ImgName: webp_server.png
[2]ImgName: webp_server.png
[3]ImgName: webp_server.png
[4]ImgName: webp_server.png
[5]ImgName: root/webp_serve

上面是在 5 处不同的地方 fmt.Println("ImgName", ImgName) 的输出,虽然我放了这么多,但是实际上在代码里 ImgName 在其作用域内只有过一次赋值,

ImgPath := c.Path()
// ... 略去 10 行左右判断文件扩展名的代码
ImgName := path.Base(ImgPath)

然后就没写过了,仅有读的操作,没有任何赋值,中间只有一次被用来当作 Sprintf 的一个参数

WebpImgPath := fmt.Sprintf("%s/%s.%d.webp", DirPath, ImgName, ModifiedTime)

但显然这个也不会更改 ImgName 的内存嘛。“这不科学!” 虽然想这么叫出来,但是想想这个肯定还是有原因的!

Continue reading 记 Golang 下遇到的一回「毫无由头」的内存更改

从零开始的 Rust 学习笔记(19) —— Rewrite insert_dylib in Rust

最近鹹魚了蠻長一段時間,發現大約有一個多月沒有寫這個系列了,今天繼續學習 Rust 好啦!雖然有在看「The Rust Programming Language」,但是還是得寫寫的~想了一會兒之後,決定把在「另一种方法获取 macOS 网易云音乐的正在播放」裡用過的 insert_dylib 用 Rust 重寫一下(^O^)/

insert_dylib 本身來說並不複雜,但因為不像 C/C++/Objective-C 裡那樣可以直接 #import <mach-o/loader.h> 等,於是 MachO 的一些 struct 就需要自己在 Rust 中重寫一遍~

當然,實際上也可以用 Rust 寫個 Parser,然後去 parse 這些 header 文件,並且自動生成 Rust 的 struct。可是我太懶了,留到下次試試看好啦(咕咕咕) 這次的就放在 GitHub 上了,insert_dylib_rs

不過需要注意的就是有個 BigEndian 和 LittleEndian 的問題,不同的 MachO 使用的可能不一樣,因此就增加了一個 swap_bytes! 的 macro 和一個 FixMachOStructEndian 的 trait

src/macho/macho.rs 裡隨機選一個 struct 出來展示的話,大約就是如下這樣子

use super::prelude::*;

macro_rules! swap_bytes {
    ($self:ident, $field_name:ident) => {
        $self.$field_name = $self.$field_name.swap_bytes();
    };
}

pub trait FixMachOStructEndian {
    fn fix_endian(&mut self);
}

#[derive(Debug)]
pub struct SymtabCommand {
    pub cmd: u32,
    pub cmdsize: u32,
    pub symoff: u32,
    pub nsyms: u32,
    pub stroff: u32,
    pub strsize: u32,
}

impl SymtabCommand {
    pub fn from(buffer: [u8; 24], is_little_endian: bool) -> SymtabCommand {
        let sc_buffer: [u32; 6] =
            unsafe { std::mem::transmute_copy::<[u8; 24], [u32; 6]>(&buffer) };
        let mut symtab_command = SymtabCommand {
            cmd: sc_buffer[0],
            cmdsize: sc_buffer[1],
            symoff: sc_buffer[2],
            nsyms: sc_buffer[3],
            stroff: sc_buffer[4],
            strsize: sc_buffer[5],
        };

        if is_little_endian {
            symtab_command.fix_endian();
        }

        symtab_command
    }

    pub fn to_u8(&self) -> [u8; 24] {
        let mut data: [u32; 6] = [0u32; 6];
        data[0] = self.cmd;
        data[1] = self.cmdsize;
        data[2] = self.symoff;
        data[3] = self.nsyms;
        data[4] = self.stroff;
        data[5] = self.strsize;

        unsafe { std::mem::transmute_copy::<[u32; 6], [u8; 24]>(&data) }
    }
}

impl FixMachOStructEndian for SymtabCommand {
    fn fix_endian(&mut self) {
        swap_bytes!(self, cmd);
        swap_bytes!(self, cmdsize);
        swap_bytes!(self, symoff);
        swap_bytes!(self, nsyms);
        swap_bytes!(self, stroff);
        swap_bytes!(self, strsize);
    }
}
Continue reading 从零开始的 Rust 学习笔记(19) —— Rewrite insert_dylib in Rust

另一种方法获取 macOS 网易云音乐的正在播放

虽然标题里面写的是“另一种”,但是先前的方法其实不是我写的?而是来自可爱少女 Makito 的两篇 post ——

于是就看到了直接从 Mach 内核入手的方法,是賢い、かわいい Makito~!不过今天跑去 clone 代码下来尝试的时候似乎会 crash 的样子,毕竟距离上次 update 代码也过去了 9 个月左右了,猜想可能是网易云音乐有所修改导致(在我用别的方法尝试的时候,也是莫名 crash 了)

于是这里就写一个另一种获取 macOS 网易云音乐的正在播放的方法吧~

Continue reading 另一种方法获取 macOS 网易云音乐的正在播放

从零开始的 Rust 学习笔记(18) —— Rust Script Runner

Rust 并不能像 Python 那样有全局的 Package(当然,现在就算是写 Python,也很少有谁一上来就往全局环境里安装 Package 了),于是 Rust 要想单独运行一个引用了第三方库的 Rust script 时,就必须用 Cargo 创建一个 project。

绝大多数时候这个倒也是能接受啦,但是有时真的只是想在一边测试一个小的 function 或者验证一下自己的想法。如果直接在 working-in-progress 的 project 里写的话,就可能

  1. 不得不配合已有的部分做一些 error handling
  2. 或者手工测试到该条代码路径上
  3. 又或者写上相应的 unit test

显然只是想快速验证一下的话,上面三种方式都有不便之处。如果单独再用 cargo new 一个 project 的话,也不是不行,但是懒(

在用 Code Runner(对你来说也许是 VSCode 之类的)的时候,直接新建一个 Rust file 开始写会相对方便。假如我们的 Rust script 叫 example.rs,那么要引入第三方 crate 的话,比如引用 regex,我们可以用这样的语法,

// cargo-deps: regex="1"

如果要控制 crate 的 feature 之类的,则可以写

// cargo-deps: opencv = {version = "0.28", default-features = false, features = ["opencv-41", "contrib"]}

虽然并不能实现 Python 那样的全局 package,但是我们可以用代码扫描 exmaple.rs 里面所有的 // cargo-deps: {:dependency},然后自动生成一个 example 目录和相应的 Cargo.toml 文件,接着将 example.rs 文件复制到 example/src/main.rs, 最后自动调用 cargo run

Continue reading 从零开始的 Rust 学习笔记(18) —— Rust Script Runner

从零开始的 Rust 学习笔记(17) —— 做一个提问箱 Boxy ?

于是我自己的提问箱就是 https://ask.[data deleted]

源代码在这里 #/boxy ?(给大家表演如何用一个项目气死你写前端和 Rust 的朋友(x

回答是人工的,并不是人工智能?(不过感觉加上人工智能的话似乎也蛮好玩诶!

然后因为是模仿 peing 或者 sarahah 那样的匿名的提问箱,所以这个截图里就差不多是后台了~既然说是匿名的话,那就是真匿名~除了记录了提问时间,IP 只用来做了速度限制,没扔数据库。Question 在 MongoDB 里的模型则是

{ 
    "_id" : ObjectId("5e0a0ca0001cd1ea00876f2e"), 
    "question" : "What's this?", 
    "question_time" : NumberLong(1577716896), 
    "answer" : "It's a question box!", 
    "answer_time" : NumberLong(1577716906), 
    "id" : NumberLong(0) 
}

箱子的 owner 登录之后,直接点击答案的部分就进入编辑 / 回答模式,然后也可以删除提问什么的~

代码里倒是 Web 和纯 API 方式都实现了~然后回答之后自动生成 Twitter 卡片什么的还没有做_(:3」∠)_

再从技术层面上来说的话,这个项目用 Rust 上的 Hyper 作为 HTTP 服务器,然后数据库使用了 MongoDB,考虑到是作为单一用户的提问箱,因此用户名和密码是需要写在 boxy.json 里的~当然放进数据库里的是密码加盐后再 HMAC + SHA512 过的

stored_password = HMACSHA512(password + password_salt, password_salt)
{
    "_id" : ObjectId("5e09a250004b7da70096e3dc"),
    "user" : "ryza",
    "password" : "xxxxxxxxxxxxxxxxxxxxxxxxxxxxxxxxxxxxxxxxxxxxxxxxxxxxxxxxxxxxxxxxxxxxxxxxxxxxxxxxxxxxxxxxxxxxxxxxxxxxxxxxxxxxxxxxxxxxxxxxxxxxxxxx"
}

Web 界面和后端做了分离,我自己写了一个简单的~因此就直接手写了,没有用到现在前端流行的 Vue 或者 Angular 之类的框架。访问后端的 API 也是直接用的 jQuery 的 AJAX 模块。

登录之后会返回一个 token,包含了有效期,默认是 365 天,保存在了浏览器的 localStorage 里。登出的时候会自动清掉,但不是关闭页面 / 浏览器自动清除,所以在公用电脑上要记得登出~

那么下面是目前有的一些 API~ 以 http://localhost:5534 为例子!

Continue reading 从零开始的 Rust 学习笔记(17) —— 做一个提问箱 Boxy ?