Category Archives: Raspberry Pi

PicoBf: A brainf**k lang REPL environment for Pico Pi

こんぺこ〜こんぺこ〜こんぺこ!

I heard that Pico Pi @Raspberry_Pi only has MicroPython REPL at the moment, so I had some fun writing a brainf**k REPL in C++17 for Pico Pi XDDDDD (btw, the output image is also written in bf lang!)

The brainf**k interpreter is adapted from a previous project, you can find it in this post, Brainfuck Interpreter in C++17——A Modern Approach to Kill Your Brain.

Source code on GitHub, https://github.com/BlueCocoa/pico-bf

Hardware UART communication between Raspberry Pi 4 and Arduino Micro

作りましょう 作りましょう

あなたと私の世界をさぁ作りましょう

始めましょう 始めましょう

なにから始めましょう(ん~!?)

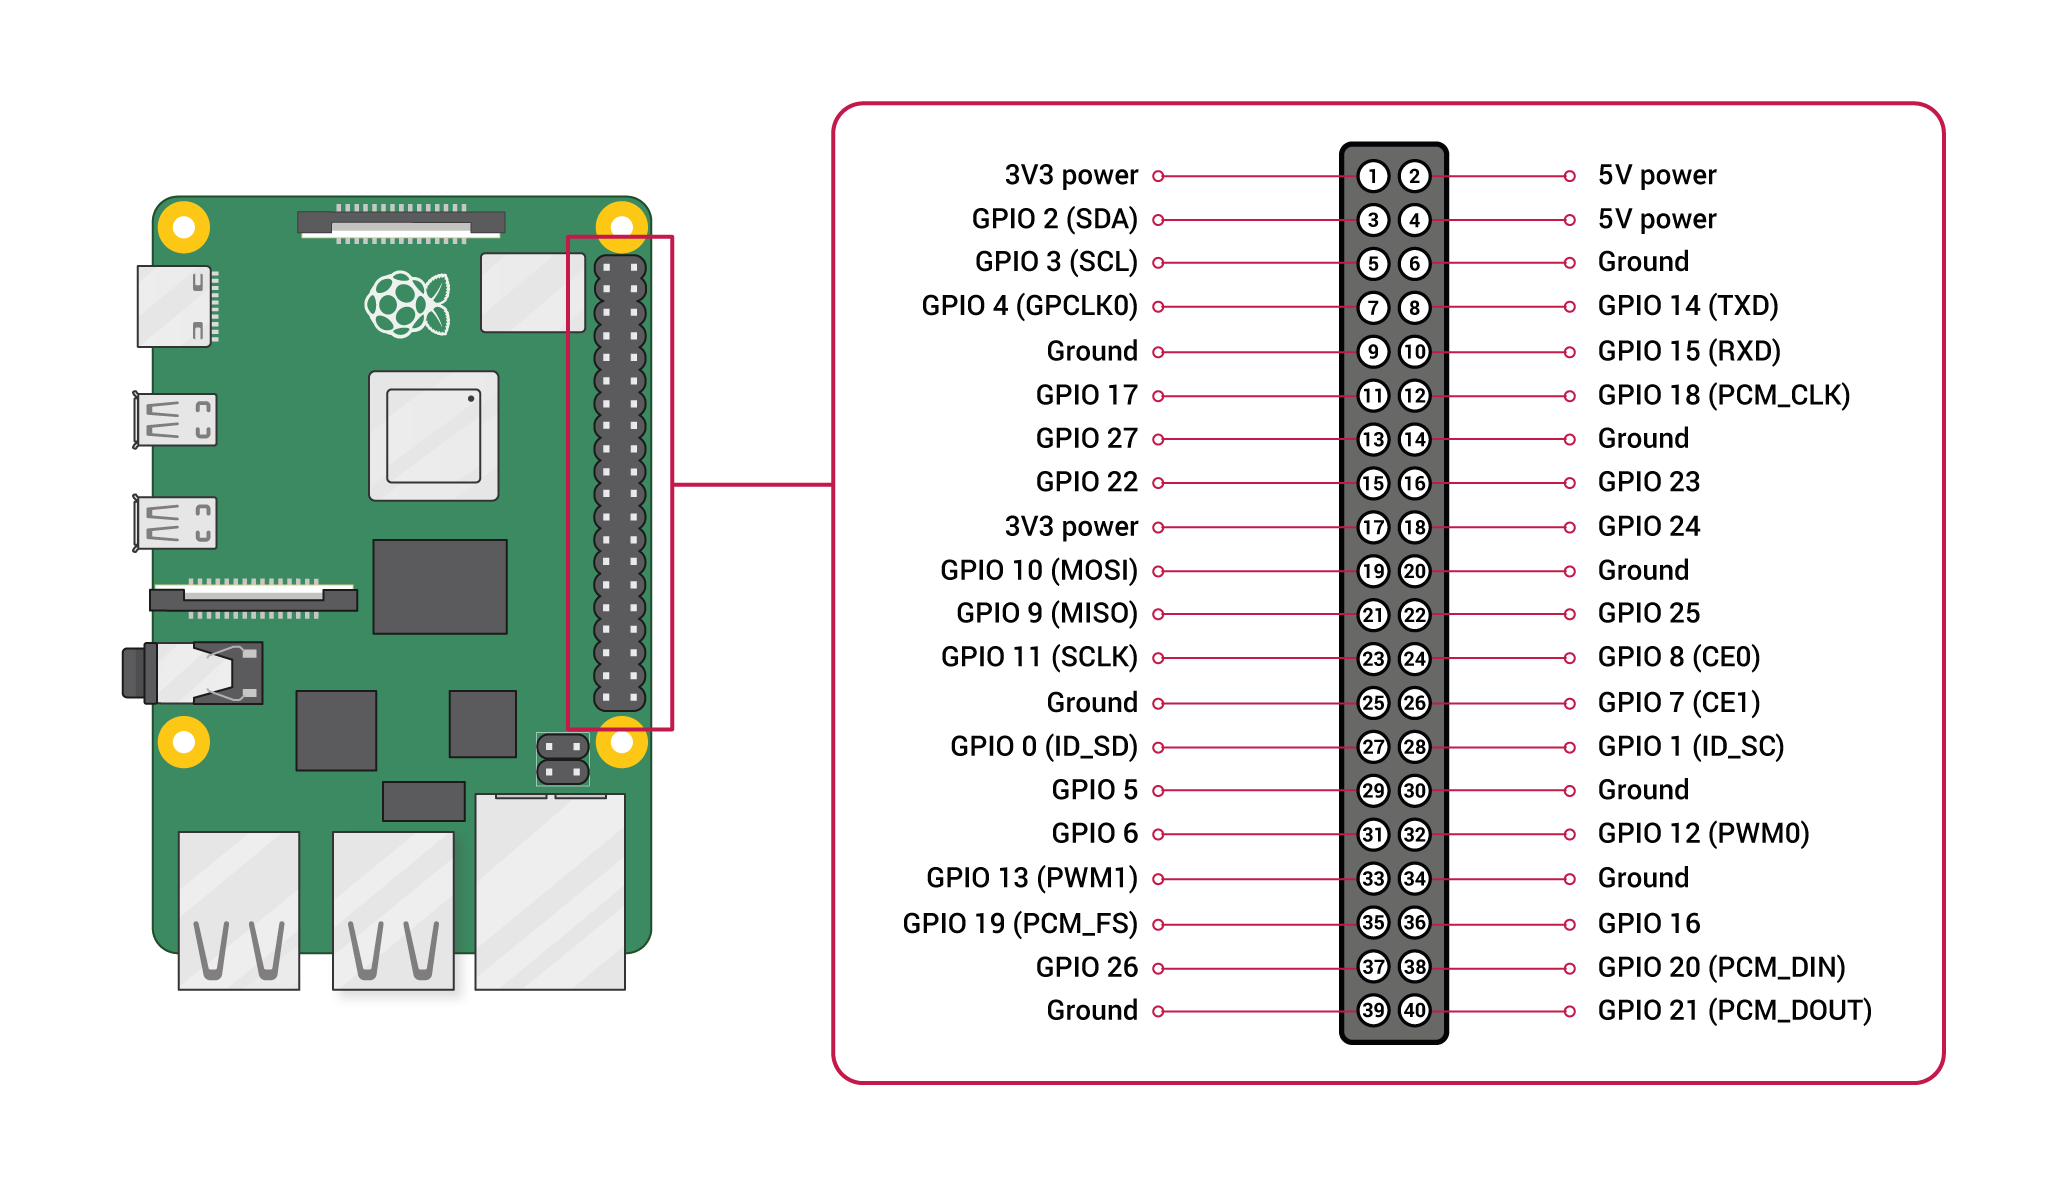
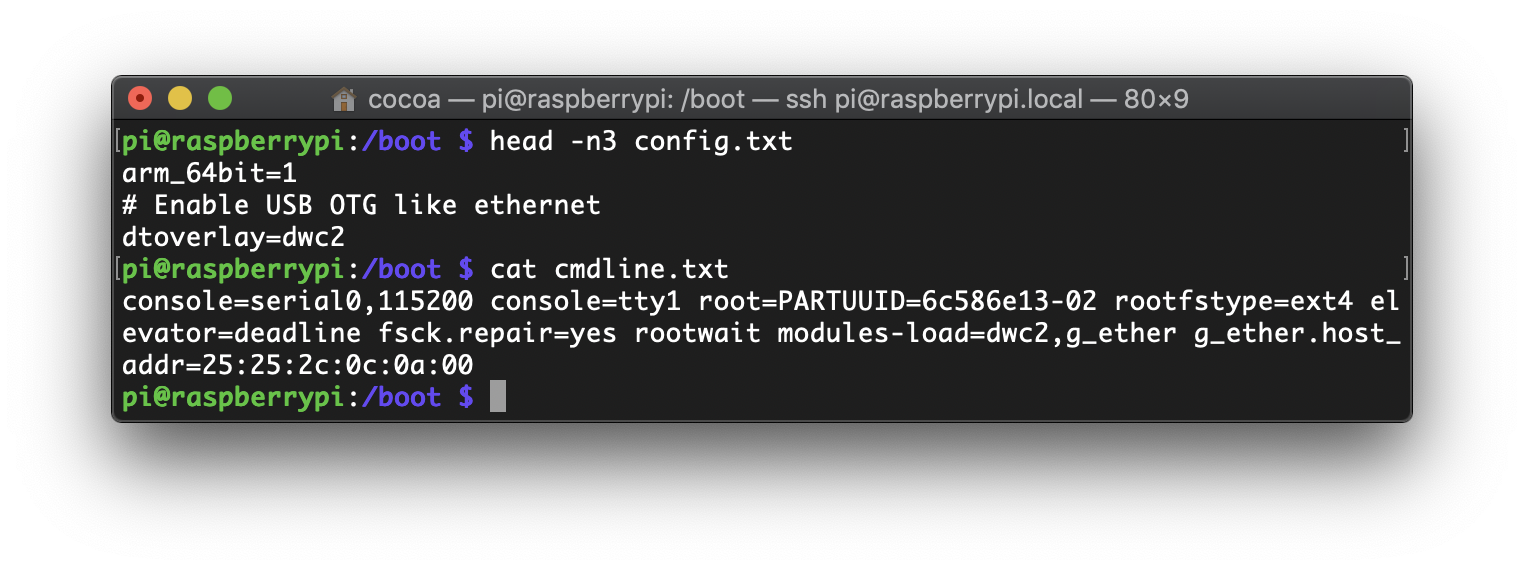
OK, let's start from communicating between Raspberry Pi 4 and Arduino Micro with hardware UART. For Raspberry Pi, GPIO pin 14 and 15 are the TX and RX pin of UART correspondingly.

1. Physical Connection

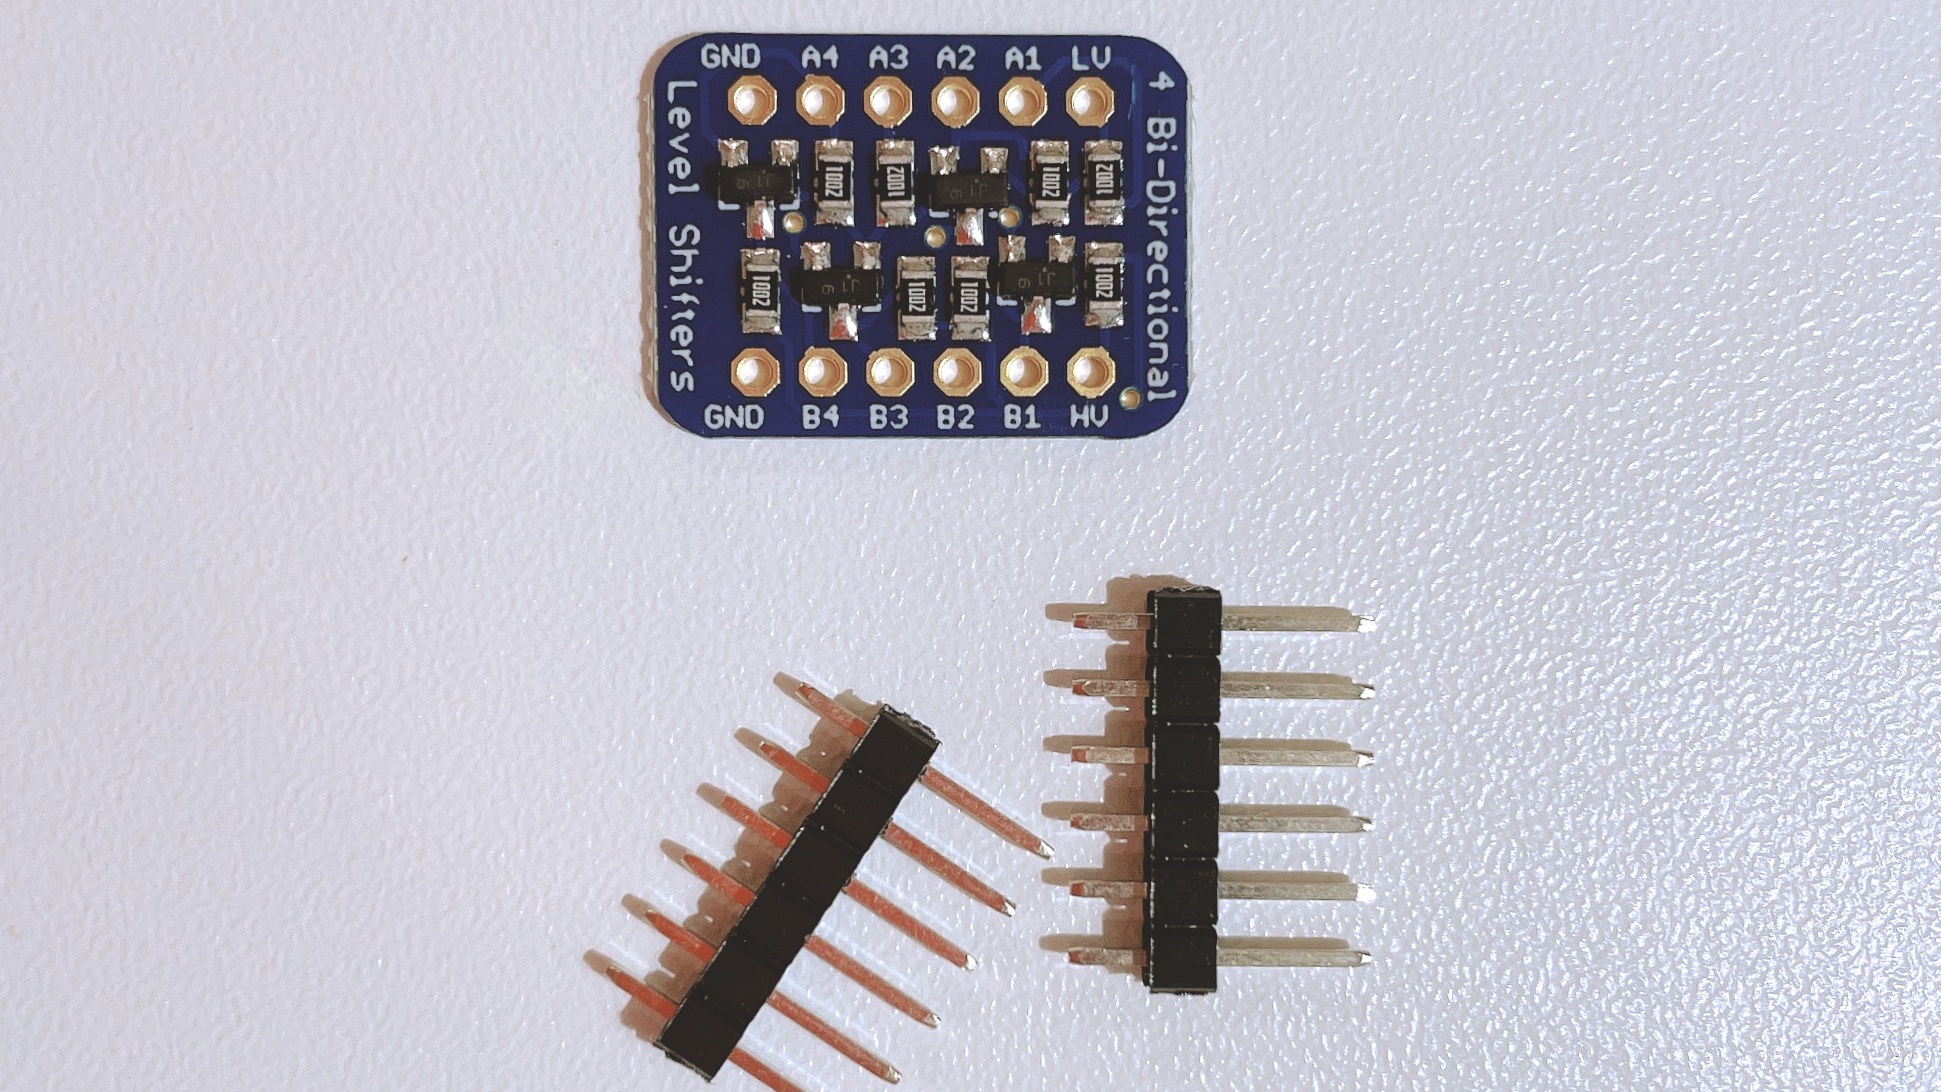
The first thing to note is that all GPIO pins on Raspberry Pi are 3.3v tolerance and Arduino Micro runs at 5v. If we connect Raspberry Pi with Arduino Micro directly, chances are that your Raspberry Pi can be damaged. Thus we need a bi-directional logic level converter.

But unfortunately, the one I brought came with separate headers that I needed to solder them onto the converter board by myself.

Well, the solder work may look just so so, but it works. That's what matters most. XD

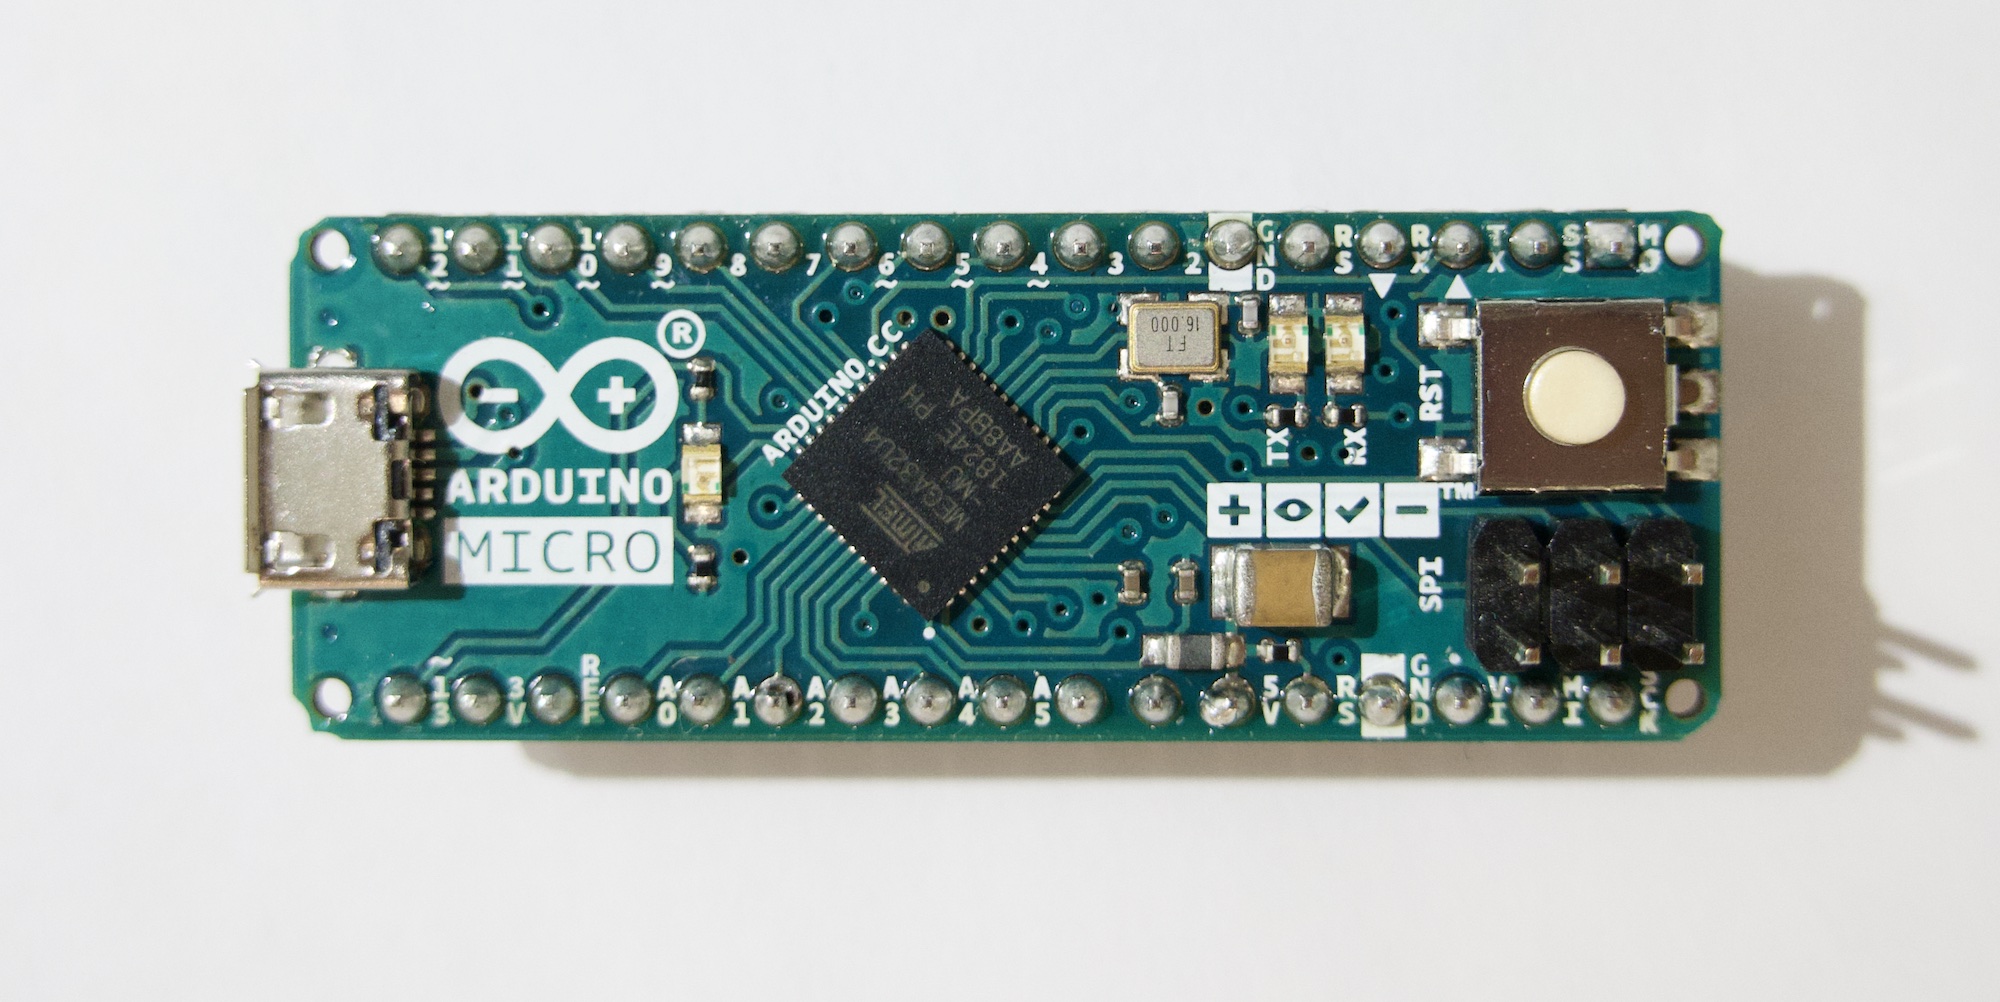
The image below is my Arduino Micro and we can see that from right to left on the top bank, the third and fourth pin are the TX and RX pin.

Next, we need to connect them as the image demonstrates below.

Now we have done the physical part, time to move on to the software part.

Continue reading Hardware UART communication between Raspberry Pi 4 and Arduino Micro

iPad 与 Raspberry Pi 4 通过 Type-C 直连 —— NAT 篇

在前两篇 post 中(iPad 与 Raspberry Pi 4 通过 Type-C 直连 —— SSH 篇iPad 与 Raspberry Pi 4 通过 Type-C 直连 —— VNC 篇),虽然 SSH 和 VNC 都可以愉快的工作,Raspberry Pi 也可以正常的用 Wi-Fi 上网。然而!(゚o゚;;

iPad 在连接有线以太网之后就默认所有的通信都走以太网了;同时,在默认设置下,Raspberry Pi 也并不会帮 iPad 做网络转发,因此还需要再单独设置一下 Raspberry Pi 上的 NAT,做到 iPad ⇆ Type C ⇆ Pi (usb0) ⇆ Pi (wlan0)

哎,不就是 iptables 和 NAT 嘛,去 pick up 一下,现学现卖hhhhhhhh╮(╯▽╰)╭

Continue reading iPad 与 Raspberry Pi 4 通过 Type-C 直连 —— NAT 篇

iPad 与 Raspberry Pi 4 通过 Type-C 直连 —— VNC 篇

上一篇折腾的时候其实只是提了一下,理论上直连之后还可以用 VNC,于是今天来实际实验一下 VNC 2333333

在完成上一篇的操作之后,已经可以直接在 iPad 上直连 Raspberry Pi 了,要加上 VNC 的话,需要如下步骤~

  1. 打开 VNC 功能
  2. 手动设定分辨率 (Optional)
  3. 设置 Raspberry Pi 默认启动到桌面
  4. 在 iPad 上使用 VNC 接连 Raspberry Pi
  5. 设置 Raspberry Pi 默认使用 Wi-Fi / Ethernet 连接网络
Continue reading iPad 与 Raspberry Pi 4 通过 Type-C 直连 —— VNC 篇

iPad 与 Raspberry Pi 4 通过 Type-C 直连 —— SSH 篇

因为 Raspberry Pi 4 现在有了 Type-C 线,并且它的 Type-C 接口不仅仅是供电,还包括了 OTG 功能,此外还支持 Etherne。于是想法就是 Raspberry Pi 4 ⇆ Type C ⇆ iPad,一根线解决供电与数据的问题~ (⁎⁍̴̛ᴗ⁍̴̛⁎)

要打开 Raspberry Pi 的 OTG 功能倒是很简单,先是修改 /boot/config.txt,在新的行里加上

# Enable USB OTG like ethernet
dtoverlay=dwc2

然后是 /boot/cmdline.txt,这个则是直接加在 rootwait 的后面,当然,rootwait 和我们增加的内容之间是有一个空格的~

modules-load=dwc2,g_ether g_ether.host_addr=25:25:2c:0c:0a:00

这两个文件编辑完之后大概如下~

接下来的话,则是需要手动设置一下 Raspberry Pi 上的 IP,如果你的电脑可以直接读写 Micro SD 卡上的 rootfs 分区的话,那么就可以直接编辑 /etc/dhcpcd.conf 这个文件;否则的话,就按老方法 SSH 到 Raspberry Pi 上编辑 /etc/dhcpcd.conf

这里我们需要配置的是 usb0 这个接口上的 IP。不过 iPad 似乎不能作为 Router,所以就让 Raspberry Pi 当 Router 好啦。在 /etc/dhcpcd.conf 这个文件里新增如下内容,给 usb0 接口设置一个静态 IP

interface usb0
static ip_address=10.42.0.1/24
static routers=10.42.0.1
Continue reading iPad 与 Raspberry Pi 4 通过 Type-C 直连 —— SSH 篇

在 Raspberry Pi 4 上部署 Apache 2 + PHP 7 + MongoDB

在前面几天终于把 64-bit MongoDB Server 折腾编译好之后,现在就可以在 Raspberry Pi 上部署 Apache 2 + PHP 7 + MongoDB 的环境了~

编译和安装可以参考之前两篇post~在 Raspberry Pi 4 上编译 64-bit 的 MongoDB Server在 Raspberry Pi 上安装 64-bit MongoDB Server 服务

那么现在就是接着在上次的 chroot 环境里部署 Apache 2 + PHP 7,以及 PHP 的 MongoDB 接口~

  1. 安装 Apache 2 与设置 Systemd Service 启动 chroot 环境下的 Apache 2
  2. 安装 PHP 7 与编译设置 PHP MongoDB 扩展
Continue reading 在 Raspberry Pi 4 上部署 Apache 2 + PHP 7 + MongoDB

在 Raspberry Pi 4 上安装 64-bit MongoDB Server 服务

啊,算是这个大坑的最后一篇了吧

前一篇是关于编译的,在 Raspberry Pi 4 上安装 64-bit MongoDB Server 服务

那么在编译完之后,就是安装这个服务了~由于编译时绝大部分是静态链接的,因此上一篇编译出来之后,MongoDB Server r4.2.1 的体积在 2.2GB 左右,emmmmm,有点大。。总之,因为几乎都是静态链接,所以可以做个清洁安装~

Continue reading 在 Raspberry Pi 4 上安装 64-bit MongoDB Server 服务

在 Raspberry Pi 4 上编译 64-bit 的 MongoDB Server

上次编译了 MongoDB 的 Embedded 版本,不过官方表示那个还只是一个实验中的程序,同时上次编译的还是 32-bit 的 Embedded 版本,因此这次就来编译一个真正可用的 64-bit 的 MongoDB 好了_(:3」∠)_

总的来说倒也没有想象中那么复杂,但是确实有几个可能踩到的的坑

首先我做的就是先让树莓派到 64-bit 环境中,可以参考我的这篇博客,让 Raspberry Pi 4 完全运行在 64-bit 模式下

确认 schroot 到 64-bit 环境中之后,同样的,通过 apt 安装必要的依赖

sudo apt install -y scons libssl-dev libffi-dev libcurl4-openssl-dev wget gcc g++ vim cmake python3 python3-pip

包括稍后会用到的 Python 的依赖

cat << EOF >~/build-requirements.txt
Cheetah3 # src/mongo/base/generate_error_codes.py
psutil
pymongo >= 3.0, != 3.6.0  # See PYTHON-1434, SERVER-34820
PyYAML >= 3.0.0
regex
requests >= 2.0.0
typing >= 3.6.4
EOF

sudo pip3 install -r ~/build-requirements.txt

在国内的话,可以指定使用清华大学 TUNA 镜像源

sudo pip3 install -i https://pypi.tuna.tsinghua.edu.cn/simple -r ~/build-requirements.txt
Continue reading 在 Raspberry Pi 4 上编译 64-bit 的 MongoDB Server

How to put Raspberry Pi 4 in 64-bit mode

I didn't realize that Raspberry Pi 4 worked in 32-bit mode until I compiled MongoDB Embedded. Though Raspberry Pi 4 comes with a 64-bit CPU, it uses 32-bit kernel by default, let alone these userland programs.

Obviously, the compiled MongoDB Embedded was 32-bit too. But fortunately, it was not what I actually want, and after setup 64-bit environment for Raspberry Pi 4 in this post, I can compile a fully-functional MongoDB.

But wait, there seems to be an easier way to put Raspberry Pi 4 to 64-bit mode -- Install Manjaro. However, I don't quite like Arch.

There are basically three steps to get a Raspberry Pi worked in the 64-bit environment.

  1. sudo rpi-update to get a 64-bit kernel.img
  2. Specify 64-bit mode by modifying /boot/config.txt
  3. schroot to get a full 64-bit environment
Continue reading How to put Raspberry Pi 4 in 64-bit mode

让 Raspberry Pi 4 完全运行在 64-bit 模式下

于是在我编译完 MongoDB Embedded 之后发现,虽然 Raspberry Pi 4 的 CPU 是 64-bit 的,但是默认使用的还是 32bit 的内核,userland 的程序也都是 32-bit 的。

自然,前一篇编译出来的 MongoDB Embedded 也是 32 bit 的,不过好在 MongoDB 的 Embedded 版本也不是我最终想要的。在这篇 post 搞好 Raspberry Pi 的 64 bit 环境之后,就可以编译一个正常的 MongoDB 了~

要让 Raspberry Pi 4 完全运行在 64 位模式下的话,有一个似乎简单的方法——安装 Manjaro,但是我不喜欢 Arch。

总体来说分如下几步~

  1. sudo rpi-update 获取 64-bit 的 kernel.img
  2. 修改 /boot/config.txt 指定 64-bit 模式启动
  3. schroot 一个完全的 64-bit 环境
Continue reading 让 Raspberry Pi 4 完全运行在 64-bit 模式下